More than 10 million telescopes are purchased worldwide every year, yet most end up unused within the first year — not because the hobby is difficult, but because buyers chose the wrong instrument for their goals. Learning about the different types of telescopes before spending a dollar is the smartest move any aspiring stargazer can make. This guide covers every major optical design, its strengths, its limits, and the practical factors that determine which one belongs in a particular backyard. The telescope guides section on this site goes even deeper on each category.

Telescopes fall into three primary families — refractors, reflectors, and catadioptric designs — each collecting and focusing light through a different optical path. That distinction sounds technical, but its real-world consequences are anything but academic. The choice between designs affects how the telescope performs on cold nights, how much setup it requires, and which targets in the sky it reveals most clearly. Getting that choice right from the start saves both money and frustration.
Stargazing is an outdoor pursuit, and it rewards those who invest as thoughtfully in their observation site as in their equipment. Conservation areas and protected open lands — like the properties stewarded by The Open Land Conservancy of Chester County — often offer the darkest accessible skies near suburban communities, making them natural destinations for a first serious session with a new telescope.
Contents
- Understanding the Different Types of Telescopes
- Weighing the Advantages and Drawbacks of Each Design
- How to Choose the Right Telescope Type
- Quick Gains for the First Night Out
- Clearing Up Common Telescope Misconceptions
- Troubleshooting, Cleaning, and Long-Term Care
- Frequently Asked Questions
- Next Steps
Understanding the Different Types of Telescopes
The phrase "different types of telescopes" refers to three distinct optical architectures, each invented to solve a specific problem in gathering and focusing starlight. Knowing what separates them — not just their names — gives buyers a framework that no marketing description can replace.
Refractor Telescopes: How They Work
A refractor uses a series of glass lenses to bend incoming light toward a focal point at the eyepiece end of the tube. It is the design most people picture when they imagine a telescope: a long, elegant tube pointed at the sky. Refractors excel at delivering sharp, high-contrast views of the Moon and planets, and because the optical tube is sealed, they require almost no routine maintenance. The primary drawback is cost — quality glass at larger apertures gets expensive fast. Most refractors available to beginners top out around 80–120mm of aperture, which limits their reach to the brighter deep-sky targets.

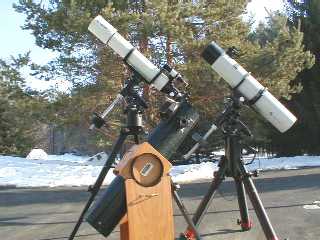
Reflector Telescopes: A Different Approach
A reflector — the most common example being the Newtonian reflector — uses a concave primary mirror at the bottom of the tube to gather light, then bounces it to a secondary mirror and out to an eyepiece positioned at the side of the tube. Isaac Newton invented the design in 1668 to eliminate chromatic aberration, the color fringing that plagues large refractor lenses at wide apertures. Reflectors offer the most aperture per dollar of any telescope type, making them the standard recommendation for anyone whose primary interest is faint nebulae, star clusters, and distant galaxies. The trade-off is that the primary mirror requires occasional collimation — a process of realigning the optics — and the open tube allows dust and air currents to affect performance over time. A detailed overview of optical telescope design is available on Wikipedia's telescope page for those who want to go deeper into the physics.
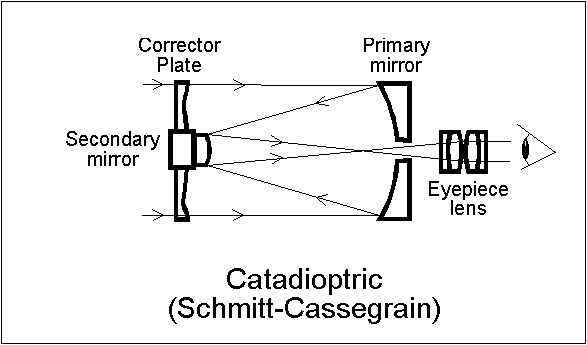
Catadioptric Telescopes: The Hybrid Design
Catadioptric telescopes — primarily Schmidt-Cassegrain (SCT) and Maksutov-Cassegrain designs — combine lenses and mirrors in a compact tube that folds the optical path back on itself. The result is a telescope that packs a long focal length into a surprisingly portable package. Catadioptric telescopes are genuinely all-purpose instruments, performing well on planets, the Moon, and most deep-sky targets. They pair especially naturally with computerized go-to mounts, which locate objects automatically. The main downside is price: quality SCTs and Maks command a significant premium compared to equivalent-aperture Newtonian reflectors.
Weighing the Advantages and Drawbacks of Each Design
Side-by-side comparisons cut through the noise faster than any amount of narrative description. The table below summarizes the core trade-offs across the four main telescope designs — the same trade-offs that should drive every purchasing decision.
| Type | Best Targets | Typical Aperture | Portability | Maintenance Level | Cost Per mm Aperture |
|---|---|---|---|---|---|
| Refractor | Moon, planets, double stars | 60–120mm | High | Very low | High |
| Newtonian Reflector | Nebulae, galaxies, star clusters | 114–300mm+ | Medium | Medium (collimation) | Low |
| Schmidt-Cassegrain (SCT) | All-purpose: planets + deep-sky | 90–350mm+ | High | Low-Medium | Medium-High |
| Maksutov-Cassegrain | Planets, Moon, globular clusters | 90–180mm | Very high | Very low | Medium-High |
Reflectors win on value when aperture is the priority. Refractors win on simplicity and low maintenance. Catadioptric designs split the difference — neither the cheapest nor the hardest to use, but consistently capable across a wider range of targets than either pure design.
Pro tip: Aperture — the diameter of the main lens or mirror — is the single most important specification on any telescope. More aperture gathers more light, which translates directly to fainter objects becoming visible and sharper detail appearing at high magnification.
How to Choose the Right Telescope Type
Choosing between telescope designs is not a matter of finding the best telescope in the abstract. It is a matter of finding the best telescope for a specific observer's circumstances. A three-step framework makes that process straightforward and prevents the most common purchasing mistakes.
Step 1: Define What You Want to Observe
The night sky divides into two broad categories: solar system objects — the Moon, planets, the Sun viewed through a proper solar filter — and deep-sky objects like nebulae, star clusters, and galaxies. Planetary observers should lean toward refractors or Maksutov-Cassegrains, both of which produce high-contrast, tack-sharp images at high magnification. Deep-sky enthusiasts should lean toward Newtonian reflectors, where aperture per dollar is unmatched. Those who want to do both should consider a mid-aperture SCT. Identifying a dark observation site is equally important: places like Friends of Salt Springs Park or the trails within the Laguna Greenbelt often sit far enough from city centers to offer skies where deep-sky targets become dramatically easier to locate and appreciate.
Step 2: Think About Portability and Setup
A telescope that stays in the garage because setup is too cumbersome delivers no value at all. Reflectors on Dobsonian mounts are powerful but bulky. Compact refractors and Maksutovs fit in a backpack and go from car to sky in minutes. For observers who plan to use the telescope in multiple locations — a backyard one evening, a dark-sky preserve the next — portability carries real weight. Setting up any heavy outdoor instrument on a stable, level surface follows the same logic as setting up a gazebo on grass, concrete, or pavers: the foundation matters as much as the structure placed on it.
Step 3: Set a Budget That Includes Accessories
The telescope tube is rarely the full cost of entry. A quality mount, at least two eyepieces covering different magnification ranges, and a red-light flashlight to preserve night vision add up quickly. A realistic entry-level budget for a complete and capable setup runs between $250 and $400. Spending significantly below that risks acquiring a telescope that underperforms so badly it kills interest in the hobby before it ever properly starts.
Warning: Avoid any telescope marketed primarily on its maximum magnification figure. High magnification without sufficient aperture produces bright, blurry images — not the crisp planetary detail the packaging implies.
Quick Gains for the First Night Out
Regardless of which telescope type an observer chooses, several universal habits dramatically improve the first session. None of them require additional equipment or any prior expertise.
Start With Low Magnification
New telescope owners instinctively reach for the highest-power eyepiece first. That is consistently the wrong move. Low magnification provides a wider field of view, makes locating targets far easier, and reveals more structure in diffuse objects like nebulae and open star clusters. A 25mm or 32mm eyepiece should be the first one in the focuser every single session. Once a target is centered and in sharp focus, switching up to higher power becomes genuinely worthwhile.
Let the Telescope Acclimate
All three telescope types are affected by thermal equilibration. A telescope moved from a warm interior to a cold backyard needs 30 to 45 minutes for its optics and tube to stabilize. Ignoring this produces shimmering, soft views that feel like a collimation or alignment problem but are actually just physics running its course. The most efficient approach is to set the telescope outside at dusk and spend the wait time star-hopping on a paper chart or planning the night's target list. The acclimation window is not wasted time — it is part of the ritual.
Clearing Up Common Telescope Misconceptions
The telescope market is full of misleading claims, and the information landscape around beginner astronomy can be just as confusing. A few persistent myths lead more buyers astray than any other factor.
Myth: Magnification Is What Matters Most
Telescope boxes routinely lead with figures like "675x magnification!" as though higher numbers mean better performance. In reality, magnification beyond a telescope's practical ceiling — determined directly by its aperture — produces dark, blurry images with no useful detail. A 70mm refractor cannot deliver a quality 500x view under any circumstances. Aperture and optical quality determine what a telescope can show; magnification is simply an accessory. Observers who visit protected open spaces like the Westmoreland Conservancy or lands managed by the Manada Conservancy will quickly discover that modest aperture under genuinely dark skies outperforms a much larger instrument fighting suburban light pollution.
Myth: Bigger Is Always Better
A large Dobsonian reflector can gather extraordinary amounts of light. But if the mount wobbles at every touch, the eyepiece sits at an awkward height, or the telescope never leaves the house because it is too heavy to carry alone, none of that aperture advantage translates into actual views. The best telescope is the one that actually gets used. A compact 80mm refractor taken out three nights a week consistently outperforms a 12-inch Dobsonian that sits in storage.
Reality check: The average telescope that "doesn't work" is not defective — it was simply mismatched to its owner's situation. Aligning telescope type with lifestyle and realistic commitment level predicts long-term success better than optical specifications do.
Troubleshooting, Cleaning, and Long-Term Care
Every telescope type eventually presents problems. Most of those problems have straightforward solutions that do not require professional service or expensive repairs. Knowing the most common issues — and how to address them systematically — extends a telescope's useful life by years.
Fixing Common Viewing Problems
Blurry images despite careful focusing usually trace back to one of three causes: the telescope has not thermally acclimated, the optics need cleaning, or — in the case of reflectors — the mirror alignment has drifted. For reflectors, collimation is a routine task, not an indication of a defective instrument. A collimation eyepiece costs under $20 and turns what sounds like a technical procedure into a straightforward 15-minute process. For refractors and catadioptric designs, persistent blur usually means the eyepiece needs cleaning or the magnification being used exceeds the telescope's practical limit. Diagnosing blurry views one variable at a time prevents the most common mistake of assuming the telescope is broken when the fix is entirely within reach.
Cleaning Optics the Right Way
Dust on telescope mirrors and lenses is inevitable, but most surface dust does not meaningfully degrade image quality. The instinct to clean optics frequently causes far more damage than the dust itself. When cleaning is genuinely necessary, the correct sequence is a bulb blower first to dislodge loose particles, followed by optical-grade lens tissue moistened with isopropyl alcohol for stubborn residue, applied in light circular strokes from center to edge. Paper towels, clothing, and household glass cleaners have no place near telescope optics. The same discipline that goes into winterizing a pergola or any outdoor structure applies equally here: protective storage, careful handling, and consistent maintenance compound into years of reliable performance.
Frequently Asked Questions
What are the three main types of telescopes?
The three primary telescope types are refractors, reflectors, and catadioptric (compound) telescopes. Refractors use lenses, reflectors use mirrors, and catadioptric designs combine both in a compact folded-path tube. Each family suits different observing goals and budget levels.
Which telescope type is best for beginners?
A 4.5-inch to 6-inch Newtonian reflector on a Dobsonian mount is the most consistently recommended beginner telescope because it delivers maximum aperture per dollar spent. For observers who want something simpler to maintain and easier to transport, an 80mm apochromatic refractor is an excellent alternative.
What is the difference between a refractor and a reflector telescope?
A refractor focuses light using glass lenses positioned at the front of the tube and excels at high-contrast views of the Moon and planets. A reflector uses a concave mirror to gather light and excels at faint deep-sky objects like nebulae and galaxies, offering significantly more aperture for the same price.
Is aperture or magnification more important in a telescope?
Aperture is far more important than magnification. Aperture determines how much light the telescope collects, which controls what objects are visible and how much fine detail appears at any given power. Magnification beyond the aperture-based practical limit only makes the image larger and dimmer — not clearer or more detailed.
What is a catadioptric telescope?
A catadioptric telescope, such as a Schmidt-Cassegrain or Maksutov-Cassegrain, combines lenses and mirrors to fold a long focal length into a short, compact tube. These designs are portable, low-maintenance, and capable across both planetary and deep-sky targets, making them the most versatile all-purpose choice.
How often does a Newtonian reflector need collimation?
Newtonian reflectors typically need collimation after transport and roughly every few sessions depending on how carefully the telescope is handled between uses. The process takes about 15 minutes with a collimation eyepiece and becomes straightforward after the first few attempts. Refractors and catadioptric designs rarely require collimation.
Can cleaning telescope optics cause damage?
Yes — improper cleaning causes more damage than dust does in the vast majority of cases. Abrasive materials and incorrect cleaning agents permanently scratch optical coatings. When cleaning is necessary, a bulb blower removes loose particles first, followed by optical-grade lens tissue with isopropyl alcohol for residue. Clean only when image quality is genuinely affected.
Which telescope type is best for viewing planets versus deep-sky objects?
For planets, a Maksutov-Cassegrain or quality apochromatic refractor delivers the sharpest, highest-contrast views at high magnification. For deep-sky objects — nebulae, star clusters, and galaxies — a Newtonian reflector with 6 or more inches of aperture provides the best performance per dollar. Schmidt-Cassegrains serve observers who want meaningful capability in both categories.
Next Steps
- Identify the primary observing goal — planets and the Moon, or faint deep-sky objects — and use that answer to narrow the telescope type to one of the three main families before researching specific models.
- Visit the telescope guides section to read in-depth comparisons of specific models within each telescope type and find recommendations matched to different budgets.
- Research local dark-sky sites, including conservation lands and state parks within reasonable driving distance, and plan a dedicated observation session there within the first month of ownership.
- Purchase a collimation eyepiece if a Newtonian reflector is the chosen design, and practice the alignment procedure in daylight at least once before the first nighttime session.
- Join a local astronomy club or an active online community to access experienced observers who can answer questions specific to the chosen telescope type, local sky conditions, and regional observing targets.


About Simmy Parker
Simmy Parker holds a Bachelor of Science in Civil Engineering from Sacramento State University and has applied that technical background to outdoor structure design, landscape planning, and backyard improvement projects for over a decade. Her love for the outdoors extends beyond design — she regularly leads nature hikes and has developed working knowledge of native plants, soil conditions, and sustainable landscaping practices across Northern California. At TheBackyardGnome, she covers backyard design guides, landscaping ideas, and eco-friendly outdoor living resources.
You can Get FREE Gifts. Receive Free Backyard Items here. Disable Ad Blocker to get them all now!
Once done, hit anything below