Have you ever stared at a full moon and wondered what it would look like up close — close enough to trace every crater with your eye? That impulse is one of the oldest in human history, and it's exactly what the refracting telescope was built to satisfy. Understanding how a refracting telescope works gives you more than a science lesson; it gives you the confidence to choose the right instrument for your backyard observing sessions and actually use it well. Whether you're just getting started or looking to go deeper, our telescope guides are a great companion resource.

Refractors use lenses — not mirrors — to gather and focus incoming light. The concept is centuries old, but the results are still impressive. From the craters of the moon to the cloud bands of Jupiter, a quality refractor can reveal details that would have seemed magical to earlier generations. The sealed tube design also keeps dust and moisture off the optics, which means you spend more time looking and less time maintaining.
Whether you're a complete beginner or someone stepping up from binoculars, this guide walks you through everything: how the optics work, what you can realistically expect to see, and how to keep your telescope performing at its best for years to come.
Contents
- How a Refracting Telescope Works: Understanding the Optics
- What You Can See Through a Refractor
- When a Refractor Makes Sense — and When It Doesn't
- Best Practices for Getting the Sharpest Views
- Refractors vs. Reflectors vs. Catadioptrics
- Long-Term Care and Storage for Your Refractor
- Troubleshooting Common Refractor Problems
How a Refracting Telescope Works: Understanding the Optics
At its core, how a refracting telescope works comes down to one elegant principle: light bends when it passes through glass. This bending — called refraction — is what allows a telescope to gather light from a distant object and bring it to a sharp focal point. The design sounds simple, and in many ways it is. But the engineering behind a quality refractor involves careful choices about glass type, lens curvature, and tube length that have been refined over hundreds of years.
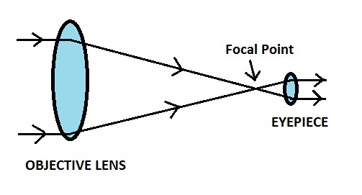
Light travels in straight lines until it strikes a new medium — like glass. The glass slows it down, and that change in speed causes the ray to bend toward or away from a central axis. A convex lens, which is thicker in the middle, bends parallel rays inward and brings them together at a single focal point. That is the basic mechanism behind every refracting telescope ever built, from Galileo's first crude instrument to modern apochromatic models used by serious amateurs today.
The Objective Lens
The objective lens is the large glass element at the front of the tube. Its job is to collect as much light as possible and focus it at a point inside the tube called the focal point. The diameter of this lens — measured in millimeters — is called the aperture, and it directly determines how much light the telescope gathers. A larger aperture means brighter, more detailed images. Most entry-level refractors have apertures between 60mm and 90mm, which is enough for impressive lunar and planetary views from your backyard.
Modern objective lenses are typically made up of two or more glass elements — called a doublet or triplet — designed to correct for optical errors that a single lens would introduce. The history of the refracting telescope traces how these multi-element designs evolved over centuries of scientific refinement.
The Eyepiece
The eyepiece is the small lens at the bottom of the focuser — the part you actually look through. Its job is to take the focused image produced by the objective and magnify it for your eye. Magnification is calculated by dividing the telescope's focal length by the eyepiece's focal length. A 1000mm focal length scope paired with a 10mm eyepiece gives you 100x magnification. Switch to a 25mm eyepiece and that drops to 40x — lower power, wider field of view, and often a better choice for scanning the sky or viewing extended objects like star clusters.
What You Can See Through a Refractor
Understanding how a refracting telescope works helps clarify what it excels at — and where its limits lie. Refractors produce high-contrast images with sharp, pinpoint stars. The sealed tube eliminates internal air currents that can cause shimmer in open-tube reflectors, which contributes to stable, steady views on good nights. That makes them particularly well suited for certain types of observing.
Planetary and Lunar Viewing
Refractors shine when pointed at the moon and planets. High-contrast views of the lunar surface — craters, mountain ranges, and the sharp line of the terminator — are among the most rewarding sights in amateur astronomy, and a refractor delivers them beautifully. Saturn's rings, Jupiter's cloud bands, and the phases of Venus are all within reach of a modest 70mm to 90mm refractor. Double stars — two stars in close orbit — also resolve cleanly through a refractor's unobstructed optics, often revealing color contrasts that make them genuinely beautiful to observe.
Terrestrial and Daytime Use
Unlike many reflectors, refractors work perfectly well for daytime viewing. Watching birds at the far edge of a field, scanning a distant ridgeline, or spotting wildlife from your yard — a refractor handles all of it. You'll want a right-angle diagonal or erecting prism to flip the image the correct way up, but once that's in place, a refractor functions as a capable spotting scope. If stargazing is just one part of how you use your outdoor space, this versatility adds real everyday value.
When a Refractor Makes Sense — and When It Doesn't
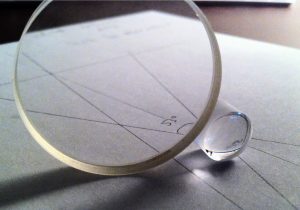
Not every telescope is right for every observer, and a refractor is no exception. Knowing when it's the smart choice — and when you'd be better served by a different design — can save you from a purchase you'll regret. Our overview of the different types of telescopes covers the broader landscape if you're still weighing your options.
Ideal Scenarios for a Refractor
Refractors are a great fit if you value ease of use above raw light-gathering power. They require virtually no maintenance, no mirror collimation, and they hold their alignment indefinitely once the lenses are set at the factory. A compact, quality refractor on a sturdy mount is genuinely pleasant to use: bring it outside, set it up in minutes, and start observing. They're also well matched to suburban environments where light pollution rules out serious deep-sky work anyway — making the refractor's strength in planetary contrast even more relevant to most backyard stargazers.
When Another Design Might Serve You Better
If your primary goal is viewing faint galaxies, nebulae, or star clusters under dark skies, a refractor may leave you wanting more. To gather serious light, you need large aperture — and large-aperture refractors are both expensive and physically cumbersome. A reflector or compound telescope delivers far more aperture per dollar. The Dobsonian telescope, for example, puts a massive primary mirror in a surprisingly simple and affordable package. For deep-sky observing on a reasonable budget, it's one of the most practical options available.
Best Practices for Getting the Sharpest Views
Pro tip: Bring your telescope outside at least 30 minutes before you start observing — letting the optics reach ambient temperature makes a noticeably bigger difference in image sharpness than most people expect, especially on cold nights.
Even a great refractor can disappoint you if you're not using it correctly. A few consistent habits will separate sharp, satisfying views from frustrating, soft ones. None of these are complicated — they're just worth doing every time you set up.
Thermal Equilibration
Glass expands and contracts with temperature. When you bring a telescope from a warm room into cool night air, the objective lens takes time to stabilize. During that transition, the air inside the tube churns with turbulence, and your images shimmer and blur. Give your telescope 20 to 30 minutes to cool to ambient temperature before you expect sharp views. This single habit improves image quality more than almost any accessory upgrade you could buy, and it costs you nothing except a little patience.
Eyepiece Selection
Start at low magnification — around 30x to 50x — to center your target and achieve focus, then increase power if the atmosphere cooperates. Atmospheric turbulence (called "seeing") sets a practical ceiling on how much magnification is useful on any given night. A widely accepted rule is that 50x per inch of aperture is roughly the maximum before images break down. A quality 25mm Plössl eyepiece is an excellent starting point for most beginner refractors and will remain useful as you grow your collection.
Refractors vs. Reflectors vs. Catadioptrics
Side-by-Side Breakdown
If you're trying to figure out which telescope design suits your setup, a direct comparison cuts through the noise. Each design has genuine trade-offs, and there's no single winner across every category. Here's how they stack up on the criteria most observers care about.
| Feature | Refractor | Reflector (Newtonian) | Catadioptric (SCT/Mak) |
|---|---|---|---|
| Optics type | Lenses only | Mirrors only | Mirrors + corrector lens |
| Maintenance | Very low | Moderate (collimation needed) | Low to moderate |
| Best use | Planets, moon, double stars | Deep-sky objects | Versatile, all-around |
| Aperture per dollar | Low | High | Medium |
| Portability | High (small models) | Varies with size | High (compact tube) |
| Cool-down time | Short | Medium | Longer |
| Chromatic aberration | Yes (unless APO design) | None | Minimal |
Your best choice depends on what you want to observe, how much you're willing to spend, and how much setup time you can tolerate. There's no objectively correct answer — just the right fit for your specific situation.
Long-Term Care and Storage for Your Refractor
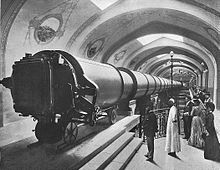
One of the underrated advantages of a refractor is how little attention it demands over the long run. The sealed tube design protects the optics automatically. Still, a little intentional care will keep your lenses performing the way they should for decades. Neglect is usually the culprit when people report degraded views from a scope that once worked beautifully.
Cleaning the Lenses
Clean your lenses as infrequently as possible. A layer of dust on the objective has far less effect on image quality than most people assume, and every cleaning carries some risk of scratching the delicate anti-reflection coatings. When cleaning is truly necessary, start with a soft rubber air blower to remove loose particles without touching the glass. Then use a high-quality optical lens tissue dampened with proper lens-cleaning solution, working in gentle circular motions from center outward. Never use paper towels, tissues, or clothing — they all leave micro-scratches that accumulate over time.
Storage and Transport Tips
Always cap both ends of the telescope when it's not in use. Store it in a padded case or wrap the tube in a soft cloth bag to cushion it against bumps. Avoid spaces with extreme temperature swings — a detached garage in winter can produce condensation inside the tube that encourages mold on lens coatings. If you travel frequently with your scope, a purpose-built hard case is worth the investment. A well-protected refractor can genuinely serve you for a lifetime with minimal fuss.
Troubleshooting Common Refractor Problems
Even a well-made refractor can occasionally produce frustrating results. Most issues have straightforward explanations — and solutions that don't require sending the scope to a repair shop or spending more money.
Chromatic Aberration
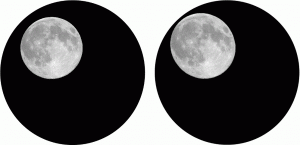
Chromatic aberration — a purple or blue-green fringe around bright objects like the moon or Venus — is the most common complaint about entry-level refractors. It occurs because different wavelengths of light bend at slightly different angles through glass, so they don't all converge at exactly the same focal point. An achromatic doublet reduces this noticeably; an apochromatic (APO) design reduces it to near invisibility, though at a higher price. If color fringing bothers you on your current scope, a yellow or light green filter can tame the effect for a modest investment and often improves planetary contrast at the same time.
Blurry or Out-of-Focus Images
If your images stay blurry even after careful focusing, run through a quick checklist before assuming something is broken. Confirm the objective lens cap is fully removed — it happens to everyone eventually. Check that the focuser moves smoothly without slipping back after you release it. Then consider whether the problem disappears at lower magnification; if it does, you're likely pushing past the useful limit for the night's atmospheric seeing conditions. On nights of poor seeing, even a flawless telescope produces soft, boiling images. Some nights you simply wait for better conditions — and the good ones make it worthwhile.
Final Thoughts
Now that you understand how a refracting telescope works — from the objective lens bending and gathering light to the eyepiece magnifying the focused image for your eye — you're in a much better position to choose wisely and get real enjoyment out of every observing session. Head over to our full collection of telescope guides for gear recommendations, setup tips, and everything else you need to make your backyard stargazing sessions as rewarding as possible.


About Simmy Parker
Simmy Parker holds a Bachelor of Science in Civil Engineering from Sacramento State University and has applied that technical background to outdoor structure design, landscape planning, and backyard improvement projects for over a decade. Her love for the outdoors extends beyond design — she regularly leads nature hikes and has developed working knowledge of native plants, soil conditions, and sustainable landscaping practices across Northern California. At TheBackyardGnome, she covers backyard design guides, landscaping ideas, and eco-friendly outdoor living resources.
You can Get FREE Gifts. Receive Free Backyard Items here. Disable Ad Blocker to get them all now!
Once done, hit anything below