What's stopping you from getting into your hot tub more often? For many backyard owners, the answer is surprisingly simple — the entry. A slippery climb-up or an awkward step-over is enough to turn a relaxing ritual into a cautious ordeal. Learning how to build hot tub steps gives you a safe, sturdy access point that's custom-fit to your specific tub height and backyard layout. Whether you're setting up a new spa — check out our complete guide on how to install a hot tub in your backyard — or upgrading an existing setup, well-built steps make every soak safer and more enjoyable.
This guide walks you through every decision you'll face: materials, dimensions, build steps, costs, and the myths that trip up most DIYers. You don't need advanced carpentry skills. You need accurate measurements, the right materials, and a free weekend.
As you plan your project, browse the full range of hot tub accessories to complete your outdoor spa setup alongside your new steps.
Contents
- The Real Benefits (and Trade-offs) of Building Your Own Hot Tub Steps
- How to Build Hot Tub Steps for Every Backyard Setup
- Keeping Your Hot Tub Steps Safe and Looking Great
- DIY Build vs. Pre-Made Steps: Making the Right Call
- Hot Tub Step Myths That Need to Go Away
- What It Actually Costs to Build Hot Tub Steps
The Real Benefits (and Trade-offs) of Building Your Own Hot Tub Steps
Why DIY Steps Make Sense
Building your own hot tub steps puts you in complete control. You decide the height, the width, the material, and the finish. That level of customization simply doesn't exist with off-the-shelf plastic units. Here's why DIY is the better choice for most backyard setups:
- Perfect fit every time. You measure your specific tub height and build accordingly — no awkward half-steps or mismatched heights.
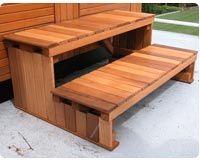
- You match the aesthetic. Wood steps finished to match your deck look intentional, not like an afterthought.
- You control the quality. Use premium pressure-treated lumber or composite decking for steps that outlast any injection-molded alternative.
- Real cost savings. A DIY build typically runs $100–$300 in materials versus $200–$600 for a manufactured unit of comparable quality.
- You can add handrails, storage cubbies, or a towel shelf — features that pre-made steps rarely offer.
What You're Signing Up For
No project is without trade-offs. Go in with clear expectations:
- Time commitment: Plan for a full weekend — one day for cutting and assembly, one day for finishing and installation.
- Basic tools required: circular saw, drill/driver, measuring tape, carpenter's square, and a level.
- You're responsible for ongoing maintenance. Unlike a pre-made unit under warranty, a DIY build requires you to reseal, re-sand, or refinish on schedule.
- If your tub sits on an unlevel surface, your build complexity increases significantly.
Pro tip: Before you cut a single piece of lumber, photograph your hot tub from the side and note the exact entry height. You'll catch clearance issues before they cost you time and materials.
How to Build Hot Tub Steps for Every Backyard Setup
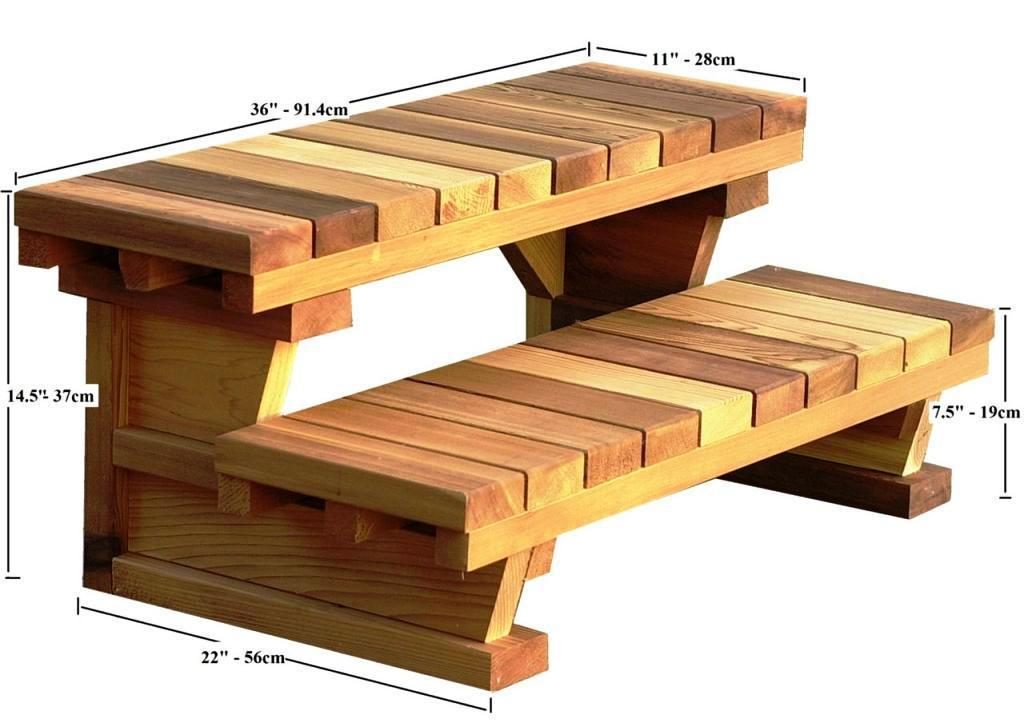
Taking the Right Measurements
Accurate measurements are the foundation of a safe build. Get these wrong and your steps will be uncomfortable at best, dangerous at worst.
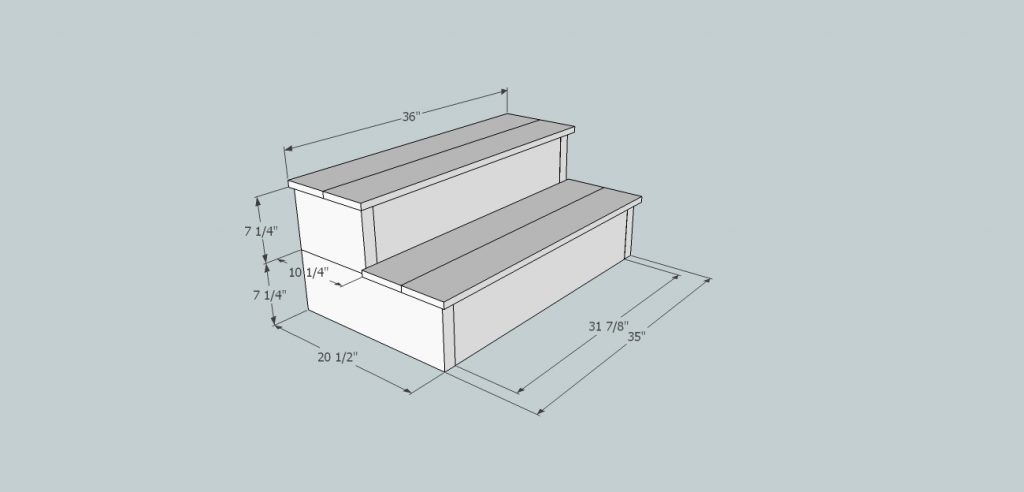
Use these standard dimensions as your starting point:
- Rise (step height): 7–8 inches per step. This matches the standard comfortable step height for adults.
- Run (tread depth): 10–12 inches minimum. Deeper treads are safer when wet.
- Width: 24 inches minimum; 36 inches is ideal for two people passing side by side.
- Measure from the ground to the top lip of your tub's entry point. Divide that number by 7.5 to determine how many steps you need. Always round up.
Choosing Your Material
Your material choice determines how long your steps last and how much upkeep they demand. Hot tub steps live in a wet, chemical-exposure environment — choose accordingly.
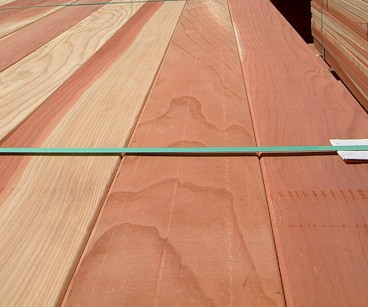
- Pressure-treated lumber: The most affordable option. Rated for ground contact (UC4B) and highly resistant to rot. Requires annual sealing.
- Cedar or redwood: Naturally rot-resistant, attractive grain, and more comfortable underfoot than treated pine. Costs roughly 2× more than treated lumber but looks far better next to a finished deck.
- Composite decking: Low maintenance, splinter-free, and highly moisture-resistant. Higher upfront cost but nearly zero ongoing upkeep.
- Concrete: Permanent and excellent for in-ground or semi-sunken tubs. Requires forming and finishing skills most DIYers don't have.
For most backyard setups, cedar or pressure-treated lumber strikes the best balance between cost, durability, and appearance.
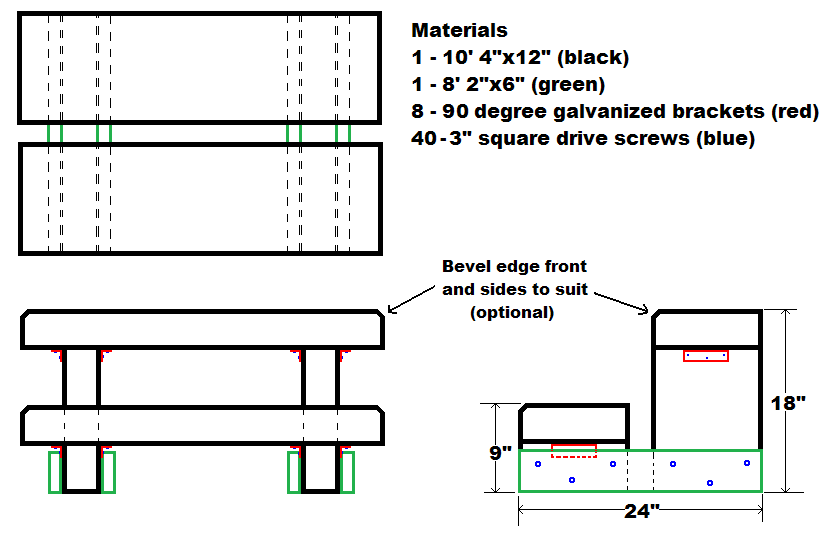
The Step-by-Step Build Process
Once you have your measurements and materials locked in, the build itself is straightforward. Here's the process for a standard 2-step or 3-step entry unit:
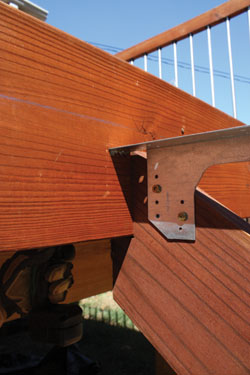
- Cut your stringers. Stringers are the angled side supports. Use a framing square to mark your rise and run measurements, then cut with a circular saw. You need two stringers per step unit.
- Attach stair brackets. Metal stair brackets are faster and stronger than toe-nailing. Secure one at each tread location on both stringers.
- Install the treads. Cut your tread boards to width (typically 36 inches). Drive two 3-inch exterior screws at each board end. Leave a 1/8-inch gap between boards for drainage.
- Add a kickboard or riser board at the front of each step for a cleaner look and to prevent foot-snagging — optional but recommended.
- Apply non-slip strips. Adhesive anti-slip tape on the front edge of each tread is non-negotiable. Refer to established hot tub safety rules and guidelines — slip prevention around spas is consistently the top priority.
- Seal or finish the wood. Apply an exterior waterproof sealant or deck stain. Two coats minimum. Allow full cure time before anyone uses the steps.
Keeping Your Hot Tub Steps Safe and Looking Great
Routine Maintenance
Steps next to a hot tub take more abuse than a standard deck. Constant moisture, chlorine splash, and UV exposure accelerate wear. Stay on top of these tasks:
- Inspect non-slip strips monthly. Adhesive edges peel with repeated wet/dry cycles. Replace any lifting sections immediately — a peeled strip is a fall waiting to happen.
- Check fasteners every 3 months. Screws back out over time with seasonal expansion and contraction. Re-drive any raised screws before they become a snag hazard.
- Sweep and rinse treads weekly. Algae and biofilm build up fast in wet environments. A stiff brush and a quick rinse takes two minutes and prevents serious slipping.
- Inspect the wood surface for cracks and checks. Small cracks let water in and accelerate rot from the inside out.
Seasonal Care
Give your steps a thorough once-over at the start and end of each season:
- Annual re-sealing: Sand lightly with 120-grit and apply a fresh coat of exterior sealant every 12–18 months. This single task extends your steps' lifespan by years.
- Winter prep: In freeze-thaw climates, ensure water doesn't pool on treads. Pooled water expands when it freezes and splits boards within a season or two.
- Post-winter inspection: Check stringer ends for rot, especially where they contact the ground or a concrete pad.
- Composite steps require far less — just a wash with mild soap and water. According to the U.S. Consumer Product Safety Commission, slip-and-fall accidents around residential pools and spas rank among the most common home injuries, making tread surface maintenance a genuine safety issue, not just cosmetic upkeep.
DIY Build vs. Pre-Made Steps: Making the Right Call
When to Build Your Own
A DIY build is the right call when:
- Your tub height doesn't match standard pre-made dimensions (most manufactured steps are sized for 24–36 inch entry heights)
- You want steps that integrate visually with an existing deck or patio
- You're adding a handrail, storage bench, or platform extension alongside the steps
- You have basic carpentry skills and the tools already on hand
- You want a sturdy, custom solution for under $250
If you're planning to move or relocate your hot tub — our detailed guide on how to remove a hot tub or spa from your backyard covers the full process — a portable or semi-permanent DIY step unit makes far more sense than a concrete build.
When to Buy Pre-Made
Go with a manufactured step unit when:
- You need steps immediately — manufactured units ship in days, not weekends
- Your tub entry sits at a standard height that off-the-shelf units accommodate
- You have no interest in annual wood maintenance
- You want a tested load rating and a manufacturer's warranty
| Factor | DIY Wood Steps | Pre-Made Plastic/Resin | Pre-Made Composite |
|---|---|---|---|
| Typical Cost | $100–$300 | $150–$350 | $300–$600 |
| Customizable Size | Fully customizable | Fixed sizes only | Fixed sizes only |
| Aesthetic Options | Paint, stain, any finish | Limited colors | Moderate variety |
| Maintenance Level | Medium (annual seal) | Low (wipe clean) | Very low |
| Typical Lifespan | 10–20+ years | 5–10 years | 15–25 years |
| Skill Required | Basic carpentry | None | None |
| Warranty | None | 1–3 years typical | Up to 10 years |
Hot Tub Step Myths That Need to Go Away
Misinformation about building hot tub steps is everywhere. Here's the reality behind the most common misconceptions:
- Myth: "Any scrap wood will work." Untreated pine rots within two seasons in a wet outdoor environment. You need pressure-treated lumber rated UC4B or a naturally rot-resistant species like cedar or redwood. No exceptions.
- Myth: "Wider steps are always safer." Tread depth matters far more than width. A 10-inch deep tread on a 24-inch wide step is safer than a 6-inch deep tread on a 48-inch wide step.
- Myth: "One step is enough." If your tub entry height exceeds 18 inches, a single step creates a dangerous rise. Use the formula: entry height ÷ 7.5 = number of steps needed. Never round down.
- Myth: "Paint is enough protection." Exterior paint without a proper primer or sealant still allows moisture penetration at seams and end grain. Use a dedicated penetrating wood sealant or a solid-color deck stain with a built-in waterproofer.
- Myth: "Non-slip strips are optional." Wet feet plus smooth wood equals falls. This is not an aesthetic choice — it's a safety requirement. Install anti-slip strips on every tread.
- Myth: "DIY steps can't handle heavy loads." Properly built steps with doubled 2×12 stringers and steel stair brackets handle 500+ lbs with ease. A well-built DIY unit exceeds the load capacity of most manufactured plastic steps.
What It Actually Costs to Build Hot Tub Steps
Material Costs Breakdown
Here's a realistic budget for a standard 2-step wood entry unit at 36 inches wide:
- Pressure-treated 2×12 stringers (2): $20–$35
- 2×6 tread boards (6–8 boards at 36 inches): $30–$60
- Metal stair brackets (4–6): $15–$25
- Exterior screws (3-inch, 1 lb box): $8–$12
- Anti-slip adhesive strips (one roll): $10–$20
- Exterior sealant or deck stain (1 quart): $15–$30
- Total materials: $100–$185
Upgrade to cedar instead of treated pine and add $40–$80 to your total. Add a handrail kit and budget another $30–$80. Your all-in DIY cost for a fully finished cedar step unit with a handrail lands around $200–$300.
Hidden Costs to Budget For
First-time builders consistently underestimate these line items:
- Tool rental: If you don't own a circular saw, rental runs $35–$55 per day.
- Lumber overage: Budget 10–15% extra on all boards. Even experienced builders miscalculate cuts at least once.
- Base preparation: If your ground is soft or sloped, a gravel base or small concrete pad for stringer footings adds $20–$50 in materials.
- Ongoing maintenance: Sealant reapplication every 12–18 months costs $15–$30 per application. This is not optional if you want 15+ year performance from wood steps.
Compare that to manufactured options: plastic resin steps run $150–$350 and need replacement every 5–8 years. A well-maintained DIY cedar unit will outlast two or three of those replacements at a fraction of the lifetime cost.
Frequently Asked Questions
What is the best wood for hot tub steps?
Cedar and redwood are the top choices for natural rot resistance and appearance. If budget is a priority, pressure-treated lumber rated UC4B is a solid alternative. Avoid untreated pine — it will deteriorate within two seasons in a consistently wet outdoor environment.
How many steps do I need for my hot tub?
Measure the height from the ground to your tub's entry point, then divide by 7.5 inches (the ideal rise per step). Round up — never down. Most standard hot tubs in the 30–36 inch entry range require four to five steps for safe, comfortable access.
Do I need special tools to build hot tub steps?
A circular saw, drill/driver, measuring tape, carpenter's square, and a level cover the essentials. If you don't own a circular saw, rent one — it costs $35–$55 per day and makes the stringer cuts far more precise than a handsaw.
Should hot tub steps be anchored to the tub?
Anchoring is strongly recommended. Use L-brackets or carriage bolts to secure the top of the step unit to the tub cabinet. This prevents shifting under load and is especially important for households with older adults or children who rely on stable entry support.
How do I keep wooden steps from getting slippery?
Install adhesive anti-slip strips on the front edge of every tread. Use a matte or satin finish sealant — gloss finishes become slick when wet. Brush off algae and standing water regularly. These three habits eliminate nearly all slip risk.
How long will DIY hot tub steps last?
With proper sealing and annual maintenance, pressure-treated wood steps last 10–15 years. Cedar and redwood steps, well maintained, routinely reach 20 years. Composite steps require minimal upkeep and last 20–30 years under normal conditions.
Can I add a handrail to DIY hot tub steps?
Absolutely — and you should. A handrail adds confidence for anyone entering a hot tub in low light or on slippery surfaces. Standard handrail height is 36 inches. Use stainless steel or powder-coated aluminum hardware to resist the moisture and chemical exposure that's constant near a spa.
The best hot tub steps aren't the ones you bought — they're the ones you built to fit exactly where you need them.


About William Murphy
William Murphy has worked as a licensed general contractor in Fremont, California for over thirty years, specializing in outdoor structures, green building methods, and sustainable design. During that career he has written about architecture, construction practices, and environmental protection for regional publications and trade outlets, bringing technical depth to subjects that most home improvement writers approach only from a consumer perspective. At TheBackyardGnome, he covers outdoor product reviews, backyard construction guides, and sustainable landscaping and building practices.
You can Get FREE Gifts. Receive Free Backyard Items here. Disable Ad Blocker to get them all now!
Once done, hit anything below