The first time I dragged a telescope into the backyard, I spent forty-five minutes aiming at what I was convinced was Saturn — it was a sodium streetlight two blocks away. If that sounds familiar, you are in good company. Knowing how to set up a telescope correctly is the difference between a maddening evening of blurry guesswork and a genuinely jaw-dropping first look at the night sky. This guide walks you through everything, from understanding your telescope's parts to locking in your first clear view of a planet's rings. Bookmark the telescope setup guide page for more resources as you build your backyard astronomy habit.

Backyard astronomy is one of those hobbies that rewards you fast. You don't need a remote dark-sky park, a physics degree, or a garage full of expensive gear. A decent telescope, a clear night, and the right preparation give you access to craters on the Moon, Jupiter's cloud bands, and the rings of Saturn — all from your own yard. The time investment is real but modest. The payoff is lasting.
This guide keeps things practical. You'll learn which parts actually matter, how to assemble and align your scope step by step, what to realistically expect to see, and how to match your gear to your budget. Whether you're shopping for your first telescope or trying to make sense of one you already own, start here.
Contents
- Why Backyard Stargazing Is Worth Your Time
- Telescope Parts Every Beginner Should Know
- How to Set Up a Telescope: A Step-by-Step Walkthrough
- What You Can Spot With a Backyard Telescope
- Beginner Telescopes vs. Advanced Models
- Breaking Down the Cost of a Telescope Setup
- Frequently Asked Questions
- Final Thoughts
Why Backyard Stargazing Is Worth Your Time
The Backyard Advantage
Stargazing from your own yard eliminates every excuse not to go out. No long drives to a dark-sky preserve. No hauling gear across a parking lot. You can step outside for twenty minutes on a clear Tuesday and call it a productive session. That low barrier to entry is exactly why backyard astronomy turns casual curiosity into a lifelong practice.
If you already spend meaningful time outdoors — tending a garden, managing a backyard project, or simply enjoying the evening air — astronomy fits naturally into that same rhythm. The A2A Collective's mission to connect people with the natural world captures it well: direct, unhurried contact with nature is something modern life rarely offers, and a clear night sky delivers it in abundance.
Here's why people get hooked fast:
- No physical fitness requirement — anyone at any age can participate
- Works in any climate (cold nights often mean the clearest skies)
- Improves noticeably with practice — every session teaches you something new
- Scales easily from solo hobby to a family evening activity
- Pairs naturally with other backyard pursuits you already enjoy
A Brief History of the Telescope
The telescope has been humanity's window to the universe for over four centuries. Galileo pointed one at Jupiter in 1609 and discovered four of its moons — concrete proof that not everything orbited Earth. That single observation reshaped our understanding of the cosmos. According to Wikipedia's history of the telescope, the fundamental refracting design Galileo used hasn't changed conceptually — modern consumer telescopes simply apply centuries of optical refinement to that same principle.
The physics hasn't changed. The accessibility has. A scope that would have taken a craftsman weeks to build now ships to your door in a cardboard box for under two hundred dollars. That's worth appreciating the next time a wobbly tripod tests your patience.
Telescope Parts Every Beginner Should Know
Before you learn how to set up a telescope, you need a working map of the hardware. You don't need to understand the optics at a physics level — just know what each part does and why it matters.
The Main Optical Components
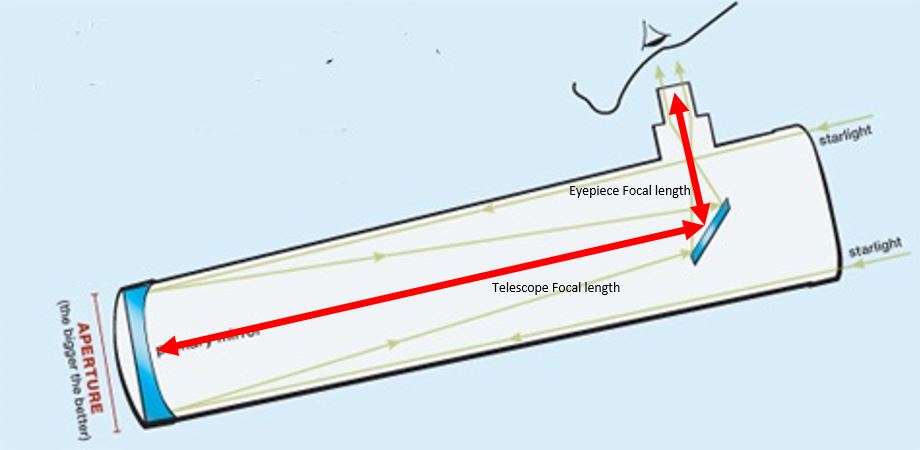
- Optical tube (OTA): The main body of the telescope. Light enters through the front opening and travels toward the eyepiece end where you observe.
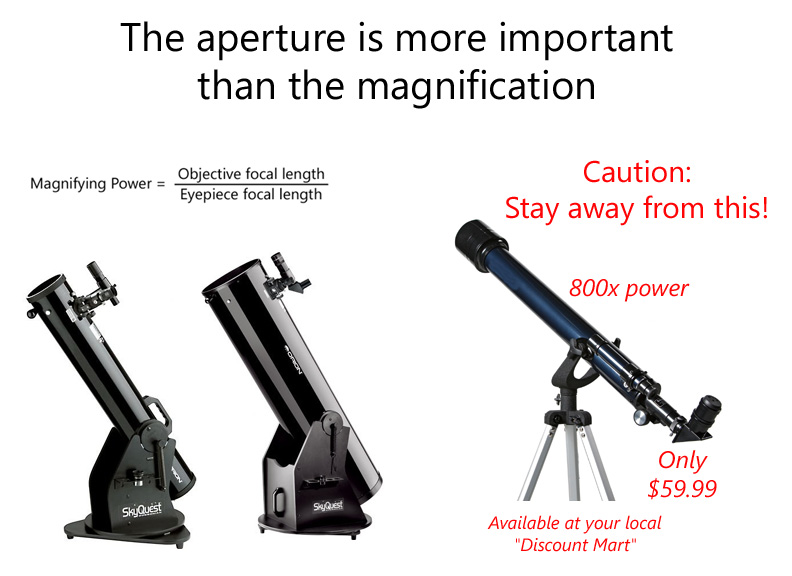
- Aperture: The diameter of the main lens or mirror. Aperture is the single most important specification in any telescope — a larger aperture collects more light, which produces brighter, sharper, more detailed images.
- Eyepiece: The lens you look directly through. Swapping eyepieces changes your magnification. The number printed on the eyepiece barrel (e.g., 25mm or 10mm) is its focal length — lower numbers produce higher magnification.
- Focuser: The knob or rack mechanism you turn to sharpen the image. Start with coarse adjustments, then make small fine corrections until the image snaps into focus.
- Finder scope: A small, wide-field scope mounted to the side of the main tube. It helps you aim the telescope at a target before you peer through the primary eyepiece.
- Barlow lens: An optional accessory that multiplies eyepiece magnification — typically 2×. It's a cheap, practical way to double the effective range of your eyepiece collection.
Understanding Mounts
The mount holds your telescope and determines how easy it is to point and track objects across the sky. A shaky or awkward mount ruins even a great optical tube. Three main types exist:
- Alt-Azimuth (AZ) mount: Moves up and down (altitude) and left and right (azimuth). Intuitive and simple to operate — exactly what most beginners need.
- Equatorial (EQ) mount: Aligned with Earth's rotational axis. Harder to polar-align initially, but makes tracking objects across the sky far smoother. Better for longer sessions and astrophotography.
- Dobsonian mount: A heavy-duty alt-azimuth design engineered for large reflector telescopes. Extremely stable and offers outstanding value when you want maximum aperture without overspending on the mount.
For most beginners, an alt-azimuth mount is the right starting point. You spend your time actually observing instead of fighting the equipment. Once you know the sky well, upgrading to equatorial makes genuine sense.
How to Set Up a Telescope: A Step-by-Step Walkthrough
This is the practical core of everything. Follow these steps in order and you sidestep the mistakes that send most beginners back inside frustrated on their first night out.
Getting Ready Before Dark
Never unbox your telescope for the first time after sunset. Do all of this during daylight:
- Lay every component on a clean surface and match each piece to the parts list in your manual.
- Assemble the tripod first. Extend the legs to a comfortable working height and lock every brace clamp securely before attaching anything above.
- Attach the mount head to the tripod and tighten all mounting bolts firmly.
- Slide the optical tube into the mount rings or saddle plate and tighten the tube clamp — snug, not so tight you risk cracking the tube body.
- Attach the finder scope to its bracket on the main tube.
- Insert your lowest-magnification eyepiece — the one with the highest mm number, typically 25mm or 30mm — into the focuser and tighten the thumbscrew.
One step almost every beginner skips: let your telescope sit outside for 20–30 minutes before you observe. This is called thermal equilibration (allowing the optics to reach the same temperature as the outdoor air). Bringing a warm scope into a cold night produces shimmering, blurry images even when everything else is done perfectly. Patience here pays off immediately.
If you observe regularly and want a comfortable, covered spot, consider setting up under a hardtop gazebo — it keeps dew off your gear and shields you from wind while leaving your sky view unobstructed.
Aligning the Finder Scope
Your finder scope and main telescope must point at the exact same target. Even a small misalignment turns every object search into frustrating guesswork in the dark. Align them during daylight with these steps:
- Pick a distant stationary target at least 100 meters away — a rooftop antenna, a chimney, a flagpole.
- Center the target precisely in the main eyepiece. Don't move the telescope after this step.
- Look through the finder scope without touching the main tube. Note where the crosshairs are actually pointing.
- Use the finder scope's adjustment screws (usually two or three screws around its mounting bracket) to shift the crosshair view until it lands exactly on your target.
- Recheck the main eyepiece — the target should still be centered perfectly.
This five-minute daytime task eliminates the most common first-night frustration. An unaligned finder scope makes it nearly impossible to locate objects once the lights go out.
First Light Tips
Your first observing session will go smoothly if you follow these habits from the start:
- Start with the Moon when it's visible. It's large, bright, easy to find, and delivers stunning crater detail even at low magnification. Use 50× to 80× to start.
- Always begin with your lowest-magnification eyepiece. Higher magnification narrows your field of view dramatically — much harder to aim when you're still learning the sky.
- Give your eyes 15–20 minutes to dark-adapt before observing faint objects. That means no phone screens and no white flashlight. Use a red-light flashlight if you need to read anything.
- Keep a simple notebook. Write down what you saw, which eyepiece you used, and what the sky conditions were like. Observers who log their sessions improve measurably faster than those who don't.
- Be patient at the eyepiece. Objects look noticeably better after your eye settles and dark-adapts at that magnification.
What You Can Spot With a Backyard Telescope
The first question every new owner asks is: what can I actually see from my yard? The answer surprises most people. You don't need pristine rural darkness for the best targets — and suburban skies are far more useful than you probably expect.
The Moon and Planets
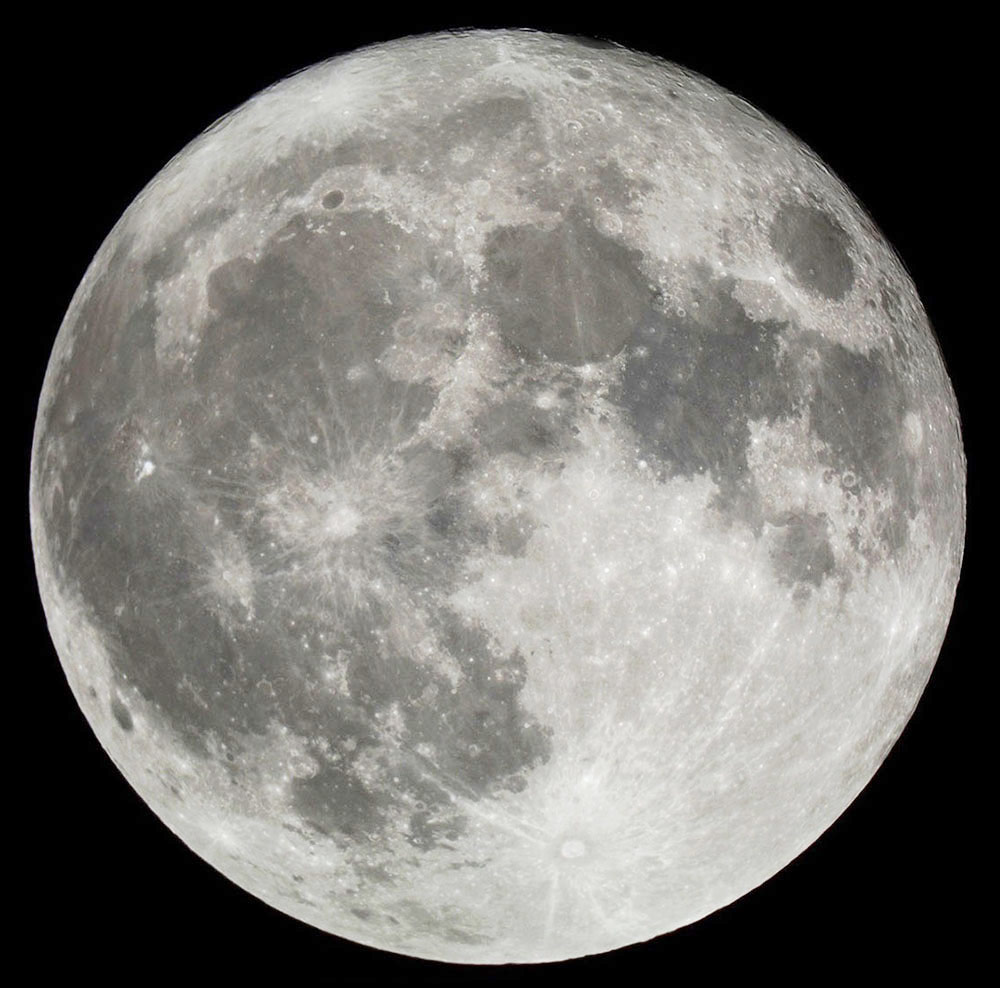
The Moon is the undisputed highlight for beginners. Even a basic 60mm refractor reveals craters, towering mountain ranges, and dark volcanic plains called maria in extraordinary detail. A first-quarter or half moon phase is actually better for surface detail than a full moon — the shadows along the terminator (the boundary between lunar day and night) make craters and ridges stand out dramatically.
Planets you can observe from any suburban backyard:
- Jupiter: Two main cloud bands are visible at 75× in almost any telescope. You'll also spot up to four Galilean moons — the same ones Galileo identified four centuries ago.
- Saturn: The rings are absolutely real and visible at modest magnification. First-timers routinely ask if it's a sticker on the lens. It isn't.
- Mars: Best near opposition, when it's closest to Earth. An orange-red disk, sometimes showing a polar ice cap through mid-range scopes.
- Venus: Displays distinct phases like the Moon. Its dense cloud cover hides all surface detail, but tracking the phase changes over weeks is genuinely fascinating.
Winter nights consistently deliver the clearest, steadiest air for planet observing. They're also a natural opportunity to combine stargazing with other outdoor winter activities — a telescope session makes an excellent centerpiece for a backyard gathering on a cold, clear evening.
Deep Sky Objects
Push beyond the solar system and you encounter a different category of wonder entirely. Many of these targets are visible even from moderately light-polluted backyards:
- Orion Nebula (M42): A glowing cloud of gas and dust where new stars are actively forming. Visible to the naked eye in Orion's sword, and spectacular through any telescope.
- Pleiades star cluster: Dozens of hot blue-white stars packed tightly together. Use your lowest magnification for the widest, most dramatic view.
- Andromeda Galaxy (M31): The nearest major galaxy to our own, 2.5 million light-years away. Visible to the naked eye on darker nights; a telescope reveals its full oval glow.
- Double stars: Pairs of stars orbiting each other. Albireo in Cygnus shows a beautiful gold and blue contrast even at low magnification — a crowd-pleaser every time.
| Target | Best Season | Minimum Aperture | Good Magnification Range |
|---|---|---|---|
| Moon | Year-round | 60mm | 50×–150× |
| Jupiter | Shifts yearly (check an app) | 60mm | 75×–150× |
| Saturn | Shifts yearly (check an app) | 70mm | 75×–120× |
| Mars | Near opposition | 80mm | 100×–200× |
| Orion Nebula | Winter / early spring | 70mm | 30×–60× |
| Andromeda Galaxy | Autumn | 80mm | 20×–40× |
| Pleiades cluster | Winter | Any | 10×–30× |
Beginner Telescopes vs. Advanced Models
Entry-Level Options
You don't need to spend a lot to get started with real, rewarding views. A solid beginner telescope in the $100–$300 range covers every target most people actually want to see — the Moon, all the bright planets, and the most striking deep-sky objects.
What to look for in a beginner scope:
- At least 70mm aperture for a refractor (the lens type), or at least 114mm for a reflector (the mirror type)
- A stable mount — avoid any scope with a central pole mount and no locking mechanism
- Two or more eyepieces included, ideally covering different magnification ranges (e.g., 25mm and 10mm)
- An established brand with an active user community: Celestron, Orion, Sky-Watcher, and Meade all make reliable beginner scopes with genuine support
What to avoid:
- Any telescope marketed primarily by magnification ("500× POWER!"). Maximum magnification claims are meaningless without adequate aperture — this is pure marketing.
- Plastic focusers that can't hold an eyepiece steady under the weight of a Barlow lens
- No-brand scopes with no verified reviews, no parts availability, and no manufacturer support
Learning to use a modest scope well teaches far more than jumping straight to expensive gear. Just as gardens evolved from simple functional plots into complex, layered landscapes through accumulated knowledge over time, your astronomy practice grows best when you build on solid fundamentals before adding complexity.
Stepping Up to Intermediate and Advanced Scopes
Once you've mastered the basics — finding objects reliably, understanding magnification trade-offs, reading the seasonal sky — a more capable setup pays off visibly. Here's what the next levels look like:
- 6–8" Dobsonian reflector ($300–$600): Massive aperture for the price. The single best choice for visual deep-sky observing on a realistic budget. Heavy to move but straightforward to operate.
- Computerized (GoTo) mount ($500+): You input the object name; the telescope automatically slews to it. Excellent for sessions where you want to cover many targets quickly.
- Apochromatic refractor ($600–$2,000+): Produces pin-sharp planetary images with no color fringing. The preferred choice for serious planetary work and astrophotography.
A beginner who thoroughly knows their entry-level scope will outobserve someone with expensive gear they don't understand. Master the basics first. The upgrades will mean much more once you know what you're actually gaining.
Breaking Down the Cost of a Telescope Setup
Budget Tiers at a Glance
Here's a clear-eyed look at what different budgets actually deliver when you're setting up for backyard stargazing:
| Budget | What You Get | Best For |
|---|---|---|
| Under $150 | 60–70mm refractor or 114mm reflector, basic AZ mount | Moon, bright planets |
| $150–$350 | 80–102mm refractor or 130mm reflector, sturdier mount | All planets, bright nebulae and clusters |
| $350–$600 | 6" Dobsonian or 5" refractor, solid mount | Full solar system + deep-sky objects |
| $600–$1,500 | 8" Dobsonian or computerized GoTo mount, quality eyepiece set | Serious visual + beginner astrophotography |
| $1,500+ | Apochromatic refractor or large SCT on equatorial mount | Advanced visual + serious astrophotography |
Hidden Costs to Know Before You Buy
The sticker price on the telescope box is rarely the full story. Budget for these extras before you place your order:
- Extra eyepieces: Most telescopes ship with one or two. A 2× Barlow lens ($20–$50) doubles your effective eyepiece range at minimal cost.
- Red flashlight: Preserves your night vision while you read star charts or check your notes. Essential, and costs only $5–$15.
- Star chart or app: You need targets. Apps like SkySafari or Stellarium are free and excellent. A printed atlas is a good backup when your phone battery dies in the cold.
- Collimation tools (reflectors only): Reflector mirrors drift out of alignment over time and need periodic realignment (collimation). A basic collimation cap runs $10–$20; a laser collimator costs $30–$60.
- Carrying case or bag: Important if you ever transport the scope away from home for a darker observing site.
A practical rule: budget an additional 15–25% above the telescope's purchase price for accessories that make it fully functional from night one. Astronomy is a hobby that grows with you — the investment compounds over time in a very satisfying way. For the kind of perspective that makes all outdoor hobbies feel worthwhile, the collection of backyard quotes and sayings on this site captures that spirit of patient, purposeful time spent outside.
Frequently Asked Questions
What is the best telescope for a complete beginner?
A 70–80mm refractor or a 114–130mm reflector on a stable alt-azimuth mount is the ideal starting point. Brands like Celestron, Orion, and Sky-Watcher all produce reliable beginner models in the $100–$250 range. Prioritize aperture and mount stability over everything else — and ignore any scope marketed primarily by maximum magnification claims.
How long does it take to set up a telescope for the first time?
Expect 30–60 minutes for your very first assembly, including reading the manual and aligning the finder scope. After a few sessions, setup time drops to 10–15 minutes. Always do your first assembly in daylight — attempting it for the first time in the dark, on your first observing night, is a reliable way to end the evening disappointed.
Do I need to live outside the city to stargaze through a telescope?
No. The Moon, all the bright planets, and many prominent deep-sky objects are fully visible from suburban and even urban backyards. Light pollution dims faint galaxies and diffuse nebulae, but it does not meaningfully affect your view of the Moon, Jupiter, Saturn, or Mars. A backyard in a mid-sized city is a perfectly functional observing site for the majority of beginner targets.
What magnification do I need to see Saturn's rings?
Saturn's rings are clearly visible at around 50×–75× through a telescope with at least 70mm of aperture. You don't need high magnification — even a modest scope at relatively low power shows the ring structure on a steady night. Pushing magnification too high on a turbulent night actively degrades the image, so start low and only increase if the seeing conditions support it.
How do I know if my telescope is properly aligned?
The main check is the finder scope alignment: aim at a distant daytime target, center it in the main eyepiece, and confirm the finder crosshairs land on the same point. At night, if you center an object in the finder scope and it appears within the main eyepiece's field of view, your alignment is solid. If the object is consistently missing, the finder scope needs readjustment using its bracket screws.
Final Thoughts
Learning how to set up a telescope is genuinely one of those skills that clicks after just a handful of evenings outside — and once it does, the night sky becomes an entirely different place. Get your scope assembled and aligned before dark, start with the Moon, give your eyes time to adapt, and let your curiosity lead from there. Head over to the telescope setup guide to explore beginner scope recommendations, seasonal target lists, and step-by-step alignment walkthroughs that will keep your clear nights fully booked.


About Simmy Parker
Simmy Parker holds a Bachelor of Science in Civil Engineering from Sacramento State University and has applied that technical background to outdoor structure design, landscape planning, and backyard improvement projects for over a decade. Her love for the outdoors extends beyond design — she regularly leads nature hikes and has developed working knowledge of native plants, soil conditions, and sustainable landscaping practices across Northern California. At TheBackyardGnome, she covers backyard design guides, landscaping ideas, and eco-friendly outdoor living resources.
You can Get FREE Gifts. Receive Free Backyard Items here. Disable Ad Blocker to get them all now!
Once done, hit anything below