Knowing how to use campfire colorant is simpler than most people expect — toss a packet into an established fire and the flames shift from plain orange to vivid greens, blues, and purples within a minute. Our team has spent years testing Mystical Fire and other campfire colorants in real backyard setups, and the results are consistently impressive when a few key steps are followed. This complete guide covers everything from first use to getting the most out of every packet, every season. For a full breakdown of available products, our campfire colorants guide is the best starting point.
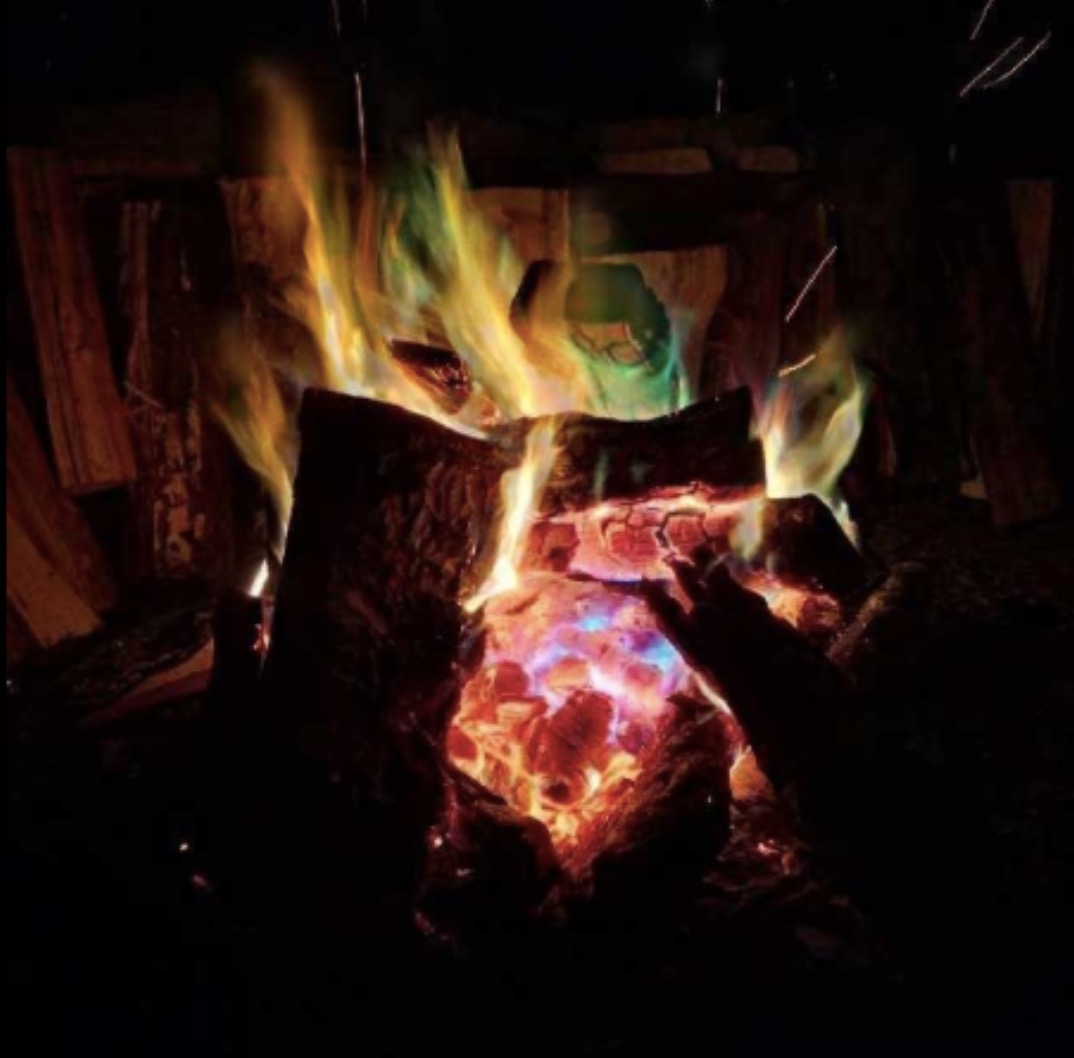
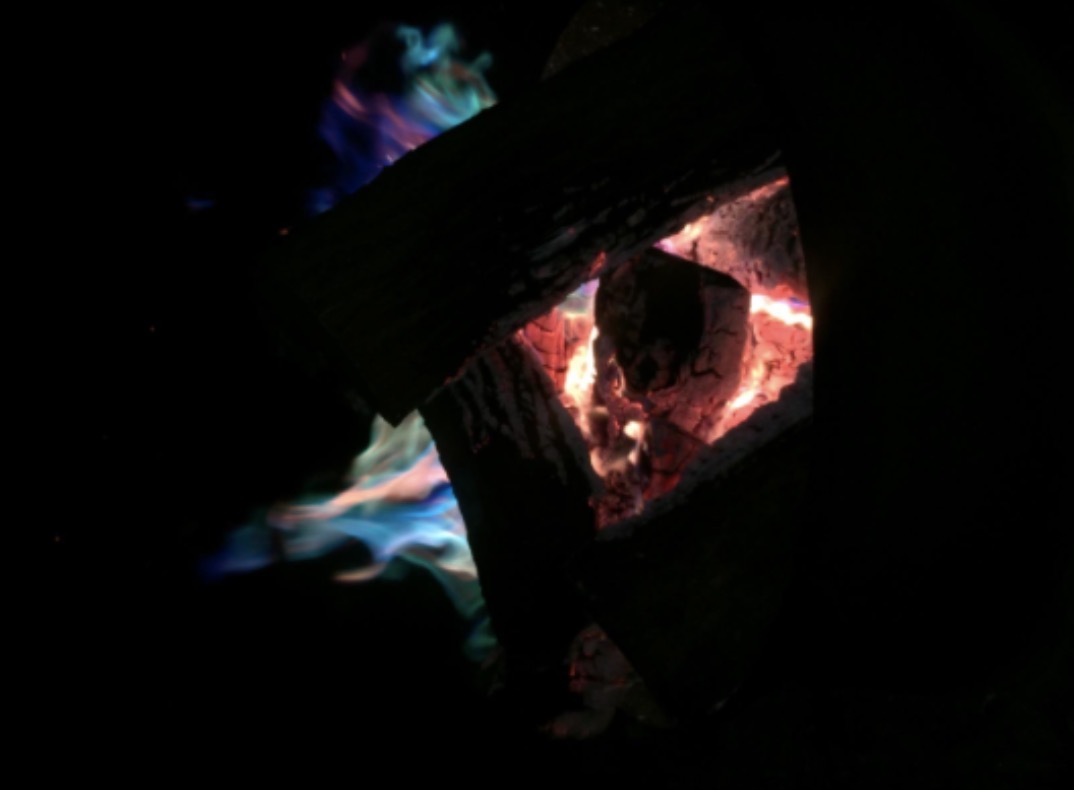
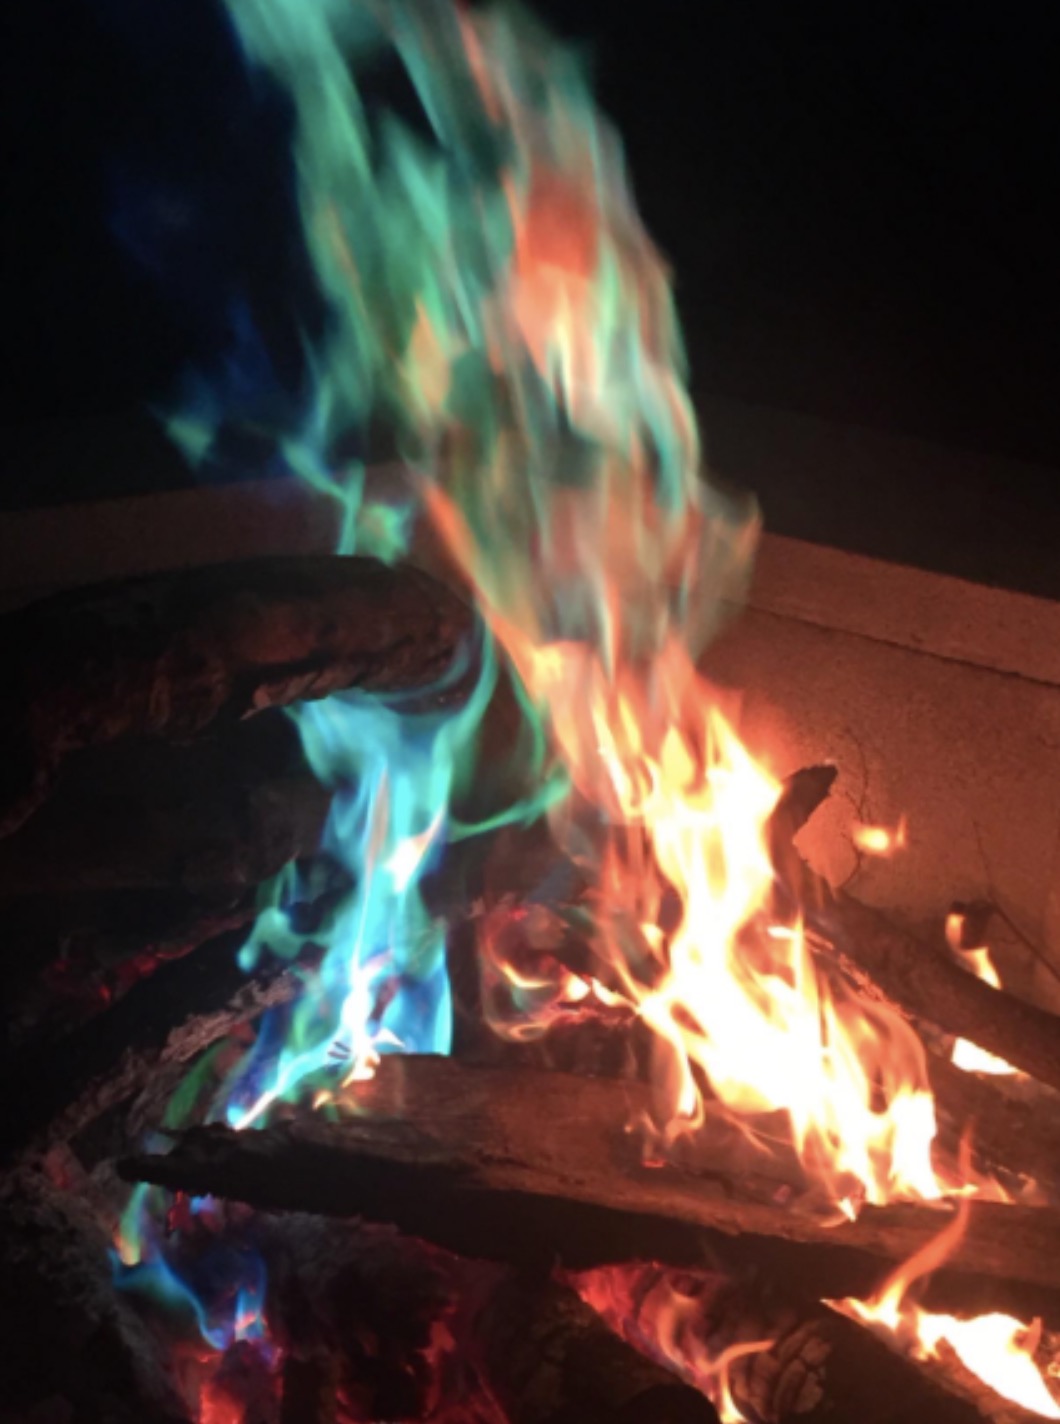
Mystical Fire works by using metal salts — chemical compounds that produce specific emission colors when burned. Copper sulfate burns green and blue, potassium chloride produces violet, and lithium chloride makes red. The packets are pre-measured and sealed, so the chemistry is already handled. What most people miss is that fire conditions matter just as much as the product itself — the wrong setup produces disappointing results even with a quality colorant.
Our team has used these at everything from casual weeknight fires to larger backyard gatherings. The color effect is genuinely striking in low ambient light, and it adds a layer to outdoor fire nights that plain wood burning simply can't match. That said, there are a handful of details that separate a mediocre color show from a great one — and our experience has pinpointed exactly what those are.
Contents
Step-by-Step: How to Use Campfire Colorant
Setting Up the Fire First
The single most important rule our team follows is never adding colorant to a cold or freshly lit fire. The fire needs to be fully established — a solid bed of glowing coals with active, steady flames — before any packet goes in. This typically takes 15 to 20 minutes from initial lighting. A hot, well-developed fire produces the most saturated colors and burns the colorant completely, which is better for the color show and better for safety.
Dry, seasoned hardwood is the foundation of a good color fire. Wet or green wood produces heavy smoke that mutes colors and makes the flame changes genuinely difficult to see. Oak, hickory, and maple are the woods our team reaches for — they burn hot and clean, and they produce the consistent combustion temperature that makes campfire colorant perform at its best.
Adding the Colorant Packet
The technique is straightforward: hold the packet by one corner and toss it directly into the hottest section of the flame — the center, not the edge. Packets placed on the periphery of the fire tend to smolder rather than burn cleanly, which produces weak, patchy color that fades in under five minutes. Center placement means full combustion and maximum color intensity from the first seconds.
One packet colors a medium-sized backyard fire for 20 to 30 minutes. For larger fires or longer sessions, two to three packets work well. Our team recommends spacing them out — adding a second packet as the first starts to fade keeps the color show continuous without the competition between packets that happens when multiple are thrown in simultaneously. Always keep original packaging well away from the fire, and never break a packet open to pour the colorant directly — the packet itself controls the release rate, and bypassing that produces erratic results.
Safety note: campfire colorant is designed strictly for outdoor wood-burning fires — never use it in a gas fire, gas grill, or indoor fireplace, where incomplete combustion and ventilation issues create real hazards.
Getting the Best Color Results Every Time
Fire Temperature Is the Key Variable
Color intensity is almost entirely a function of fire temperature. A low or fading fire produces brief, muted color that most people find underwhelming. A hot, actively burning fire produces deep, vivid flames that hold for the full burn time of the packet. Our team waits for at least 20 minutes of steady burning before adding any colorant — this ensures the fire is at peak temperature and the coals are fully established underneath.
Airflow matters just as much as wood type. A fire that's been packed too tightly or built in a space with poor ventilation burns cooler and produces less complete combustion. Our team builds fires with a loose, open structure — leaving gaps between logs for air to move through. The difference in color quality between a well-aerated fire and a smothered one is immediately visible. This is one of those details that separates people who get great results from those who feel let down by the product.
Reading the Fire
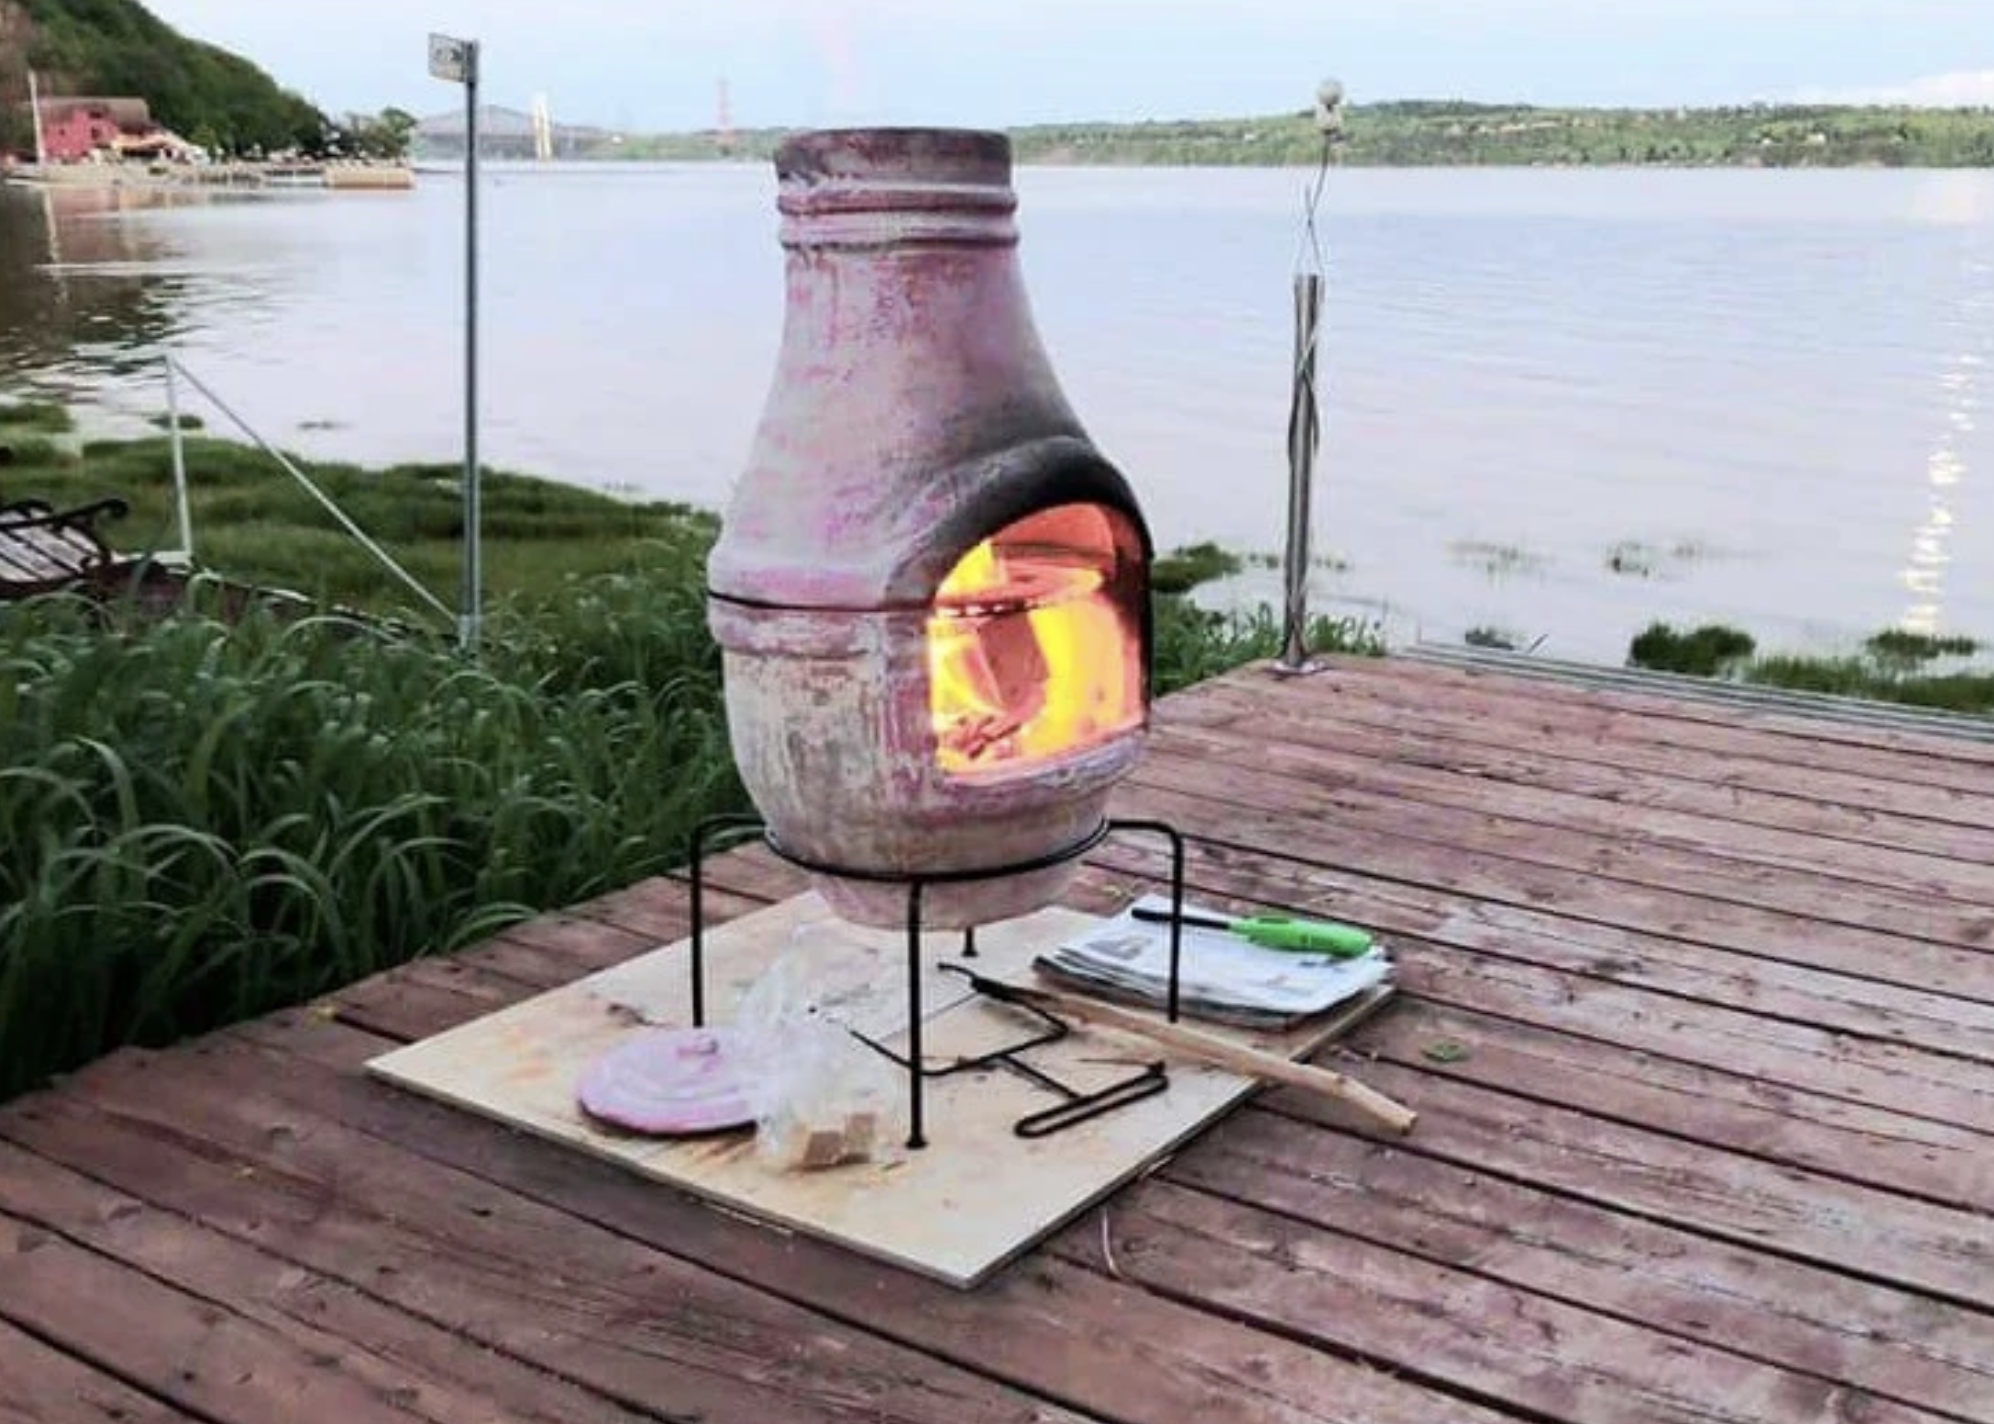
One practical skill our team has developed is reading the fire before adding colorant. The flames should be tall and active, not flat and low. The coals should glow orange-white at their core, not dull red. If the fire looks like it's winding down, the right call is to add a log and wait another ten minutes rather than wasting a packet on a declining fire. For anyone building a dedicated outdoor fire space, our Gardeco X-Large Chiminea review covers one of the best contained-fire options for consistent colorant performance — a quality chiminea holds heat far better than an open ring.
Small Changes That Make a Big Difference
A few simple adjustments consistently improve the overall experience. The most impactful one: dim or switch off all nearby lights before adding the colorant. The colors are dramatically more vivid in low ambient light. Porch lights, string lights, and lanterns all wash out the effect. Our team switches everything off and lets the fire be the only light source — the difference is striking, and it takes about ten seconds to do.
Timing matters almost as much as fire condition. Adding colorant about 20 minutes into a fire night, when the fire is at peak heat and everyone is settled in, produces the best reaction. Waiting until the fire is dying down wastes the packet on a fire that can't support a proper show. Treating the colorant as a planned moment — rather than an afterthought — makes the whole experience feel deliberate and impressive.
The setting amplifies everything. A well-arranged outdoor space turns a color fire from a novelty into a genuine experience. Our team covered the full approach to building that kind of evening in the outdoor winter party guide, and most of those principles carry over to any season. For leaning into the atmosphere angle, the 1920s-themed party guide has a lot of useful overlap in terms of using the environment deliberately to create a mood around a fire.
Campfire Colorant Products Compared
Not all campfire colorants deliver the same results. Our team has tested several brands alongside Mystical Fire across multiple fire nights, and the differences in color range, burn time, and consistency are real and worth knowing before buying. Here's how the most commonly available options compare:
| Product | Colors Available | Burn Time | Approx. Price Per Packet | Best For |
|---|---|---|---|---|
| Mystical Fire (single packs) | Green, blue, violet, red | 20–30 min | $1.75–$2.25 | Vivid colors, general use |
| Mystical Fire (bulk pack) | Green, blue, violet, red | 20–30 min | $1.00–$1.50 | Frequent use, best per-packet value |
| Colorflame Packets | Green, blue | 15–20 min | $1.25–$1.75 | Budget use, shorter shows |
| Pine Mountain Fire Color | Green, orange-red | 10–15 min | $1.00–$1.25 | Occasional use, limited color range |
Our team's recommendation is unambiguous: Mystical Fire in bulk is the clear winner on every meaningful metric. The flame test chemistry — burning metal salts to produce distinct spectral emission colors — is theoretically the same across all brands, but Mystical Fire's formulation consistently produces cleaner and more saturated colors under real outdoor fire conditions. The wider color range and longer burn time make every packet count more.
What It Actually Costs to Color a Campfire
The per-session cost is low. A single Mystical Fire packet runs between $1.75 and $2.25 at most outdoor retailers. A six-pack typically costs around $9 to $12. For anyone who fires up the backyard pit regularly through the outdoor season, a bulk pack of 24 to 50 packets brings the per-packet cost down to around $1.00 or less. Our team considers this one of the most cost-effective upgrades available for an outdoor fire setup — the visual return on a $2 packet is hard to beat.
The real investment is in the fire setup itself. A quality fire pit or chiminea — the platform that makes colorants perform at their best — runs from $50 for a basic steel ring to $300 or more for a cast-iron or clay model. That cost is amortized across dozens of fire nights over several seasons. For anyone planning the full backyard fire area layout, our slate patio design ideas post is a strong starting point for thinking through the surrounding space.
For a regular fire household, a six-pack covers three to six sessions depending on fire size and how long the color show runs. At that cadence, the annual colorant budget for a full outdoor season runs around $30 to $50 — a minor line item compared to firewood, seating, or lighting. The value case is straightforward.
Storing and Maintaining the Setup
Keeping Colorant Packets in Good Condition
Moisture ruins campfire colorant packets before they ever reach the fire. Even slight dampness causes the metal salts inside to clump, partially dissolve, or fail to ignite properly, producing weak or no color output. Our team stores all packets in a sealed plastic container kept in a dry indoor location — a shelf in the garage or a cabinet in the shed works well. Never store them in an outdoor storage box that collects humidity, and never leave loose packets near the fire pit where morning dew or rain can reach them. Properly stored packets last for years without any degradation.
Maintaining the Fire Pit for Peak Performance
A clean fire pit produces better fires, and better fires produce better color shows. Ash buildup restricts airflow and lowers combustion temperatures — both of which directly affect campfire colorant performance. Our team clears ash from the fire pit after every two to three uses, always leaving a thin base layer for insulation and heat retention. Grates, screens, and spark guards should be checked before each use and cleared of any debris that might interfere with airflow. A five-minute inspection before lighting prevents most in-session problems. For anyone building out a complete covered outdoor space where fires are part of the regular plan, the Sunjoy Chatham Steel Hardtop Gazebo review covers how a quality overhead structure anchors a full backyard fire setup without limiting airflow.
Mistakes That Ruin the Color Show
Adding Colorant Too Early
This is the mistake our team sees most often, and it accounts for most of the disappointment people report with campfire colorants. A freshly lit fire doesn't generate the sustained heat needed to combust the colorant packet properly. The result is weak, short-lived color that burns out in under five minutes and leaves most people wondering what all the fuss is about. The fix is simple and costs nothing: wait for a full, well-established fire before adding anything. Patience here pays off immediately.
Using the Wrong Wood
Wet wood is the single biggest color killer. The smoke from damp or green wood coats the flame zone and turns vivid greens and blues into a muddy, hard-to-see haze. Our team only uses hardwood that has been seasoned for at least six months. The field test: split a piece of wood and examine the interior. If it's visibly wet or has a greenish tint, it's not ready. Kiln-dried firewood from a hardware store is a reliable fallback when home-seasoned wood isn't available — it's consistent and burns at the temperatures colorants need.
Overloading the Fire with Packets
More packets at once doesn't produce a better show — it consistently produces a worse one. Throwing four or five packets into a fire simultaneously smothers the combustion, drops the temperature, and creates erratic, short-lived color that fades out before any real visual impact lands. Two packets at a time is the practical maximum for a standard backyard fire. Three works for a large bonfire with a strong coal bed underneath. Our team has found that spacing packets 25 to 30 minutes apart produces a far more sustained and visually satisfying color show than dumping multiple packets at once. Treat each packet as a planned moment in the evening, not a quantity play.
Frequently Asked Questions
Is Mystical Fire campfire colorant safe to use outdoors?
Yes — Mystical Fire is specifically formulated for outdoor use in wood-burning fires. The metal salts used are low-hazard in the quantities contained in each packet, and the combustion products dissipate quickly in open air. The key restriction is that these packets are for outdoor wood fires only — never gas fires, grills, or indoor fireplaces.
Can campfire colorant be used in a chiminea or enclosed fire pit?
Our team has used it successfully in both chimineas and enclosed fire pits. The main requirement is that the fire has good airflow and reaches full operating temperature before the packet is added. A well-vented chiminea actually produces excellent color results because the contained combustion environment burns cleanly and consistently.
How long does one Mystical Fire packet actually last?
One packet colors a medium backyard fire for 20 to 30 minutes under good conditions — a hot, established fire with dry hardwood. A low or declining fire may produce color for only 10 to 15 minutes. Our team consistently gets the full 25 to 30 minutes by waiting until the fire is well-established before adding any colorant.
Is it safe to roast food over a fire treated with campfire colorant?
Our team does not recommend roasting food — marshmallows, hot dogs, or anything else — over a fire that has an active colorant packet burning in it. The metal salts, while low-hazard in open air, should not be introduced into food. Wait until the colorant has fully burned out and the fire returns to normal before using it for cooking.
Does weather or humidity affect how campfire colorant performs?
Humidity affects the stored packets but not the burning performance. As long as the packets have been stored dry, wet weather on the night of use doesn't meaningfully impact results — a hot fire burns through surface moisture quickly. Wind, however, can disperse the colored flames before they're fully visible. A fire in a sheltered location always performs better than one in an exposed, windy spot.
How many packets are needed for a full evening of colored fire?
For a standard two- to three-hour backyard fire night, our team typically uses three to four packets, spaced 25 to 30 minutes apart. This produces a sustained color show through the best part of the evening without exhausting the supply. For a larger gathering or a longer fire, a six-pack is the right quantity to have on hand.
Where can Mystical Fire campfire colorant be purchased?
Mystical Fire is available at most major outdoor retailers, hardware stores, and online. Buying in bulk packs of 24 or more significantly reduces the per-packet cost — our team always buys in bulk at the start of the outdoor season to have supply on hand without repeat purchases.
Final Thoughts
Using campfire colorant well comes down to a few fundamentals: start with a fully established fire, use dry seasoned hardwood, time the packets deliberately, and dim the surrounding lights to let the colors speak for themselves. Our team's recommendation is to grab a bulk pack of Mystical Fire, try it on the next fire night with these steps in place, and see the difference that proper technique makes compared to just tossing in a packet and hoping for the best. Head over to our full campfire colorants guide to explore more product options and find the right fit for the fire setup most people already have in their backyard.


About Simmy Parker
Simmy Parker holds a Bachelor of Science in Civil Engineering from Sacramento State University and has applied that technical background to outdoor structure design, landscape planning, and backyard improvement projects for over a decade. Her love for the outdoors extends beyond design — she regularly leads nature hikes and has developed working knowledge of native plants, soil conditions, and sustainable landscaping practices across Northern California. At TheBackyardGnome, she covers backyard design guides, landscaping ideas, and eco-friendly outdoor living resources.
You can Get FREE Gifts. Receive Free Backyard Items here. Disable Ad Blocker to get them all now!
Once done, hit anything below