More than 70 percent of homeowners who add outdoor audio systems underestimate how vinyl siding behaves as a mounting surface—and that knowledge gap leads directly to speaker failures, cracked panels, and water infiltration behind walls. Understanding how to mount speakers to vinyl siding properly means treating the siding as a cosmetic layer, not a structural one, and anchoring everything to the framing underneath it. If you're planning your outdoor speaker installation, the mounting strategy you choose determines both the longevity of your setup and the condition of your home's exterior.
The good news is that vinyl siding doesn't have to stop you from building a great-sounding outdoor system—it just requires a different technique than wood or masonry does. Understanding how vinyl siding is constructed as a wall assembly helps you identify solid anchor points in the framing and use hardware that accommodates thermal movement without cracking the panels or pulling loose over seasons of temperature change.
Whether you're designing a patio sound zone for summer cookouts or gearing up for an outdoor winter gathering, wall-mounted speakers deliver cleaner sound distribution and a cleaner look than freestanding alternatives—as long as the mounting is executed correctly from the start.
Contents
The Right Way to Mount Speakers to Vinyl Siding
Vinyl siding is a floating cladding system—it's engineered to slide horizontally as it expands and contracts with temperature, which means it was never designed to carry point loads like speaker brackets. Every correct installation technique works around this fundamental constraint by passing through the siding and anchoring into something structural underneath.
Locate the Studs Before You Drill Anything
Wall studs sit 16 inches apart in standard residential framing, and they're your primary anchor target because they give you several inches of solid wood to grip. Finding them through vinyl requires a quality deep-scan stud finder rather than the tap-and-knock method you'd use on interior drywall, because the air gap behind the panels confuses acoustic detection entirely.

- Use a deep-scan stud finder like the Zircon i700, which reads through multiple layers including the siding, sheathing, and housewrap simultaneously.
- Mark both edges of the stud so you can calculate the center point before committing to a drill position.
- Confirm the stud location with a small pilot hole through the sheathing before drilling your full mounting holes.
- Use 3-inch exterior-grade structural screws to reach through the siding, sheathing, and at least 1.5 inches into the stud itself.
Choose Hardware Designed for Vinyl
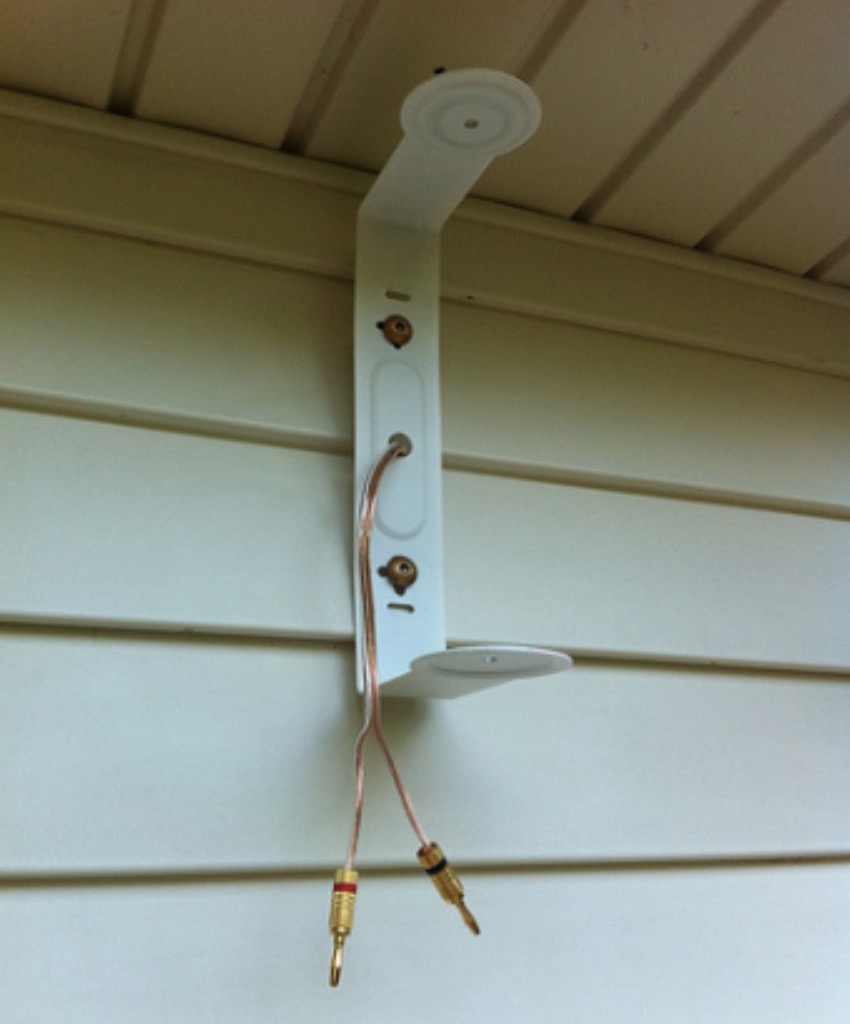
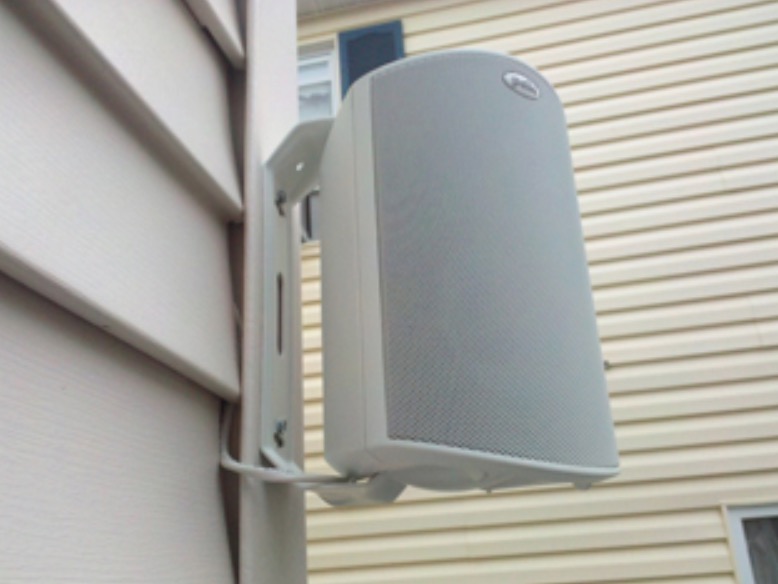
Standard speaker mounting brackets that ship with most outdoor speakers are designed for hard surfaces like wood or masonry. You need a vinyl siding mounting block—also called a siding hook or flat-mount block—which creates a stable platform that sits flush against the wall while the siding continues to move freely around it.
- Mounting blocks come in UV-stable PVC and ABS plastic in several profiles and colors matched to common siding styles.
- Size your block to match your speaker bracket's footprint so there's no overhang that catches wind or pools water.
- Use stainless steel hardware throughout — zinc screws rust and stain your siding within a single outdoor season.
- Install a rubber or neoprene gasket between the mounting block and the siding face to prevent vibration transfer and water wicking along the fastener shaft.
Seal Every Penetration Against Moisture
Every hole you drill through vinyl siding creates a direct path for water to enter the wall cavity. Sealing is non-negotiable—it's the step that separates a professional installation from one that causes expensive structural damage years down the line.
- Apply a full perimeter bead of exterior-grade silicone caulk around every mounting block before pressing it to the wall surface.
- Seal wire entry points with waterproof grommets, not just caulk alone, because caulk shrinks and cracks over repeated freeze-thaw cycles.
- Inspect all seals annually and re-apply wherever you see gaps, discoloration, or separation from the siding face.
When Direct Mounting Works — and When It Doesn't
Direct mounting to vinyl siding is an excellent solution in many situations, but it's the wrong call in others. Knowing the difference before you buy hardware saves you from a job that looks solid initially but fails under the cumulative stresses of outdoor exposure over several seasons.
Scenarios Where Direct Mounting Is Your Best Option
- Studs align with your desired speaker position — when your preferred mounting height places the bracket directly over a stud, direct mounting gives you maximum rigidity at minimal hardware cost.
- The speaker weighs under 15 pounds — most quality outdoor speakers fall in the 5–12 pound range, which a properly blocked vinyl mount handles with no issue.
- You want a clean, permanent installation with no visible poles, posts, or freestanding hardware cluttering your patio or deck space.
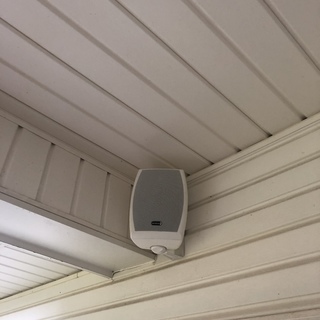
- The wall runs under a covered porch or eave, which limits direct rain exposure on the mounting hardware and significantly extends its service life.
Scenarios That Call for a Different Approach
Pro tip: If the speaker wall receives six or more hours of direct sun daily, choose a bracket with a tilt adjustment — aiming the drivers toward the seating area rather than straight out from a hot reflective surface makes a noticeable difference in perceived volume and clarity.
- The speaker weighs more than 20 pounds — heavy cabinets require anchors into masonry or dedicated wood blocking installed from inside the wall cavity, which vinyl alone cannot provide.
- You cannot locate a stud within 4 inches of your target position — screwing into sheathing alone is insufficient for long-term load-bearing under outdoor conditions.
- The siding panels are old or show existing cracks — aged vinyl baked by years of UV exposure becomes brittle and will crack even under careful installation pressure.
- You want to relocate the speakers seasonally — a freestanding post or landscape speaker stake is a better fit than a permanent wall penetration in that case.
Mounting Methods Compared
Your Main Options at a Glance
When planning how to mount speakers to vinyl siding, you have four practical approaches, each with a different profile of cost, permanence, and installation complexity. Understanding what each method requires before you buy anything prevents the common mistake of purchasing the wrong hardware and starting over.
Side-by-Side Comparison
| Mounting Method | Best For | Stud Required? | Removable? | Avg. Cost |
|---|---|---|---|---|
| Vinyl mounting block + bracket | Permanent install, speakers under 15 lbs | Yes | No | $15–$40 |
| Wood sister board (backing board) | Heavy speakers, multiple brackets on one wall span | Yes (2+ studs) | No | $25–$60 |
| Freestanding speaker post | Flexible placement, zero wall drilling | No | Yes | $30–$80 |
| Pergola or overhead structure mount | Overhead placement, covered patio setups | No | Partial | $20–$50 |
What to Budget for Your Installation
A solid outdoor speaker installation doesn't require a large hardware budget, but skimping on mounting components is exactly where most setups fail. The fasteners, blocks, and sealants represent a small fraction of your total system cost—and doing the job right once is far cheaper than repairing siding damage or reinstalling a bracket that pulled free.
DIY Hardware Costs
- Vinyl mounting blocks: $8–$15 each, available at most home improvement retailers in profiles and colors matched to popular siding styles.
- Deep-scan stud finder (one-time purchase): $25–$60 — a tool that pays for itself on the first installation and every one after it.
- Stainless steel exterior screw set (50-pack): $12–$18, enough for two speaker installations with hardware left over.
- Exterior silicone caulk: $6–$10 per tube — use gun-grade rather than squeeze-tube for a more precise, controlled bead application.
- Waterproof cable grommets (4-pack): $8–$12, essential for sealed wire entry points that stay watertight through seasonal temperature cycling.
- Total DIY hardware for a two-speaker installation: $60–$115, excluding the speakers and amplifier themselves.
Professional Installation Costs
- Basic outdoor speaker mount and connect (two speakers, pre-run wire, no new circuit): $150–$300 in labor.
- Full installation including a new dedicated outdoor circuit and concealed in-wall wiring: $400–$800 depending on local electrician rates and wire run complexity.
- AV integrators handling a complete backyard audio buildout with source selection and weatherproof covers: $1,000–$3,000 for a full-zone system.
- If the wire is already run and you just need mounting and connection, most AV handymen charge $75–$150 per hour, with simple jobs finishing well under two hours.
How Mounted Speakers Transform Your Outdoor Space
Your primary use case determines where to mount, how high to aim, and what coverage pattern you need — and getting placement right the first time saves you from drilling new holes to fix an audio dead zone you discover after the job is done.
Patio and Deck Entertainment Zones
For defined hardscape areas — the kind built around surfaces featured in our slate patio design guide or our flagstone patio overview — wall-mounted speakers at 8–10 feet of height deliver excellent coverage without sound dissipating into open sky the way that ceiling mounts sometimes do.
- Angle speakers downward at 15–20 degrees toward the primary seating area using a swivel bracket, which you can fine-tune after the initial installation.
- Space two speakers at least 10–12 feet apart horizontally to achieve genuine stereo separation at typical outdoor listening distances.
- Position mounting blocks at a wall corner when possible — corner placement widens your coverage area from a single speaker and reduces total wall penetrations.
Pool Areas and Outdoor Kitchens
- Pool environments require speakers rated at minimum IP65 for water resistance — verify the manufacturer's ingress protection rating before purchasing, because standard outdoor speakers aren't rated for splash-zone proximity.
- Mount to the house wall adjacent to the pool rather than on fencing or arbor structures, which flex and vibrate and loosen hardware faster than a rigid wall assembly does.
- Outdoor kitchens benefit from a secondary volume zone so you can turn up the sound near the grill without overdriving guests who are seated across the patio.
- Route all cable runs at least 12 inches from gas lines and heat-generating equipment, running wire through conduit wherever it crosses an exposed exterior surface.
Frequently Asked Questions
Can you screw directly into vinyl siding without a mounting block?
Technically yes, but it leads to cracked panels, loosened fasteners, and water infiltration behind the wall over time. Vinyl siding is a floating system designed to move with temperature, so a screw driven directly through it creates stress points that degrade the panel over each seasonal cycle. Always use a vinyl mounting block to create a stable, load-bearing platform that lets the siding move freely around the fastener assembly.
How do you run speaker wire through vinyl siding without damaging it?
Drill a clean hole through the siding and sheathing at a slight upward angle — about 10 degrees — so water naturally drains outward rather than inward if it enters the passage. Insert a waterproof rubber grommet into the hole before routing the wire through it, then apply exterior silicone caulk around the grommet perimeter to complete the weather seal. Never rely on caulk alone without a grommet, because wire movement over time will break the caulk bond.
What size screws should I use to mount speakers to vinyl siding?
Use 3-inch stainless steel exterior structural screws that pass through the vinyl, housewrap, and sheathing and penetrate at least 1.5 inches into the wood stud behind them. Shorter screws that only bite into sheathing will pull free under the constant torque load that a speaker bracket creates. Never use drywall screws or zinc-plated fasteners outdoors — both corrode rapidly and lose holding strength within one or two seasons of moisture exposure.
Do I need an electrician to install outdoor speakers?
For passive speakers connected to an interior amplifier by speaker wire, most homeowners complete the installation without an electrician as long as the wire run doesn't require a new dedicated circuit. If your setup includes powered outdoor speakers that need a dedicated 120V outdoor outlet, a licensed electrician must install that outlet to meet residential code requirements. Always check local permit requirements before starting any exterior electrical work on your home.
Key Takeaways
- Always anchor speaker mounts to wall studs through a vinyl siding mounting block — never drive fasteners directly into the siding panels themselves.
- Use stainless steel fasteners and waterproof grommets at every wire entry point to prevent corrosion and water infiltration into the wall cavity.
- DIY hardware for a two-speaker installation costs $60–$115, making proper mounting one of the most cost-effective decisions in the entire outdoor audio project.
- Match your mounting height, speaker angle, and coverage pattern to your specific use case — patio dining zones and pool decks have fundamentally different audio distribution requirements.


About William Murphy
William Murphy has worked as a licensed general contractor in Fremont, California for over thirty years, specializing in outdoor structures, green building methods, and sustainable design. During that career he has written about architecture, construction practices, and environmental protection for regional publications and trade outlets, bringing technical depth to subjects that most home improvement writers approach only from a consumer perspective. At TheBackyardGnome, he covers outdoor product reviews, backyard construction guides, and sustainable landscaping and building practices.
You can Get FREE Gifts. Receive Free Backyard Items here. Disable Ad Blocker to get them all now!
Once done, hit anything below