How To Winterize Your Backyard – Your Complete Guide
by Simmy Parker
"Winter is coming…" - a phrase that some of us only like to hear when we're tuned into Game of Thrones. Otherwise, the coming of winter can be a rather depressing thought. Less daylight, more cold, and the burden of snow all lead to us staying indoors and cozying up in front of the TV. So, we've put together a complete guide on how to winterize your backyard, packed with information on winterizing the folowing:
- Your Shed
- Your Gazebo
- Fall Leaf Clean Up Tips
- Trees, Shrubs, and Gardens
- Patio Furniture and Lawn Equipment
- Your Pond
It all seems daunting, but it will save you a ton of labour and time when spring comes around again.
Contents
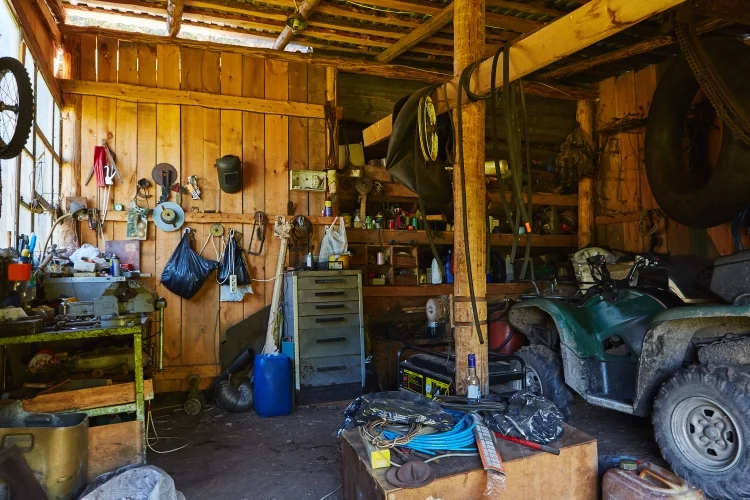
How To Winterize Your Shed
Your shed is the second house, the shelter that houses and protects your outdoor equipment from the elements. No matter what your shed is made from, it will require some preparation for winter. You will typically use your shed far less in the winter, and therefore might not notice seasonal damage. It is important to winterize the shed so it remains stable and sturdy during winter and is ready to serve you in the spring.
Firstly, it is wise to organize the shed and keep it tidy throughout the winter. Eliminate all garbage or broken pieces. Clutter will only frustrate you and attract critters. Your shed is storage for equipment that you use; it is not a graveyard. Another easy way to keep it tidy is by rolling up and securing each power cord to its according tool, and hanging these on wall hooks.
Secondly, Many small creatures will try to make a home in the shed if you don't seal it up properly. The first step is to sweep out all dust and cobwebs. Get rid of existing insects so they can't breed in your shed in the springtime. Sweep the floor, wipe down the shelves and equipment; you may even want to use bug poison. Creatures will try to get into your bags of potting soil, mulch, etc., burrowing there to make homes or use it for litter. You can prevent this by sealing off those packages and storing them inside garbage bags.
In step three, you must clean all garden tools and dry them thoroughly, then store them wrapped so they are clean and ready for spring.
Eliminate all flammable or poisonous fluids, like paint, thinner, or fuel. It is crucial you dispose of them properly, according to environmentally safe standards. Remove the oil and gas from the lawn mower and any other equipment. Cover the equipment with a tarp to prevent moisture and dust getting in. As for the garden hose, empty any remaining water inside, and roll it up for safe and proper storage.
After a thorough cleaning, check all crevices and apply caulking if necessary. Oil the door hinges and check all seals on windows and doors. If you intend to use winter tools, make sure you waterproof the floor by sealing it. Double check the roof's condition. Does it need rustproofing? Are there loose shingles? You can do all these steps over the course of a few days to ease the workload. Once it's done, your shed will be ready for winter, ensuring its longevity as well as that of the tools.
How To Winterize Your Gazebo

Of course, your gazebo is a permanent outdoor structure, but you can take some measures to ensure its longevity by strengthening it against the winter elements. Winter damage includes warping or splintering to the wood, due to the extreme change in temperatures. The cells in the wood absorb moisture and then expand and contract with temperature change. This can lead to cracking. Snow buildup is also a big problem in winter. No matter how sturdy your gazebo is, you should take all precautions to prepare it for the cold, snowy season. A little bit of extra preparation will go a long way, saving you money.
Firstly, remove all patio furniture. Please do not leave your furniture out in the snow. It will rust and rot. Take it into the shed or garage and cover with a tarp. Separate the cushions and wrap them in garbage bags or additional tarp, if you can. This will prevent little critters from burrowing into the cushions.
After the last leaf has fallen, sweep the gazebo floor and rake all leaves or twigs up. Keeping the space tidy will prevent extra rotting.
To ensure that pests don't hole up around the gazebo for winter, remove all cobwebs, and clean the spaces between the steps and benches. Once this is finished, give the whole thing a good hosing down to ensure all crevices are clean. You should scrub it a bit, too: with a soft-bristled brush, remove any mildew or algae buildup. (Never use a wire brush, as it will scratch your gazebo). You can clean with warm water and detergent.
Go through all hardware and ensure all screws are tightened.
Throughout the winter, you should regularly clear the roof of snow. Excessive snow buildup will end up as too much accumulated weight. The weight, combined with the moisture, will lead to rot and eventual roof collapse. An easy way to avoid snow build-up is by laying vinyl sheets before winter comes. The vinyl will seal the roof off from moisture while letting the snow slide easily.

Fall Leaf Clean Up Tips
Of course, the falling leaves in fiery reds, oranges, and yellows are a spectacular sight, and can reflect the sunshine in a magical way, creating a warm landscape to look at.
Leaves begin to fall in September, but continue to blanket the grass until late November. Raking leaves is such a chore, so why do we have to do it? Because they block sunlight from reaching the grass. Leaves carry moisture and when enough layers have built up, they become quite heavy and contribute to decay. Also, they get messy and can be tracked into the house. And guess what? If you leave them over the winter, they'll still be there when the snow melts. Be kind to yourself and divide up the work by raking the leaves up whenever you notice a thin layer accumulating. Don't leave it all to one rake-up at the end of the season.
If you really dread this chore, there are some ways around it. You can run a lawn mower over a thin layer of leaves, which will shred them and cause the pieces to fall between blades of grass. These leaf shreds will act as a fertilizer. Or, you can attach a grass-collecting bag to the mower and suck up the leaves that way, and simply dump the bag into your compost.
It is okay to leave some; you don't have to collect every last leaf, unless you are that meticulous about having a perfect lawn.
If you want a good tip for cleaning up your leaves, and want to avoid all the raking and bagging, you can try leaf shredding! Here's a video by Land Designs Unlimited that provides some useful info.
Winterizing Trees, Shrubs, & Gardens
Any potted outdoor plants will be done for the season, so it will be time to chuck them out and clean their pots. Terracotta and plastic potters are particularly vulnerable to winter weather, so you should store them in your basement, garage, or shed.
Annuals should be deadheaded to avoid the spread of plant disease. Perennial plant stems should be cut an inch or two from the ground, and the garden mulched. Trunks of deciduous trees should be wrapped with tree wrap by the beginning of November, by starting at the base of the tree and wrapping upward until you hit the first line of branches.
Shrubs should also be wrapped up, in order to prevent sunscald injury. It is important to water trees and shrubs into late fall, as long as the soil isn't frozen, so that they can enter dormancy with plenty hydration. All vegetables should be harvested before frost can do any damage.
Here's a great video provided by nature lover P. Allen Smith that talks in more detail about how to prepare your shrubs for winter temperatures.
Winterizing Patio Furniture & Lawn Equipment
You may be able to leave your furniture out-of-doors over the winter if it is made of wrought iron; however, be sure to cover it with a tarp or manufacturer's weatherproof cover.
Plastic furniture is relatively lightweight and can be brought indoors for the season. It would be wise to clean your patio furniture before storing it away, so that stains don't become permanent. This will also eliminate any bugs or spiders living in there.
Barbecues will typically come with a tarpaulin cover, and you will want to leave the propane tank out-of-doors, anyway. Portable grills should be moved into shelter. Try mixing motor oil with some sand and dipping your garden tools in there. This will clean and lubricate them for the next summer.
Hoses should always be disconnected, emptied, and put away for the winter season.
Check out this handy video by The KimSix Fix showing how to winterize a gas grill.
Winterize Your Backyard Pond
If you have a backyard pond, you must prepare it for winter to avoid freezing and subsequent damage. Remove anything that sticks out past the water's surface. Using a pond vacuum, remove all sludge and dead plants from the bottom of the pond. Lower all water plants below the freezing line.
If you have fish, and your pond is at least three feet deep, the fish will be able to hibernate in the pond. Begin to add fish vitamins to their food in September.
Do this every ten days, and continue through October or until temperatures drop below 8 degrees Celsius. It is important to maintain a carefully balanced gas exchange by running the pump by the surface of the pond, so that noxious gases can escape.
If your pond is 30 to 36 inches deep, you must insulate the surface with straw or Styrofoam, and a piece of plywood to cover the pond, while leaving some room for oxygen to get in. If the pond is less than 30 inches deep, fish must be kept indoors over winter.
When it comes to ponds, the Home Depot knows a thing or two about that. Watch their video about winterizing your pond for additional information.
 |
 |
 |
 |

About Simmy Parker
Simmy is an outdoor expert who loves to spend time in the wilderness. She received a BS degree in Civil Engineering at Sacramento State University, and has put her skills to use by helping design and build some of the most impressive structures in the world. However, Simmy's true passion lies in sharing her love of nature with others, and she spends much of her free time leading hikes and teaching people about the flora and fauna that can be found all around them.
Thoughts on "How To Winterize Your Backyard – Your Complete Guide"
|
|
|
|
Backyard Stuff
You can Get FREE Gifts. Receive Free Backyard Items here. Disable Ad Blocker to get them all now!
Once done, hit anything below
|
|
|
|