Last summer, a neighbor called me over after the corner post on his aging gazebo had started leaning so badly that nobody wanted to sit under it anymore. He'd already priced out repairs, but the frame was too corroded to save. If you're in a similar spot — or just ready for a change — knowing how to remove a gazebo the right way saves you time, prevents injuries, and protects the lawn underneath. This guide covers both soft top and hard top models from the first bolt to the last footing. You can also browse our complete gazebo removal resource hub for related tips and tools.
Gazebo removal isn't complicated, but it does require a plan. Rush it and you risk collapsing a frame section onto yourself, stripping bolts you'll need to chisel out later, or cracking a concrete footing you weren't expecting. Work section by section and most homeowners finish in a single afternoon with one helper.
It also helps to know exactly what type you're dealing with. Soft top gazebos use fabric or vinyl canopies over a lightweight metal or wood frame. Hard top models — like steel or aluminum panel units — are heavier and require more coordination during disassembly. Either way, the golden rule is the same: always work from the top down, and never touch the frame until the roof is completely off.
Contents
When Removing Your Gazebo Makes Sense
Gazebos don't last forever. Most soft top models hold up for five to ten years before the frame or canopy gives out. Hard top steel or aluminum units can last longer, but corrosion, shifting foundations, and storm damage all take their toll. According to Wikipedia's overview of gazebo structures, these open-sided shelters are meant to be semi-permanent — and sometimes full removal is the smartest move.
Here are the most common reasons homeowners choose removal over repair:
- Structural damage beyond fixing — bent or rusted posts, rotted wood, or a leaning frame that can't be safely straightened
- Preparing to sell your home — buyers often prefer a clean, open yard over an older structure they'd have to maintain
- Backyard redesign — swapping the footprint for a deck, patio, or open lawn
- Upgrading the structure — replacing with a newer, sturdier model or a different shelter type altogether
- Reclaiming the space — you simply don't use it anymore and want your yard back
If your canopy is the only problem and the frame is still solid, full removal may be premature. Check out this guide on how to replace a canopy on a gazebo before committing — a simple swap is often all you need.
What You Gain and Lose by Taking It Down
Removal is a permanent decision for most people. It's worth thinking through both sides before you grab a wrench.
| Factor | Removing the Gazebo | Keeping or Repairing It |
|---|---|---|
| Upfront cost | One-time labor; possible disposal fees | Repair materials and ongoing upkeep |
| Yard space | Full footprint reclaimed for anything | Footprint stays committed to the structure |
| Safety | Eliminates structural risk immediately | Risk remains if damage goes untreated |
| Resale appeal | Clean slate; buyers can plan their own space | May appeal to buyers who want built-in shade |
| Time investment | One afternoon of focused work | Seasonal upkeep every year going forward |
| Flexibility | Space open for a new project immediately | Layout locked in around the existing structure |
The right call depends on how much life your structure has left. A well-built hard top unit that just needs a new anchor bolt is worth keeping. A soft top frame with three bent legs and a torn canopy isn't. Be honest about what you're actually working with before you invest more time or money into it.
Pro tip: Before removing your gazebo, photograph every anchor point and frame connection. If you plan to install a new structure later, those photos save hours of guesswork on measurements and hardware sizing.
Step-by-Step: How to Remove a Gazebo
Before you start, pull together your tools: a cordless drill with screwdriver bits, an adjustable wrench, a rubber mallet, work gloves, and safety glasses. Have a helper lined up — you need one person stabilizing sections while the other unfastens hardware. Never attempt the frame stage alone.
Removing a Soft Top Gazebo
Soft top gazebos are the easier of the two. Most pop-up and semi-permanent soft tops use push-button connectors or slip-fit joints (a tube slides into a sleeve and locks with a pin). Here's the sequence:
- Remove the canopy first. Unzip or unclip the fabric panels starting with the roof section. Fold each piece as you go so it doesn't drag across the frame and tear.
- Detach the cross-braces. These horizontal bars run between posts near the top. Most are held by push-pins or small bolts — remove them before touching anything above.
- Take down the roof frame. If the top is a separate hub assembly, have your helper support it while you remove the final connectors. Don't let it drop.
- Remove the posts. Work on opposite corners first — this keeps the remaining frame balanced as you go.
- Pull the anchor stakes or unscrew the base plates. Most soft tops anchor with ground stakes or surface screws. A rubber mallet loosens stuck stakes quickly.
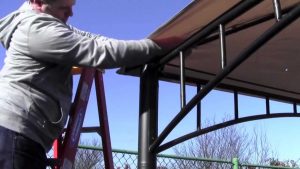
Removing a Hard Top Gazebo
Hard top gazebos — like those reviewed in our Elite Shade Titan overview — involve heavier roof panels and more fasteners. Budget extra time and bring a second helper if you can.
- Clear the roof panels first. Most hard tops have individual panels secured with screws along the ridge and eave. Remove one panel at a time and lower each to a helper standing below — never toss or drop them.
- Remove gutters and trim pieces if your model has them. These often hide additional bolts underneath that you won't see until the trim is off.
- Take off the ridge cap. This center piece holds the roof together — it comes off last in the roof stage.
- Disassemble the rafter arms. These are bolted to a central hub and to the top rail of each post. Unfasten the rafter-to-post connections first, then disconnect from the hub.
- Lower the top rail assembly. This is the heaviest part. Your helper stabilizes each section while you remove the bolts — don't let it swing free.
- Remove the posts. Hard top posts are usually bolted to anchor plates set in concrete. If the anchors are cast into a slab, you'll need a chisel or rotary hammer (a drill that chips and rotates at the same time) to free them.
Warning: Hard top roof panels are heavy and awkward. Always keep your helper clear of the drop zone — a falling panel causes serious injury. Gloves and steel-toed boots are not optional here.
Common Problems and How to Solve Them
Hardware and Canopy Issues
These are the problems you'll most likely hit early in the job:
- Stripped or rusted bolts — Apply penetrating oil and wait 15 minutes before trying again. A bolt extractor bit set removes most stripped heads cleanly; they're inexpensive and available at any hardware store.
- Canopy stuck to the frame — UV exposure and moisture can fuse fabric to metal grommets over time. Use a plastic pry tool instead of metal to avoid tearing the fabric if you plan to reuse or sell it.
- Frame joints that won't separate — Push-button connectors on aluminum frames sometimes seize with corrosion. Press the button fully while twisting the joint slightly — the rotation clears debris from the channel and releases the lock.
Footing and Anchor Problems
- Concrete footings — A rented rotary hammer makes this manageable. Score around the perimeter of the pad first, then work toward the center. For shallow pads, a cold chisel and sledgehammer get the job done without the rental cost.
- Anchor stakes that won't budge — Rock the stake back and forth while pulling straight up. Soaking the surrounding soil with water about 30 minutes before loosens packed earth and cuts your effort in half.
Smart Strategies That Make the Job Easier
Before You Start
- Label every piece of hardware. Use labeled zip-lock bags for each section's bolts and screws. If you're storing the gazebo or selling it, this one step saves hours of confusion later.
- Schedule a dumpster or bulk pickup in advance. Having a designated place for pieces as you remove them keeps your yard clear and the work moving forward.
- Pick a dry day. Wet metal and damp wood are slippery and harder to handle. Clear weather also makes rust spots and structural damage easier to spot.
During Disassembly
- Work from the outside in. Always remove perimeter connections before center ones. This prevents the structure from collapsing inward unexpectedly.
- Stack components flat and lean posts against a wall. A freestanding pile is a tipping hazard. Lay flat pieces on the grass and lean long posts against a fence as you remove them.
If you originally set up your gazebo on a tricky surface like pavers or a concrete slab, this guide on setting up a gazebo on grass, concrete, or pavers describes the anchor types in detail — which tells you exactly what tools you'll need to reverse the process.
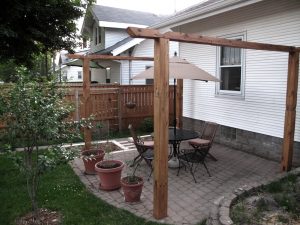
Planning Your Backyard After the Gazebo Is Gone
Removing a gazebo opens up real possibilities. The footprint you reclaim is often one of the best spots in the yard — flat, centrally located, and already prepared for use. Don't leave the space undefined. A clear plan before removal day means you can act on it immediately rather than letting the area sit as a patchy square of dead grass.
Here are the most popular options:
- Plant a garden bed — The cleared area often has compacted soil that benefits from aerating and fresh compost before planting; work the ground at least eight inches deep before you seed or transplant
- Lay a simple patio — Pavers or gravel fill the footprint cleanly and require minimal prep if the ground is already level from the gazebo base
- Install a pergola — A pergola gives you overhead structure without the enclosed feel of a gazebo; if you go this route, read up on how to winterize your pergola before the first cold season
- Replace with a newer gazebo model — If you want shade in the same spot, a fresh hard top unit like the ones covered in our Sunjoy Chatham review offers better longevity than most older soft tops
- Return it to open lawn — Seed or sod the area and give it one full growing season with regular watering to fully establish
Also think through material disposal before the job starts. Steel and aluminum frames are accepted at most metal recycling facilities — call ahead to confirm. Treated lumber may have specific disposal rules depending on your municipality, so check with your local waste authority before tossing it in a dumpster.
Frequently Asked Questions
How long does it take to remove a gazebo?
Most soft top gazebos take two to four hours with one helper. Hard top models with concrete anchors can take four to six hours, especially if you need to break out footings with a rotary hammer.
Do I need a permit to remove a gazebo?
In most areas, no permit is required for removal. However, if your gazebo was permitted when installed or is attached to a permanent structure, check with your local building department before you start work.
Can I remove a gazebo by myself?
You can handle prep work solo, but you need at least one helper for the frame stages. Hard top roof panels are too heavy and awkward to safely manage alone — don't attempt it.
What do I do with the old gazebo parts?
Steel and aluminum frames go to metal recycling facilities. Fabric canopies go in regular trash. Concrete anchor pads can be broken up and disposed of as bulk waste — confirm your city's rules before hauling them to the curb.
How do I remove concrete anchor footings?
A rented rotary hammer makes short work of shallow pads. Score around the perimeter with a cold chisel and sledgehammer first, then break toward the center. Each footing typically takes 30 to 45 minutes depending on depth and thickness.
Will removing a gazebo damage my lawn?
Expect some compaction and bare spots where the posts and base plates sat. Loosen the soil with a garden fork, add fresh topsoil, and reseed. Most lawns recover in four to eight weeks with consistent watering.
What is the main difference between removing a soft top versus a hard top gazebo?
Soft top models are lighter and faster to take apart — most use push-button or slip-fit joints that require no special tools. Hard top models have heavy roof panels bolted to a steel or aluminum frame, which requires more tools, at least one helper, and careful coordination during every stage of disassembly.
Key Takeaways
- Always work top-down — remove the canopy or roof panels completely before touching the frame or anchor points.
- Hard top gazebos require more tools and at least one helper; never attempt to lower roof panels alone.
- Stripped bolts and stuck concrete footings are the two most common roadblocks — penetrating oil and a rented rotary hammer solve both.
- Plan what comes next before removal day so you can act on the reclaimed space right away instead of leaving a bare patch of ground.


About Simmy Parker
Simmy Parker holds a Bachelor of Science in Civil Engineering from Sacramento State University and has applied that technical background to outdoor structure design, landscape planning, and backyard improvement projects for over a decade. Her love for the outdoors extends beyond design — she regularly leads nature hikes and has developed working knowledge of native plants, soil conditions, and sustainable landscaping practices across Northern California. At TheBackyardGnome, she covers backyard design guides, landscaping ideas, and eco-friendly outdoor living resources.
You can Get FREE Gifts. Receive Free Backyard Items here. Disable Ad Blocker to get them all now!
Once done, hit anything below