Installing a sunken patio is a direct process: excavate the area to the target depth, frame the perimeter with retaining walls or edging, compact a gravel sub-base, and lay your chosen surface material. If you're looking for a clear, step-by-step breakdown of how to install a sunken patio into grass or raw ground — including tools, materials, and the exact order of operations — this guide covers every phase. For a broader look at outdoor surface planning, start with our patio installation guide.
The appeal of a sunken patio goes well beyond aesthetics. Dropping the patio level below the surrounding grade creates natural wind protection, adds privacy without requiring a fence, and gives the space a defined, room-like quality that a flat patio simply can't deliver. It's the outdoor equivalent of a conversation pit — and it adds genuine value to a backyard, both functionally and at resale.
This project is achievable without professional experience if you're comfortable with physical excavation and understand basic drainage principles. The critical variables are accurate depth planning, proper drainage design, and a well-compacted sub-base. Nail those three things and the surface installation is the easy part. Here's how to do it right.
Contents
How to Install a Sunken Patio Step by Step
The full process breaks into four phases: planning, excavation, base preparation, and surface installation. Each phase builds on the one before it. Skipping steps — especially in base preparation — leads to surface movement, cracking, and drainage failures within a few seasons. Work through the sequence and you'll build something that lasts decades.
Planning and Layout
Define the patio footprint with marking paint, stakes, and string lines before any digging starts. Standard sunken patios drop 18 to 36 inches below grade — even a 12-inch drop creates a meaningful sense of enclosure. Confirm these details before excavation:
- Call 811 (USA) or your local utility locating service to mark underground lines — this is a legal requirement in most states and must be done 48 to 72 hours before digging
- Measure the total patio area and calculate material quantities, adding 10% for waste and cuts
- Identify where water will exit the patio — every sunken design needs a clear drainage route
- Check local permit requirements — excavations past a certain depth or retaining walls over 30 inches often require approval
- Choose your retaining wall material: timber, concrete block, natural stone, or steel edging
Your depth determines your soil removal volume. A 20×20-foot patio at 24 inches deep means removing roughly 30 cubic yards of material — that's three to four full dump truck loads. Arrange disposal before the first shovel goes in the ground.
Pro tip: Always confirm utility line locations before digging. Gas, electric, and water lines can run within 12 inches of the surface in residential yards, and striking one creates a serious safety hazard.
Excavation
For most residential projects, a rented mini excavator or compact track loader is far more practical than hand digging. A machine that fits through a standard gate opening handles bulk excavation in hours, not days. Budget $250–$450 per day for the rental — it's one of the best investments in the project.
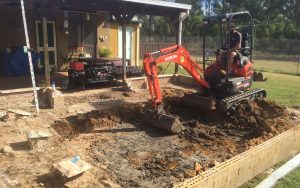
Excavate to your target depth plus an additional 6 to 8 inches for the gravel sub-base. Keep the excavation walls as vertical as possible — this makes retaining wall installation cleaner and reduces the risk of wall footing erosion. Check depth at multiple points with a level and tape measure as you go. Consistency matters here.
Once the floor is excavated, compact the exposed soil with a plate compactor. Loose, uncompacted subsoil shifts under load. That movement telegraphs directly to the surface as cracking and uneven settling. Run the plate compactor in overlapping passes across the entire floor before moving to the next phase.
Drainage and Sub-Base
Drainage is the most critical technical element of the entire project. Because water naturally flows toward low points, a recessed patio will accumulate runoff unless you route it away deliberately. Your three main options:
- French drain: A perforated pipe buried in crushed gravel at the patio's lowest point, routed to daylight, a dry well, or a rain garden
- Center drain with catch basin: A square or round drain cover connected to a solid drainage pipe — cleaner looking and easier to maintain in smaller patios
- Permeable paving: Open-joint flagstone, permeable pavers, or gravel that lets water pass through the surface directly into the sub-base below
After installing your drainage solution, add 6 to 8 inches of compacted crushed gravel — 3/4-inch clean crush or road base aggregate both work well. Spread and compact in 2-inch lifts. Never dump the full depth at once and compact once; the base won't achieve adequate density. This layered compaction is what separates a stable patio from one that shifts.
Warning: Skipping proper sub-base compaction — or laying the full gravel depth without staged lifts — is the single most common reason sunken patios crack and settle within a few seasons. There are no shortcuts here.
Laying the Surface Material
Once the base is solid, level, and graded toward the drain, you're ready for the finish surface. The process varies by material:
- Concrete pavers: Lay over a 1-inch bedding sand layer, tap level with a rubber mallet, sweep polymeric sand into joints, then compact the finished surface
- Natural flagstone: Set in a mortar bed for permanence, or dry-laid in sand for easier adjustment — dry-laid also drains better
- Poured concrete: Requires forming, rebar grid, and a clean pour — this is a skilled trade and generally not a first-time DIY job
- Decomposed granite or gravel: Spread over a compacted base and contained with edging — the fastest and least expensive option
Work from one corner and check level frequently as you go. Build in a consistent pitch of 1/8 inch per foot toward your drain. That slight slope is intentional — it moves water off the surface and into your drainage system before it can pool.
Where a Sunken Patio Works Best
Not every property is a good candidate. Knowing which yard conditions favor a sunken patio design helps you decide whether to move forward and how to approach the project engineering.
Flat Yards and Open Lawns
Flat properties benefit most from this design. When there's no natural grade change, a yard can feel exposed and featureless. Dropping a patio section 18 to 24 inches creates immediate visual interest and a defined outdoor living zone where none existed before. The excavated soil can be mounded around the perimeter to reinforce the enclosed feeling without additional retaining structures.
Flat lawns also make the excavation more predictable. You're working with a consistent soil profile and don't have to manage drainage redirections across multiple grade transitions. According to general hardscape design principles, level surfaces provide the most reliable foundation for permanent outdoor structures precisely because they eliminate lateral water pressure variables.
Sloped or Uneven Ground
A gently sloped yard can work with a sunken patio, but it demands more planning. On a slope, one side of the excavation sits deeper than the other — meaning taller retaining walls on the uphill side and more complex drainage to manage surface runoff flowing toward the recessed area from higher ground.
Slopes greater than 10% grade are not good candidates for DIY sunken patios. At that pitch, retaining wall engineering becomes complex, soil pressure calculations matter, and a wall failure can damage property or injure people. On steep sites, hire a licensed landscape contractor rather than guessing at the engineering.
Size and Shape Considerations
Most residential sunken patios run between 200 and 400 square feet — large enough for a full seating group and a fire feature, but small enough to excavate and drain without major infrastructure. Shapes are flexible: rectangular layouts are the easiest to build and edge, but circular or curved designs are achievable with flexible steel edging or curved concrete block.
Whatever shape you choose, build in a minimum of 3 feet of clearance between seating and the retaining walls on each side. A patio that's technically large enough on paper but feels cramped against its walls defeats the whole purpose of the design. Plan the furniture layout before you finalize the dimensions.
Keeping Your Sunken Patio in Good Shape
A well-built sunken patio is durable and low-maintenance — but low-maintenance is not zero-maintenance. The three areas that need routine attention are your drainage system, the surface and joints, and the retaining walls.
Drainage Maintenance
The drainage system is the component most prone to failure over time. Debris, root intrusion, and sediment buildup can compromise flow capacity and turn a functional patio into a standing-water problem. Here's what to do routinely:
- Clear leaves and debris from drain covers after every major storm
- Flush French drain pipes with a garden hose once a year to check for blockages
- Check the surface pitch after freeze-thaw cycles — frost heave can alter grade and cause pooling
- Watch for standing water after rain — any pooling that doesn't clear within an hour signals a drainage issue
Tip: Install a removable drain cover with a filter basket — it takes 10 seconds to clear after a storm and prevents the vast majority of sediment blockages before they become pipe problems.
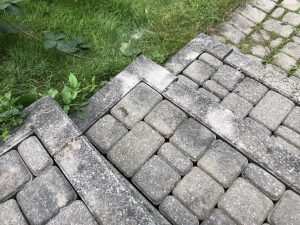
Surface and Joint Care
For paver patios, the polymeric sand in the joints is what holds everything stable. It erodes and washes out over time, leaving open joints that allow weeds to root and pavers to shift laterally. Reapply polymeric sand every two to three years, or whenever joints become visibly hollow. Seal concrete pavers every three to four years with a penetrating sealer to protect against moisture absorption and surface staining.
Natural flagstone patios benefit from occasional re-mortaring on mortar-set joints and active weeding for dry-laid installations. A stiff brush and diluted bleach solution clears algae and mildew — a common issue in shaded sunken patios where moisture lingers longer than it does on exposed surfaces.
Seasonal Inspections
The most important maintenance window is early spring, after freeze-thaw cycles have finished their work. Inspect for these specific issues:
- Shifted or heaved pavers that create trip hazards
- Retaining wall movement — lean, bulge, or hairline cracking in the face
- Mortar joint deterioration between flagstones
- Soil erosion at the base of retaining walls, which can undermine the footing over time
Catching problems in early spring costs almost nothing to fix. A single shifted paver reset with a rubber mallet takes five minutes. Left unaddressed for two or three seasons, the same problem can spread to require partial surface reconstruction.
DIY vs. Hiring a Contractor
The honest answer is that it depends on your project's scale and site conditions. Most homeowners with physical capacity and basic tool experience can install a small sunken patio themselves. But specific variables tip the balance toward hiring a professional.
What DIY Can Handle
You're in solid DIY territory when:
- The patio footprint is 300 square feet or less
- The drop depth is 24 inches or less
- Your yard is relatively flat (under 5% slope)
- You're using pavers, gravel, or decomposed granite — not poured concrete
- You're comfortable renting and operating a plate compactor and compact excavator
The physical work is demanding. Expect two to three full days of hard labor for a 200-square-foot project, even with equipment. The skill ceiling is manageable — drainage and base compaction are where DIYers most often cut corners, so give those steps the time they deserve. For broader context on how outdoor construction projects are typically scoped and priced, our look at outdoor addition costs covers the variables that affect budget across different project types.
When to Hire a Pro
Hire a licensed landscape contractor when any of these apply:
- Your slope exceeds 8–10% grade
- The patio is larger than 400 square feet
- You're using poured concrete (forming and finishing concrete is a skilled trade)
- Your soil is expansive clay with high shrink-swell movement, which requires engineered drainage
- You're near a property line where retaining wall failure could affect a neighbor's yard or structure
Get three quotes and ask specifically about the drainage design in each proposal. That's where low bids typically skip critical steps. A contractor who can't explain exactly how water exits the patio isn't the right hire.
Cost Comparison by Surface Material
| Surface Material | Materials Cost (per sq ft) | DIY Difficulty | Drainage Performance | Expected Lifespan |
|---|---|---|---|---|
| Concrete pavers | $8–$15 | Easy | Good (with joints) | 25–50 years |
| Natural flagstone | $15–$30 | Moderate | Excellent (dry-laid) | Indefinite |
| Poured concrete | $6–$12 | Difficult | Fair (needs slope) | 20–30 years |
| Decomposed granite | $3–$8 | Very easy | Excellent | 5–10 years (refreshable) |
| Brick | $10–$20 | Moderate | Good | 25–40 years |
Labor adds $15–$30 per square foot on top of materials for most contractors. A professionally installed 300-square-foot paver patio runs $7,000–$13,500 in most U.S. markets, depending on retaining wall complexity and local labor rates.
Expert Tips for a Flawless Finish
The gap between a sunken patio that holds up for decades and one that needs repair within a few seasons usually comes down to a handful of details. These are the ones that make the biggest difference.
Drainage and Grading Tips
- Pitch the surface exactly 1/8 inch per foot toward your drain — less and water pools, more and furniture feels tilted underfoot
- Install a cleanout access cap on French drain pipes so you can flush them from above without digging
- Size your drain for the maximum rainfall intensity in your area, not the average — undersized drains overflow during heavy storms when you need them most
- Route drainage overflow to a planted rain garden or a dry creek bed rather than directing it to a neighbor's property or the street
Material Selection Tips
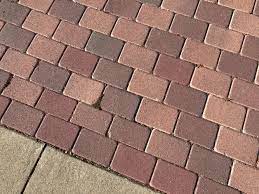
Choose your surface material based on how the space will actually be used, not just how it photographs. High-traffic areas need durability. Shaded patios need surfaces that resist algae and stay slip-resistant when wet. Here's what works in each scenario:
- High traffic, kids, pets: Textured concrete pavers — durable, slip-resistant, and individual units can be replaced without tearing out the full surface
- Formal entertaining: Natural bluestone or limestone flagstone — refined appearance and effectively indefinite lifespan
- Shaded locations: Avoid smooth polished stone finishes — they become dangerously slippery when wet. Use tumbled or honed textures instead
- Budget builds: Decomposed granite or pea gravel installed over a compacted base — laid in a weekend and refreshable every few years for minimal cost
Finishing and Edging Tips
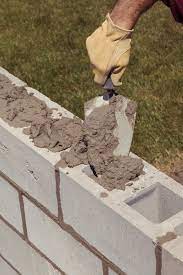
The retaining walls and step transitions are the most visible design element of your finished patio — they frame the space and set the visual tone. A few details here make a significant difference in the final result:
- Use the same material for retaining walls and paving surface for a cohesive, intentional look that reads as designed rather than assembled
- Build steps at a comfortable rise-to-run ratio: a 6-inch rise with a 12-inch tread run is standard, comfortable, and safe
- Rough-in conduit for step lighting during construction — adding recessed riser lights after the fact means breaking up finished work
- Leave at least 12 inches of planting depth at the top of retaining walls — softening walls with grasses, perennials, or trailing plants integrates the patio into the landscape
Once the hardscape is finished, think about what you'll add to the space. A fire feature transforms a sunken patio for evening use — see our detailed Iron Embers chiminea review for an in-depth look at one of the most popular choices for recessed outdoor living spaces.
Frequently Asked Questions
How deep should a sunken patio be?
Most residential sunken patios drop 18 to 36 inches below surrounding grade. A 12-inch drop is the practical minimum for any noticeable sense of enclosure, while depths beyond 36 inches require engineered retaining walls and more complex drainage systems. For a DIY project, 18 to 24 inches is the sweet spot — deep enough to feel intentional, manageable enough to build without professional engineering.
Do I need a permit to install a sunken patio?
Permit requirements vary by municipality, but many jurisdictions require permits for excavations deeper than 18 inches or for retaining walls taller than 30 inches. Check with your local building department before starting. Some areas also require a drainage plan if your project alters natural water flow across property lines.
What is the best drainage solution for a sunken patio?
For most residential projects, a center catch basin connected to a 4-inch solid drainage pipe routed to daylight is the most reliable and easiest to maintain option. French drains work well for larger patios and areas where running a pipe to daylight isn't practical. Permeable paving is a strong supplement but shouldn't be your only drainage strategy in regions with heavy rainfall events.
Can I install a sunken patio on a sloped yard?
Yes, but slopes above 8–10% significantly increase project complexity. On a slope, the uphill retaining wall will be taller and bear more lateral soil pressure, and drainage design must account for surface runoff flowing toward the excavation from higher ground. Slopes under 5% are manageable for experienced DIYers. Steeper grades warrant a professional contractor with retaining wall engineering experience.
How long does it take to build a sunken patio?
A 200 to 300 square foot paver patio takes most DIY teams two to three full days — one day for excavation and base prep, one to two days for surface installation. That assumes you're renting a compact excavator and plate compactor. Professional crews typically complete the same project in one long day or two standard workdays depending on access and material delivery timing.
How do I prevent weeds from growing through my sunken patio?
Lay a non-woven geotextile landscape fabric over the compacted sub-base before adding bedding sand — it blocks weed growth from below while still allowing water to drain freely. For joints, polymeric sand is far more effective than regular jointing sand at preventing weed germination. Reapply polymeric sand every two to three years as it gradually breaks down and washes away.
Next Steps
- Call 811 (or your local utility locating service) to schedule underground line marking before any excavation — this is legally required in most U.S. states and must be booked 48 to 72 hours in advance.
- Contact your local building department to confirm permit requirements for your intended depth and retaining wall height — a 10-minute phone call prevents costly project delays.
- Measure and stake your patio footprint, calculate the volume of soil you'll need to remove, and arrange for disposal before excavation day so you're not paying equipment standby time while a truck is scheduled.
- Choose your surface material and drainage solution using the cost and difficulty comparison table in this guide — lock in these decisions before renting equipment so you can order materials and have them on-site when you need them.
- Reserve a compact excavator and plate compactor from your local equipment rental yard for your build weekend — call ahead to confirm availability and ask about delivery options if you don't have a trailer.


About Simmy Parker
Simmy Parker holds a Bachelor of Science in Civil Engineering from Sacramento State University and has applied that technical background to outdoor structure design, landscape planning, and backyard improvement projects for over a decade. Her love for the outdoors extends beyond design — she regularly leads nature hikes and has developed working knowledge of native plants, soil conditions, and sustainable landscaping practices across Northern California. At TheBackyardGnome, she covers backyard design guides, landscaping ideas, and eco-friendly outdoor living resources.
You can Get FREE Gifts. Receive Free Backyard Items here. Disable Ad Blocker to get them all now!
Once done, hit anything below