Last spring, after spending an hour washing my motorcycle, I grabbed a chamois and worked every surface I could reach — only to find white mineral rings circling every chrome piece and brake caliper two hours later. That single afternoon convinced me there was a better way. If you want to dry motorcycle with leaf blower and never deal with water spots again, this guide gives you everything you need to do it right. If you've already read our article on how to dry your car with a leaf blower, you'll recognize the core concept — but motorcycles come with their own set of challenges that make the technique worth understanding on its own terms.
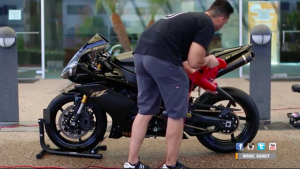
Motorcycles are uniquely difficult to dry by hand. Unlike a car's broad, flat panels, your bike is an architecture of tight spaces — engine fins, wheel spokes, fairing edges, chain links, and instrument clusters — where water collects and hides. A microfiber cloth handles open surfaces reasonably well, but it physically cannot reach inside those gaps. A leaf blower doesn't have that limitation. It blasts air into every corner and forces water out before it has a chance to evaporate and leave mineral deposits behind.
You don't need to buy specialized equipment to make this work. The leaf blower already sitting in your garage is almost certainly powerful enough. What you need is the right approach, an awareness of the machine's limitations, and about ten minutes of focused effort. This guide covers the full process — from choosing the right blower to executing a clean, spot-free dry on every inch of your bike. For comprehensive guidance on caring for your motorcycle, visit our motorcycle care guides.
Contents
Why Water Spots Are Your Motorcycle's Worst Enemy
What Happens When Water Sits on Metal and Chrome
Water itself isn't the problem. The minerals dissolved in your tap water are. When water evaporates from a surface, it leaves behind calcium, magnesium, and silica — the same compounds that build scale in your kettle and your showerhead. On a motorcycle's chrome exhaust, polished aluminum engine covers, or painted tank, these minerals bond to the surface over time and become progressively harder to remove. Early deposits wipe off with a damp cloth. Old deposits require dedicated chemical removers and real effort, and in severe cases they etch permanently into clearcoat.
This is why the drying step matters as much as the washing step. You can use premium soap, filtered rinse water, and a careful hand — but if you leave the bike to air dry, you're partially undoing that effort every single time. The goal isn't just surface appearance. Repeated mineral accumulation on bare metal surfaces — especially around bolts, clamps, and brake components — accelerates surface corrosion that shortens the life of those parts.
The Science Behind Mineral Deposits
According to Wikipedia's overview of hard water, water hardness is measured by the concentration of dissolved calcium and magnesium ions. In areas with hard water, a single rinse can leave a significant mineral load on any surface. Motorcycles are particularly vulnerable because they expose more metal surface area per square foot than most vehicles — and much of that metal sits in direct sun, which accelerates evaporation and concentrates deposits faster. Removing water physically before evaporation begins is the most reliable prevention strategy. A leaf blower makes that physically possible in ways that cloth drying simply cannot match.
Choosing the Right Leaf Blower for the Job
Electric vs. Gas: Which Works Better
Both electric and gas-powered leaf blowers work for drying a motorcycle. The choice depends on what you already own and where you wash your bike. Corded electric blowers are lightweight and generate no exhaust fumes — an important detail if you're working in a garage or enclosed space. Cordless battery-powered models offer full mobility, and modern units deliver performance that rivals entry-level gas models. Gas-powered blowers produce the highest airflow, but exhaust fumes are a real concern indoors, and the weight adds fatigue over a ten-minute drying session.
For most riders, a mid-range cordless electric blower is the practical sweet spot — easy to maneuver, powerful enough for the job, and safe to use in any environment. If you're still in the market, our detailed roundup of the best leaf blowers compares top models across every price point and use case.
CFM and MPH: The Specs That Matter
Two numbers define a leaf blower's drying effectiveness. CFM (cubic feet per minute) measures the volume of air the blower moves. MPH measures the velocity of that air. For motorcycle drying, you need a balance of both. High MPH drives water out of tight gaps — between cooling fins, inside wheel spokes, around brake calipers. High CFM sweeps water off large flat surfaces quickly. A blower rated at least 400 CFM and 90 MPH handles a full motorcycle comfortably. Below those thresholds, you'll make multiple passes without complete results.
| Blower Type | Typical CFM | Typical MPH | Suitability for Motorcycles | Key Consideration |
|---|---|---|---|---|
| Corded Electric | 350–500 | 90–130 | Good | No fumes; limited by cord length |
| Cordless Battery | 400–600 | 90–150 | Excellent | Most versatile; runtime 20–40 min |
| Gas-Powered (Handheld) | 500–800 | 150–200 | Good (outdoors only) | Powerful but heavy; exhaust fumes |
| Backpack Gas | 600–1000 | 170–220 | Overkill / Outdoor Only | More power than needed; exhaust risk indoors |
The Honest Trade-offs of This Method
Clear Advantages
Using a leaf blower to dry your motorcycle delivers several concrete benefits over traditional towel drying. It reaches places that cloth cannot — inside wheel spokes, between cooling fins, around brake caliper pistons, and under fender edges. It's also faster. A complete towel dry of a motorcycle takes 20–30 minutes of careful work. A blower pass takes 8–12 minutes and is more thorough. And there's no contact with the paint or clearcoat. Every time you drag a cloth across a surface, you risk introducing fine scratches — even with a quality microfiber. Airflow eliminates that risk entirely.
Finally, it handles post-rain drying in a way that towels simply cannot. When the entire bike is saturated from riding through rain — including water that's pushed into electrical connectors and seal gaps at road speed — a thorough airflow dry is the only practical method short of disassembly.
Real Limitations
This technique has genuine limitations you should understand before committing to it as your only drying method. A leaf blower moves water — it doesn't absorb it. On large flat surfaces like a tank or fairing, you push water to the edges, where it can run down onto areas you've already dried. Technique matters. You also need to follow up on a few specific spots with a dry microfiber: mirrors, instrument clusters, and any areas with rubber seals benefit from a light pat-dry to prevent water from seeping into seams under air pressure.
There's also the noise factor. A gas blower running in a residential driveway early in the morning makes you an unpopular neighbor fast. Battery models are significantly quieter and the considerate choice for early sessions. Neither type replaces a microfiber entirely — think of the blower as doing 90% of the work, with a quick cloth pass finishing the remaining detail areas.
Best Practices for a Safe, Flawless Dry
Distance and Angle
Keep the blower nozzle 6–12 inches from the surface and angle it so you're pushing water off the bike, not onto sections you've already dried. Work top to bottom and front to back. Start at the highest point — usually the mirrors or instrument cluster — and let water flow downward naturally with gravity on your side. Never point the airstream directly into an opening like an air intake, a carburetor vent, or an open fuel cap. Forcing water deeper into the bike defeats the purpose and can introduce moisture into areas that are difficult to reach afterward.
Use a concentrator nozzle when you have one. The narrow opening increases air velocity significantly and gives you precise control when working around intricate components like engine fins or the chain and sprocket area.
Protecting Vulnerable Components
Most modern motorcycles are built to handle rain and road spray, so a leaf blower won't damage sealed electrical components under normal use. That said, a few areas deserve extra attention. Instrument clusters with older analog gauges sometimes have imperfect seals — angle airflow across them rather than directly at them. Avoid blasting air directly into spoke nipples on wire-spoked wheels, as this can drive water into the nipple threads where corrosion begins. On chain-drive bikes, follow the chain area with a light application of chain lubricant after drying, since high-velocity air strips residual lubricant along with the water. These are small habits that add up to meaningful long-term protection.
Step-by-Step: How to Dry Your Motorcycle with a Leaf Blower
Preparation
Before you switch the blower on, make a few quick preparations. Confirm the fuel cap is closed and seated firmly. Close any storage compartment lids. If your bike has a center stand, use it — it gives you access to both sides and the underside without repositioning repeatedly. Set your blower to medium-high power. Full power isn't always necessary, and moderate airflow gives you better control in tight areas like the engine bay and fork legs.
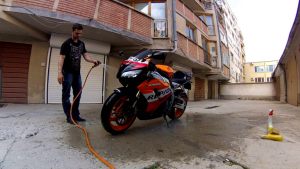
Do a final rinse of the entire bike with clean water immediately before you start. This sounds counterintuitive, but clean water sheets off more completely than droplets sitting on a partially dried or soapy surface. It also ensures any remaining soap residue doesn't concentrate into a deposit of its own as the water evaporates.
The Drying Sequence
Follow this sequence for a complete, efficient dry that covers every surface in the right order:
- Windscreen and instrument cluster first. These dry fast and need to be done before water from higher spots runs down onto them. A quick 30-second pass is all they need.
- Tank and seat. Sweep in long strokes, pushing water toward the rear of the bike. Keep the nozzle moving — don't dwell in one spot.
- Engine area. Switch to the concentrator nozzle here. Work around the fins slowly, letting air penetrate each gap. This is where most water hides and where mineral deposits do the most damage.
- Wheels and brakes. Spin each wheel slightly and blow across the spokes. Target the rotor and caliper area — water that sits on a rotor causes rust spots that affect brake feel.
- Chain and sprocket. Short, directed bursts to displace water, then apply fresh chain lubricant before the bike cools.
- Exhaust. Blow across — not into — the outlet. Residual water in the exhaust burns off harmlessly on first startup.
Finish with a single slow pass over the entire bike at medium distance to catch any water that migrated during the sequence. Then do a visual scan — remaining water beads are easy to spot against a nearly dry surface. A single microfiber pat on mirrors, seal edges, and the instrument display completes the job cleanly.
When This Technique Makes the Most Sense
After Your Regular Wash
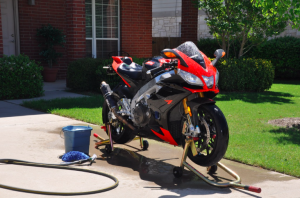
The most common application is straightforward: you've just washed your motorcycle and want to prevent water spots. This is where the technique pays off most visibly. The difference between a towel-dried bike and a blower-dried bike is clearest on chrome, polished aluminum engine covers, and dark paint — surfaces that show mineral deposits immediately. Integrating the blower into your regular post-wash routine transforms a 30-minute chore into a 10-minute one, and the results are consistently cleaner than any cloth-based approach.
This method also pairs naturally with spray detailer products. After the blower removes bulk water, a light mist of quick detailer on flat surfaces and a single wipe with a clean microfiber delivers a showroom-quality finish in under 15 minutes total. If you're the kind of person who takes pride in a well-maintained outdoor space — whether that means investing in a quality fire pit setup for your backyard or keeping your motorcycle in top condition — this process fits naturally into that same approach to caring for what you own.
Post-Ride in the Rain
Rain-soaked bikes present a different challenge than wash-soaked ones. After a wet ride, water has been driven into every seal, gap, and joint by road speed and spray. Toweling the exterior doesn't address water that's penetrated into instrument seals, seat hinges, and storage compartment edges. A thorough blower dry reaches those areas. It's also faster, which matters after a long wet ride when you'd rather not spend another 30 minutes in the garage before you call it a night.
Post-rain drying also carries a practical benefit for your electrical system. Moisture that lingers in connector housings causes corrosion and intermittent electrical faults that develop slowly and are frustrating to diagnose. A focused airflow dry after every wet ride is meaningful preventive maintenance — the kind of consistent habit that keeps a bike reliable for years longer than average. It costs you ten minutes and nothing else.
Frequently Asked Questions
Will a leaf blower damage my motorcycle's paint or clearcoat?
No — airflow alone does not damage paint or clearcoat. A leaf blower moves water without making contact with the surface, which actually makes it safer for your finish than dragging a cloth across the paint. The only meaningful risk is debris getting pulled into the airstream and striking the bike, so always run the blower in a clean area free of loose gravel, dirt, or dry plant material.
Do I need a special leaf blower, or will any model work?
Any leaf blower rated at least 400 CFM and 90 MPH handles a full motorcycle comfortably. You don't need a specialized or expensive model. A mid-range cordless battery blower is the ideal choice — powerful enough to displace water from tight spaces, quiet enough for residential use, and easy to maneuver around every part of the bike without a cord limiting your movement.
Should I still use a microfiber towel after the blower pass?
A light pat-dry on mirrors, instrument displays, and seat seam edges is worth doing after the blower finishes. The blower handles the vast majority of water removal, but these specific areas benefit from a final touch to pull moisture out of seams and prevent it from being pushed deeper under air pressure. For the rest of the bike, the blower alone produces a clean, spot-free result without any cloth contact needed.
Is it safe to blow air directly into the exhaust outlet?
Avoid pointing the airstream directly into the exhaust outlet. A small amount of water naturally enters the exhaust during washing or rain riding, and it burns off harmlessly on first startup. Forcing additional pressurized air in can push water further into the system than it would otherwise travel. Blow across the outlet at a shallow angle to dry the surrounding area instead, and let the engine handle the rest on startup.
Can I use this method after every single wash, or should I reserve it for special occasions?
Use it every time. It's faster than towel drying, produces more consistent results on complex surfaces, and eliminates the contact-scratch risk that cloth drying introduces over time. Once you integrate the blower into your post-wash routine, returning to towels alone feels unnecessarily slow and incomplete. The same approach works on your car — our guide on drying your car with a leaf blower covers the full four-wheel process with the same level of detail.
Next Steps
- Check the CFM and MPH specs on your current leaf blower — if it falls below 400 CFM or 90 MPH, review our best leaf blowers guide to find a model that handles both yard work and motorcycle drying without compromise.
- Do a test run after your next wash using the top-to-bottom, front-to-back sequence described in this guide, then compare the result to your previous towel-only approach on chrome and dark paint surfaces.
- Pick up a concentrator nozzle attachment if your blower didn't come with one — it makes engine fin and wheel spoke drying significantly more effective and reduces the time you spend on detail areas.
- After your next ride in the rain, follow the full drying sequence and then inspect all visible electrical connector housings for early corrosion. Catching it before it causes an electrical fault saves a frustrating diagnostic session later.
- Bookmark our motorcycle care guides section for additional techniques covering seasonal storage prep, detailing, and long-term paint protection that complement the drying routine you've just learned.


About Simmy Parker
Simmy Parker holds a Bachelor of Science in Civil Engineering from Sacramento State University and has applied that technical background to outdoor structure design, landscape planning, and backyard improvement projects for over a decade. Her love for the outdoors extends beyond design — she regularly leads nature hikes and has developed working knowledge of native plants, soil conditions, and sustainable landscaping practices across Northern California. At TheBackyardGnome, she covers backyard design guides, landscaping ideas, and eco-friendly outdoor living resources.
You can Get FREE Gifts. Receive Free Backyard Items here. Disable Ad Blocker to get them all now!
Once done, hit anything below