Wood Carving Tools for Beginners: A Starter Guide with How-To Videos
by William Murphy
More than 3 million Americans pick up a new woodworking hobby each year, and wood carving consistently ranks among the most accessible entry points — because all you need to begin is one sharp knife, a block of basswood, and a spare afternoon. Choosing the right wood carving tools for beginners is the single most consequential decision you'll make before your first cut. Buy the wrong kit and you'll fight your material every step of the way. Buy the right one and you'll have the foundation for a craft that rewards you for decades. Explore the full collection of project walkthroughs and buying guides on our wood carving guides page to go deeper after reading this overview.
Wood carving is one of those rare hobbies that is completely tactile. You're not staring at a screen — you're holding a real tool, reading the grain of real wood, and making something permanent with your hands. It fits naturally into an outdoor lifestyle too. Most carvers work on a porch, at a backyard workbench, or on a picnic table. The shavings stay outside, the lighting is better, and the whole process feels less like a chore and more like a ritual.
This guide walks you through everything in a logical order: the history behind the craft, the tools you actually need, what to make first, a straight comparison of starter kits, the core techniques that matter, the mistakes that stall beginners, and how to troubleshoot when a project stops cooperating. By the end, you'll know exactly what to buy and what to do with it.
Contents
- A Craft Older Than Written Language
- The Essential Wood Carving Tools for Beginners
- What You Can Make: Projects That Build Real Skills
- Starter Kits Side by Side: What to Buy First
- Techniques That Separate Good Carvers from Frustrated Ones
- Mistakes That Cost Beginners Hours of Progress
- Diagnosing Problems When Your Work Doesn't Look Right
- Frequently Asked Questions
A Craft Older Than Written Language
According to Wikipedia's overview of wood carving, the practice dates back at least 400,000 years — making it one of the oldest documented human crafts. Early carvings served practical purposes: tool handles, vessels, religious objects, and architectural ornaments. What began as a survival skill became fine art, folk tradition, and eventually the meditative weekend hobby millions of people practice today.
Every major culture on earth developed its own carving tradition. Scandinavian whittling produced the clean, minimalist figures that still influence modern woodcraft. Japanese netsuke carving turned tiny toggles into intricate miniature sculptures. West African and Pacific Island traditions gave the world bold, expressive masks and ceremonial totems. This breadth of tradition tells you something important: there is no single correct way to carve. Your tools, your wood choice, and your approach all depend on what you want to make.
For backyard hobbyists, wood carving sits at a natural intersection with outdoor décor and hands-on making. If you've ever admired the kind of bold sculptural pieces you'd find at shops that carry tiki sculptures and carved outdoor art, those styles are entirely learnable once you understand the fundamentals. The tools are portable, the process belongs outside, and a well-finished carved piece weathers beautifully in a garden or patio setting. This is a craft built for the kind of person who already loves being in their backyard.
The Essential Wood Carving Tools for Beginners
You don't need a workshop to start carving. The right set of wood carving tools for beginners fits in a small canvas roll bag and costs less than most power tools. But understanding what each tool does — and which ones to buy first — saves you from filling a drawer with equipment you'll never touch.
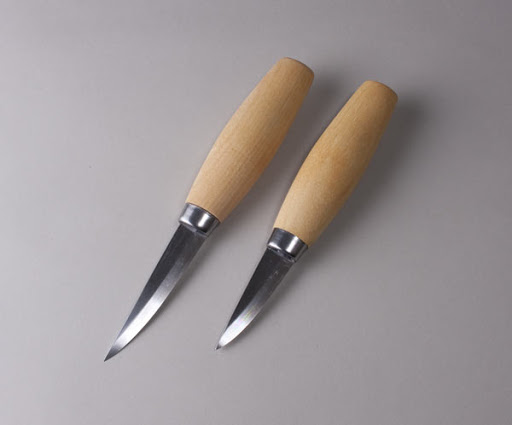
Carving Knives
A carving knife is the most essential tool you'll own. It handles the bulk of material removal on small projects and gives you the most tactile control over fine detail work. The blade is shorter and stiffer than a kitchen knife — usually between 1.5 and 3 inches — and made from high-carbon steel, which holds an edge longer than stainless and is easier to resharpen. Brands like Mora, Flexcut, and BeaverCraft produce reliable beginner knives at fair prices without sacrificing steel quality.
Most beginners benefit from starting with two knives: a detail knife for precision cuts and a slightly larger sloyd knife for bulk removal. The sloyd design originated in Scandinavian woodcraft tradition and remains one of the most versatile tools in any carver's kit. Start with these two, then add more as your projects demand them rather than buying a full set you're not ready for.
Gouges and Chisels
Once you move beyond basic whittling, gouges become indispensable. A gouge is a curved chisel that scoops wood rather than slicing it flat. The depth of the curve is described by its sweep number — a shallow sweep (2–3) removes thin material in wide arcs, while a deep sweep (7–9) cuts narrow channels and rounded hollows. For a starter kit, a #5 sweep in 6mm and 12mm widths covers most tasks. Add a V-tool for outlining and crisp line details, and you have a functional working set. Flat chisels handle the clean-up work on flat surfaces and sharp interior corners, and they pair with a mallet when you need force that a knife can't deliver.
Mallets
A carving mallet is round or cylindrical — not the rectangular hammer you'd use in carpentry — so you can strike a chisel from any angle without repositioning your grip. Traditional mallets are made from dense hardwoods like lignum vitae, but modern polyurethane versions work well and cost less. Start with something in the 400–500 gram range: heavy enough to drive a gouge through stubborn material, light enough that your wrist doesn't fatigue before you've finished a session.
What You Can Make: Projects That Build Real Skills
The fastest path to genuine skill is finishing real projects — not practicing strokes in isolation, but making actual objects with defined goals. The right beginner projects build the specific muscle memory and judgment you need before attempting something complex.
A carved wooden spoon is the classic starting project for good reason. It teaches you to work both convex and concave surfaces, navigate grain direction on a curved form, and produce a functional object you can actually use. A simple relief carving — a leaf or geometric pattern cut into a flat board — introduces gouge control and depth management without requiring three-dimensional thinking. Either project puts a finished, displayable piece in your hands quickly, which matters for motivation.
As your skill develops, small figurative carvings become the fastest way to advance. A simple bird or fish shape in basswood takes a few hours but demands the kind of spatial problem-solving that improves your technique faster than any drill exercise. If you're drawn to larger pieces for your outdoor space — garden stakes, decorative panels, or sculptural accents — the same skills transfer directly once you've built a foundation on smaller work.
Finishing your carvings for outdoor display adds a few extra steps. Sanding carved surfaces before sealing removes tool marks and opens the grain so your finish sits evenly. If you need guidance choosing the right tool for that job, the guide to best sanders for furniture refinishing covers options that work just as well on carved pieces as on flat surfaces.
Starter Kits Side by Side: What to Buy First
The beginner tool market breaks cleanly into three tiers. Budget sets under $40 include a basic knife and two or three gouges — enough to make your first cuts, but often made from softer steel that dulls quickly and discourages you before you've built any real technique. Mid-range sets in the $60–$120 range use better steel, arrive pre-sharpened to a usable edge, and often include a leather strop for maintenance. Professional-entry sets above $150 are built for carvers who've already confirmed they want to pursue the craft seriously.
| Tier | Price Range | Steel Quality | Typical Contents | Best For |
|---|---|---|---|---|
| Budget | Under $40 | Medium-carbon | 1 knife + 2–3 gouges | Absolute first-timers testing the hobby |
| Mid-Range | $60–$120 | High-carbon | 1–2 knives + 4–6 gouges + V-tool | Most serious beginners |
| Professional Entry | $150–$250 | Premium tool steel | Full set with mallet + strop | Committed hobbyists ready to invest |
| Individual Tools | $15–$40 each | Varies by brand | Single purpose | Expanding a kit you already own |
Most beginners are best served by the mid-range tier. You get tools that hold an edge through a full project session, enough variety to attempt most beginner work, and quality that won't leave you wondering whether the problem is you or your equipment. BeaverCraft, Flexcut, and Pfeil all produce strong options at this level. Avoid the cheapest kit you can find — dull tools require more force, and more force means less control and a significantly higher chance of slipping.
Techniques That Separate Good Carvers from Frustrated Ones
Equipment only takes you so far. The carvers who improve quickly are not the ones with the most tools — they're the ones who understand the material they're working with and apply controlled, deliberate cuts from the beginning. Two fundamentals define most of the gap between a competent beginner and someone who stays stuck at the "hacking at wood" stage.
Reading the Grain
Wood grain is not just a visual pattern. It's the direction the wood fibers run, and cutting against those fibers — called cutting against the grain — causes them to tear instead of slice cleanly. You'll see this as rough, ragged cuts or unexpected splitting along the surface. Always cut with the grain or across it, never into it from a shallow angle. On curved pieces like a spoon or a small figurine, the grain direction shifts as you rotate the work, so you adjust your cutting angle constantly. This feels awkward for the first hour and becomes instinctive within a few sessions.
Controlling Depth and Pressure
The most persistent beginner error is force. You do not need to press hard. A sharp knife or gouge with steady, controlled pressure removes wood cleanly and precisely. Take thin slices and assess your progress after each one rather than trying to remove large amounts at once. Aggressive cuts skip over your intended surface, dig unpredictably, and create damage that is genuinely difficult to repair. Think of carving as subtracting in small, deliberate increments — not attacking.
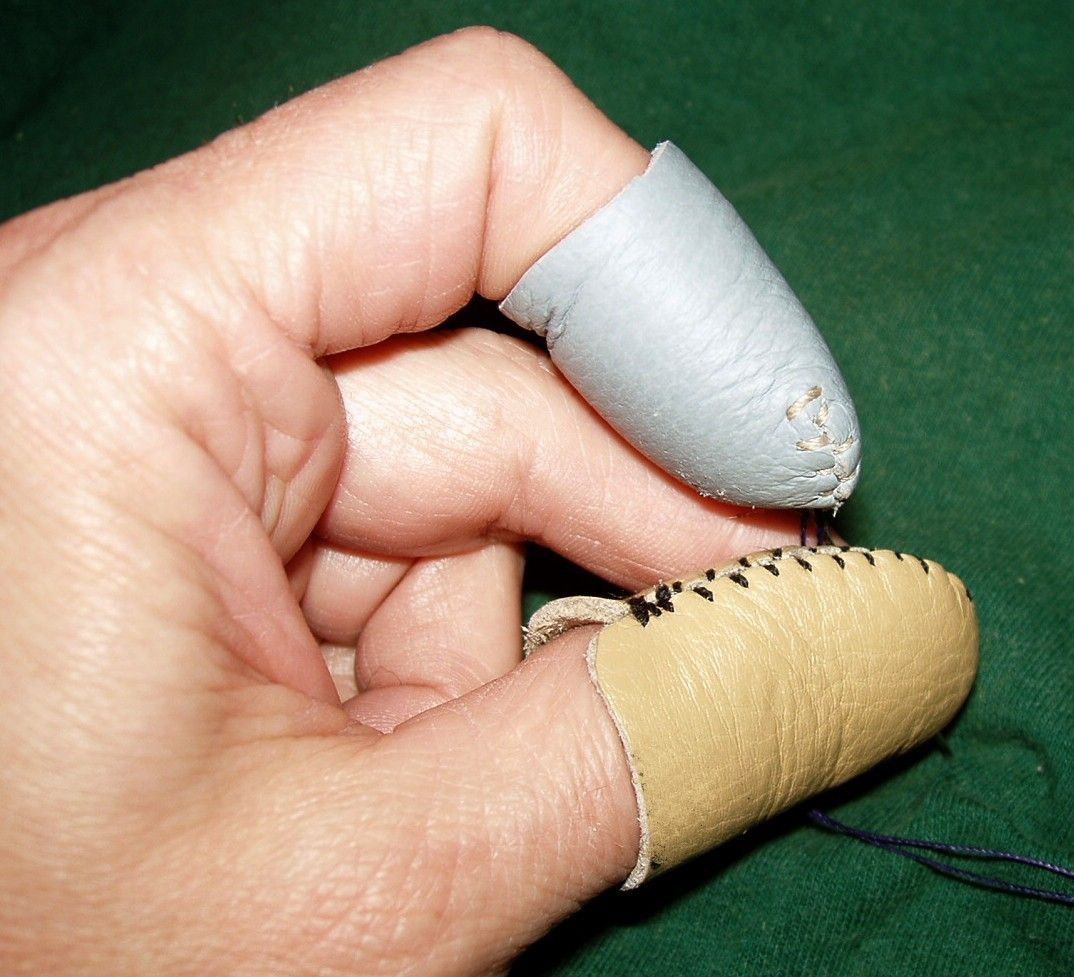
Grip technique matters just as much as pressure. The chest lever grip — blade angled away from you, thumb of the holding hand braced against the wood — gives you maximum stability for fine detail work. The pull stroke — knife drawn toward the thumb, which sits protected under a leather thumb guard — lets you make precise short cuts with complete control over depth. Both grips are worth learning early rather than developing habits you'll have to consciously unlearn later.
Pro tip: A leather thumb guard and a cut-resistant glove on your non-dominant hand are not optional accessories — they are the difference between a productive carving session and an unplanned trip to the first-aid kit. Buy both before you make your first cut.
Mistakes That Cost Beginners Hours of Progress
Everyone makes these errors when starting out. Knowing them in advance doesn't eliminate them entirely, but it shortens the time you spend confused about why your project looks wrong.
Choosing the wrong wood is the most expensive mistake you can make. Hardwoods like oak and walnut are beautiful but resist your tools until you've developed real technique and sharp tools to match. Start with basswood. It's soft, consistent, has almost no pronounced grain to fight, and is widely available at craft stores and online. Once you can reliably produce clean cuts in basswood, you're genuinely ready to explore other species.
Working with dull tools ranks second. A dull blade demands more force, and more force means less control. Most beginner sets don't arrive factory-sharp — they arrive "sharp enough to sell," which is not the same thing. Before your first session, strop your knives on a loaded leather strop. Five minutes of stropping before each session makes a measurable difference in the quality and consistency of every cut you make that day.
Skipping safety gear is understandable but genuinely costly. The cuts happen quickly and without warning — not because you're careless, but because the blade is sharp and wood is unpredictable. A cut-resistant glove on your non-dominant hand and a leather thumb guard on your dominant thumb are the two items that protect against the most common injury patterns. Neither one slows you down. Both make you a more confident carver because you stop second-guessing every stroke.
Finally, trying to fix removal mistakes by carving away more surrounding material almost always makes things worse. The impulse is natural — if one area looks wrong relative to everything else, reshape the rest to match. In practice this just produces a smaller, lumpier piece. Step back, look at the work as a whole, and ask whether the shape can be intentionally adapted before you remove anything else.
Diagnosing Problems When Your Work Doesn't Look Right
Every carver reaches a point where a project stops looking the way they intended. Learning to diagnose what's actually wrong — rather than just pressing harder and hoping for the best — is a skill as important as any grip technique.
Rough, fuzzy surface texture almost always points to one of two problems: you're cutting against the grain, or your tools need sharpening. Check both before doing anything else. Run your blade across a clean section of wood with minimal pressure. If it slices cleanly and produces a thin curl, the blade is fine and your grain direction is the issue. If it scrapes and skids, strop and hone before continuing.
Asymmetry in a figurative carving is hard to catch while you're close to the work. The fix is distance. Set the piece on your workbench, step away six feet, and look at it from a normal viewing distance. Your eye catches proportion errors at arm's length that your brain ignores when you're inches from the surface. Rotate the piece and view it from every angle before making additional cuts — back, sides, and underside all matter.
Unexpected splitting usually means you've hit a section where the grain changes direction, or you've encountered a subtle knot that wasn't visible from the surface. Stop carving in that direction immediately. Switch to a sharper tool with a more acute edge and take thinner slices, or redirect your cut perpendicular to the split to keep it from propagating further into the piece.
If your gouges are leaving ridged lines rather than smooth scooped cuts, the issue is most often your angle of approach. A gouge should enter the wood at roughly 20–30 degrees and exit cleanly without dragging. Too shallow and it skims the surface; too steep and it digs and catches. Adjust your angle first, then check sharpness if the problem continues after a few test cuts.
Frequently Asked Questions
What is the best wood for beginners to carve?
Basswood is the standard recommendation for beginners because it's soft, uniform, and widely available. It has minimal grain variation, which means fewer surprises when you shift cutting direction mid-project. Butternut and white pine are also solid starting options. Avoid hardwoods like oak, walnut, or maple until you've built reliable technique on softer materials — they'll resist your tools in ways that obscure whether the problem is your skill or your setup.
How do I keep my carving tools sharp between sessions?
Strop your tools on a leather strop loaded with honing compound — usually chromium oxide — before every session. This realigns the cutting edge without removing significant metal. For tools that have become genuinely dull from extended use, work through a fine sharpening stone to re-establish the bevel angle, then finish on the strop. Sharp tools are safer and more effective. Dull tools require the extra force that causes most carving injuries.
Do I need special safety gear for wood carving?
At minimum, use a cut-resistant carving glove on your non-dominant hand and a leather thumb guard on your dominant thumb. These protect against the two most common injury types: the pull-stroke slip and the gouge redirect. Many carvers also wear an old pair of jeans or a carving apron when working with the piece in their lap. Eye protection is worth adding whenever you're using a mallet and chisels together.
How long does it take to get competent at wood carving?
Most beginners can complete a simple, recognizable carving — a spoon, a small animal, or a relief panel — within their first five to ten hours of practice. Reaching the level where you can reliably produce the shapes you intend and solve problems as they arise typically takes 50 to 100 hours of focused practice spread across multiple project types. The fastest path there is finishing projects, not drilling techniques in isolation.
The right wood carving tools for beginners don't make you a carver — picking up a sharp knife and committing to the first cut does.


About William Murphy
William Murphy has worked as a licensed general contractor in Fremont, California for over thirty years, specializing in outdoor structures, green building methods, and sustainable design. During that career he has written about architecture, construction practices, and environmental protection for regional publications and trade outlets, bringing technical depth to subjects that most home improvement writers approach only from a consumer perspective. At TheBackyardGnome, he covers outdoor product reviews, backyard construction guides, and sustainable landscaping and building practices.
You can Get FREE Gifts. Receive Free Backyard Items here. Disable Ad Blocker to get them all now!
Once done, hit anything below