Last summer, I helped a neighbor pull together a backyard birthday party in about two hours flat. The cake was ready, the food was sorted, but the patio looked completely bare. We dug through a craft drawer, found some glitter and Mod Podge, and went to work. Forty minutes later, those balloons were the first thing every guest commented on. If you've been wondering how to make glitter dipped balloons that actually look polished, you're in the right place. This guide is part of our broader DIY party decorations collection — but glitter balloons deserve their own deep dive.
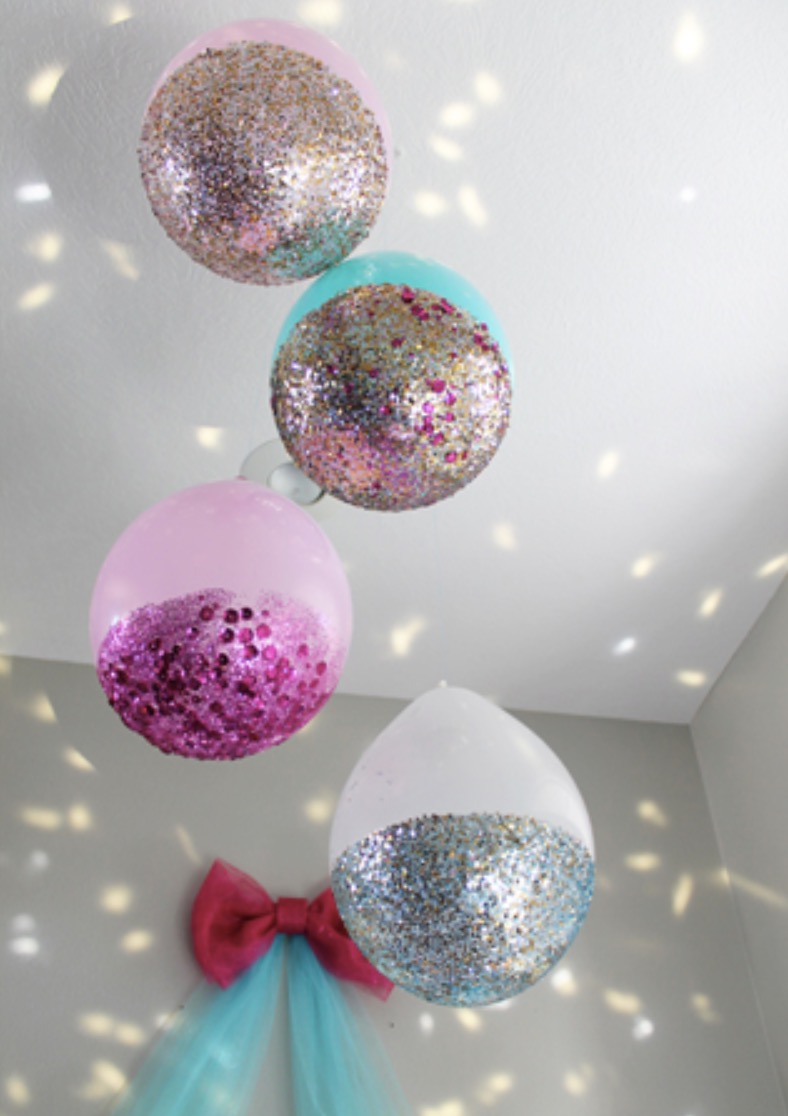
The core process is simpler than it looks. You coat the bottom half of an inflated balloon in diluted craft glue, roll it through a tray of glitter, then hang it to dry. Done right, the result looks like something from a professional event setup. Done wrong, you get patchy, shedding decorations that look worse than plain balloons. The difference comes down to a handful of details.
Whether you're setting up for a birthday, a holiday gathering, or an outdoor winter party, glitter balloons bring a festive, high-impact look for almost no cost. This guide covers the full process, the honest tradeoffs, how to fix things when they go sideways, and a few myths that might be holding you back from trying this in the first place.
Contents
How to Make Glitter Dipped Balloons: The Complete Method
Gathering Your Supplies
You don't need a specialty craft store trip. Most of this is already in your home or costs a dollar or two. Here's what you'll need:
- Latex balloons — standard 11-inch round balloons; Mylar (foil) balloons don't hold glue
- Mod Podge or white PVA craft glue — diluted 3:1 (three parts glue, one part water)
- Fine or extra-fine glitter — finer glitter gives cleaner coverage; chunky glitter needs extra glue
- A shallow plate or tray — wide enough to rotate the balloon through
- A foam brush or sponge brush — for applying glue evenly
- A drop cloth or newspaper — glitter travels far; protect your workspace
- String or a drying rack — to hang balloons upright while they cure
The glue dilution matters more than most tutorials admit. Straight-from-the-bottle craft glue is too thick — it creates ridges and dries cloudy on dark-colored balloons. Thinning it gives you a smooth, even coat that lets the glitter lie flat.
| Glitter Type | Finish Look | Best For | Adhesion Quality |
|---|---|---|---|
| Extra Fine | Smooth shimmer | Weddings, elegant events | Excellent |
| Fine | Sparkly, clean lines | Birthdays, general parties | Very good |
| Medium | Textured sparkle | Bold themed parties | Good |
| Chunky | Dramatic, dimensional | Kids' parties, festivals | Fair — needs extra glue |
| Holographic | Multi-color shimmer | Night events, disco themes | Very good |
| Biodegradable | Same as fine/medium | Eco-conscious events | Very good |
The Dipping Process, Step by Step
Inflate and tie your balloon first. Then work quickly — diluted glue starts skinning over within a minute or two once it's on the latex surface.
- Brush a thin, even coat of diluted glue onto the bottom third or half of the balloon — however far you want the glitter to reach.
- Hold the balloon by the knot and lower it slowly into the glitter tray, rotating it steadily as you go.
- Tap the balloon once or twice to knock off loose excess. Don't shake it — that cracks the glue film and creates gaps.
- Hang it immediately by the knot and don't let it touch anything while wet.
For a sharp, clean glitter line, apply low-tack painter's tape just above where you want the glitter to stop. Brush up to the tape edge, dip the balloon, then peel the tape off before the glue fully dries.
Drying and Finishing
Two hours of drying time is the minimum. Overnight is better. Once dry, a single light pass of hairspray seals the glitter and dramatically reduces shedding when guests handle the balloons. One pass is enough — too much hairspray makes the surface tacky and collects dust.
Honest Pros and Cons of DIY Glitter Balloons
Why They're Worth Your Time
The case for making these is genuinely strong. Here's what makes them a reliable go-to for outdoor events:
- Cost is almost nothing — a pack of 50 latex balloons runs a few dollars; glitter and glue add a couple more
- Speed — once your workspace is set, you can complete a balloon every two to three minutes
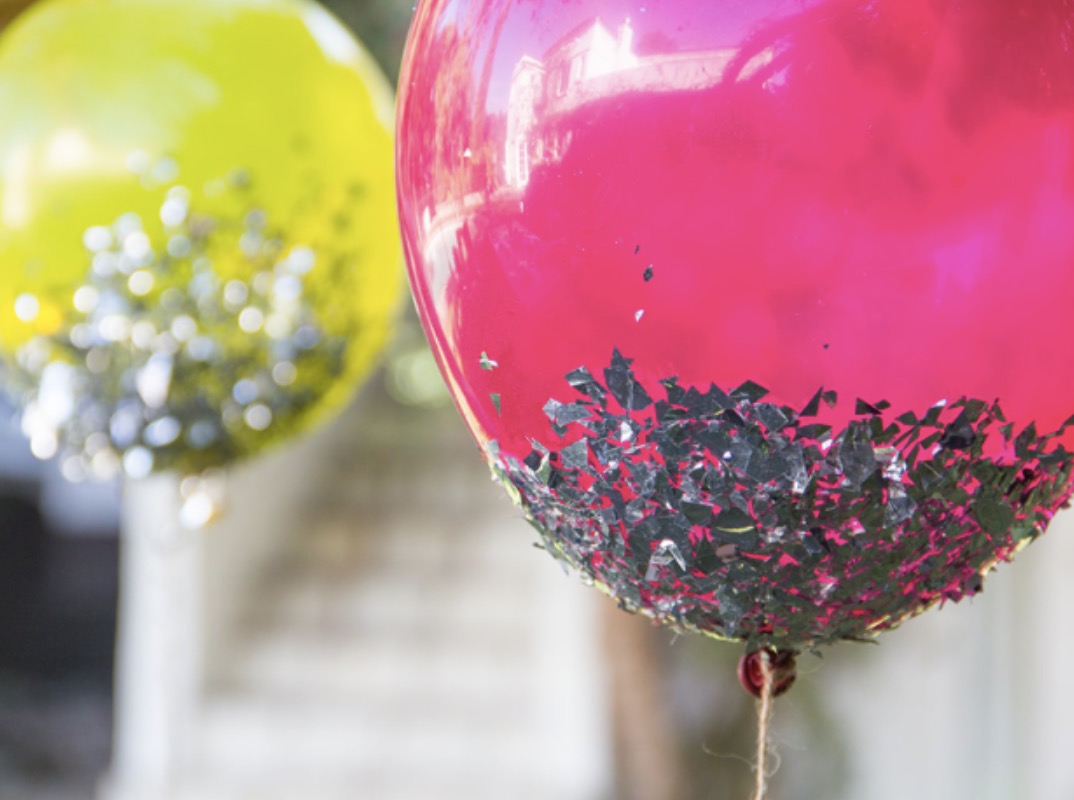
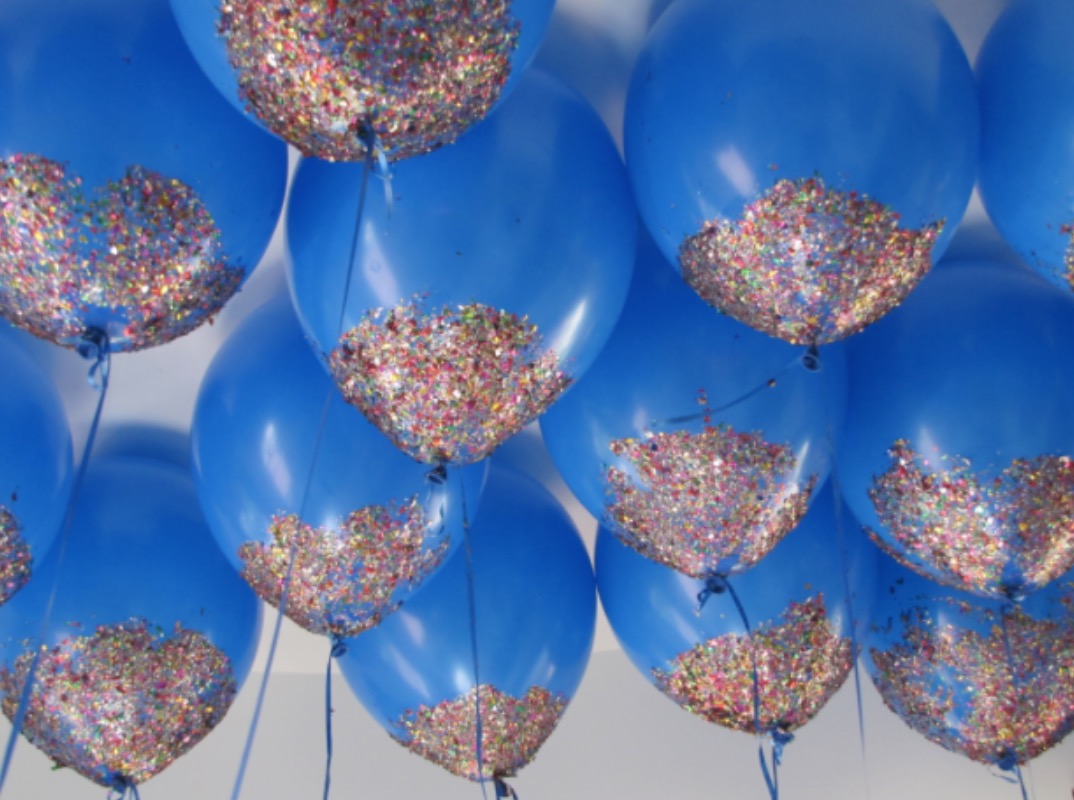
- Styling versatility — gold glitter reads elegant; rainbow reads playful; silver reads modern and clean
- Works anywhere outdoors — they look just as good at a backyard birthday as they do at a decorated gazebo holiday party
- Great for photos — glitter balloons catch the light in a way plain balloons never do
They're also one of the few decorations that work equally well at ground level, hung overhead, or clustered in a corner. You get a lot of flexibility for the investment.
Gold and silver fine glitter on black latex balloons is the single most striking combination — it photographs beautifully and works for nearly any occasion.
The Downsides You Should Know About
No decoration is all upside. Here are the real limitations:
- Cleanup is a commitment — glitter gets into grout lines, carpet fibers, and upholstery and stays there for days
- Environmental impact — conventional plastic glitter is a recognized microplastic pollutant; biodegradable plant-cellulose alternatives work just as well and are worth the small price difference
- Limited lifespan — air-filled latex balloons deflate within 12–24 hours; helium-filled ones last longer but cost more
- Glitter transfers to skin and clothes — even well-sealed balloons leave a shimmer on anyone who handles them directly
The environmental issue is worth addressing directly. Swap to biodegradable glitter once and you won't go back — it looks identical and you can enjoy your party without the guilt. For your next outdoor gathering, you might also appreciate our list of tiki-inspired drink recipes to pair with the festive atmosphere.

Fixing Common Glitter Balloon Problems
When the Glitter Won't Stick
If glitter is falling off in sheets before the balloon even dries, the glue is too thin or was applied too sparingly. Add slightly less water to your next batch — the surface should look wet, not watery. You can also do a second coat: let the first layer dry completely, then brush on more glue and dip again. Two thin coats beat one thick one every time.
Another cause: you're working in a very dry environment with high static electricity. Static makes fine glitter jump away from the balloon instead of sticking to it. Move to a more humid space or mist the air lightly before you start.
When Balloons Drip or Pop Too Early
Drips happen when the glue is too thick or you applied too much at once. The fix is to dab drips immediately with the edge of your foam brush before they travel downward. If a drip dries, you can't remove it cleanly — so catch it fast.
Balloons that pop during the gluing process are almost always over-inflated. Leave about 10% slack when you blow them up — they should feel firm but not drum-tight. This gives the latex room to flex without stress when you're handling and rolling the balloon.
Glitter Balloon Myths Worth Clearing Up
Myth: You Need Expensive Supplies
A lot of tutorials on social media show elaborate setups — specialty glitter blends, premium sealants, balloon column frames, professional pumps. None of that is required to get great results. A foam brush from a dollar store and a jar of standard Mod Podge are genuinely all you need for the core technique.
The polished results you see in glossy party photos come from good technique, not expensive materials. Nail the glue dilution and the drying method, and budget-store supplies produce results indistinguishable from anything more expensive.
Myth: The Coating Makes Them Fragile
People assume that adding a glue-and-glitter layer weakens the balloon. It doesn't. A properly dried coat of diluted craft glue is thin and fully flexible — it moves with the latex without adding any meaningful stress. It won't cause premature popping.
What actually pops balloons outdoors is heat and direct sun exposure. A latex balloon in direct summer sunlight can fail within minutes — glitter coating or not. The solution is simple: keep your balloons in shaded areas and bring them out just before guests arrive. Air-filled balloons anchored to weights in a shaded corner will outlast helium-filled ones every time.
Heat and direct sunlight are what pop balloons outdoors — move your display to shade and they'll hold up through the whole party.
Frequently Asked Questions
What glue works best for glitter dipped balloons?
Mod Podge is the most reliable choice — it dries clear, bonds well to latex, and is easy to thin with water. Standard white PVA craft glue also works well when diluted. Thin your glue to a 3:1 ratio (three parts glue, one part water) for the smoothest, most even coverage.
How long do glitter balloons stay inflated?
Air-filled latex balloons typically last 12–24 hours before noticeably deflating. Helium-filled ones last longer — usually 8–12 hours for standard latex. The glitter coating doesn't affect inflation time. If longevity matters, use Hi-Float (a latex treatment) inside helium-filled balloons before inflating to extend their life significantly.
Can I make glitter balloons without helium?
Absolutely. Air-filled glitter balloons work just as well for most party setups. Tie them to ribbon-weighted decorative anchors, cluster them in groups, or attach them to balloon arches. They actually last longer than helium versions and cost far less to produce in bulk.
How do I stop glitter from getting on everything?
Two things help most: first, seal the finished balloons with a single light pass of hairspray after they're fully dry. Second, handle them by the knot or ribbon whenever possible rather than gripping the glittered surface. Even sealed balloons transfer some shimmer — that's the nature of glitter, so set expectations accordingly.
What's the difference between fine and chunky glitter for this project?
Fine and extra-fine glitter packs together tightly, giving you a smooth, shimmery surface with no visible gaps. Chunky glitter creates a more dimensional, dramatic look but requires more glue to hold each piece and tends to shed more over time. For a clean, professional finish, fine glitter is the better choice. Chunky works well for kids' parties where bold visual impact matters more than longevity.
Is biodegradable glitter as effective as regular plastic glitter?
Yes. Modern biodegradable glitter (made from plant cellulose) performs identically to conventional plastic glitter in terms of appearance, adhesion, and light-catching quality. It's slightly more expensive but widely available at craft stores and online. Given that traditional plastic glitter is a persistent microplastic pollutant, biodegradable versions are the better default choice for any outdoor event.
The best decoration is the one you actually make — and glitter dipped balloons prove that a few dollars of supplies and one good technique will always beat a bigger budget with no follow-through.


About Simmy Parker
Simmy Parker holds a Bachelor of Science in Civil Engineering from Sacramento State University and has applied that technical background to outdoor structure design, landscape planning, and backyard improvement projects for over a decade. Her love for the outdoors extends beyond design — she regularly leads nature hikes and has developed working knowledge of native plants, soil conditions, and sustainable landscaping practices across Northern California. At TheBackyardGnome, she covers backyard design guides, landscaping ideas, and eco-friendly outdoor living resources.
You can Get FREE Gifts. Receive Free Backyard Items here. Disable Ad Blocker to get them all now!
Once done, hit anything below