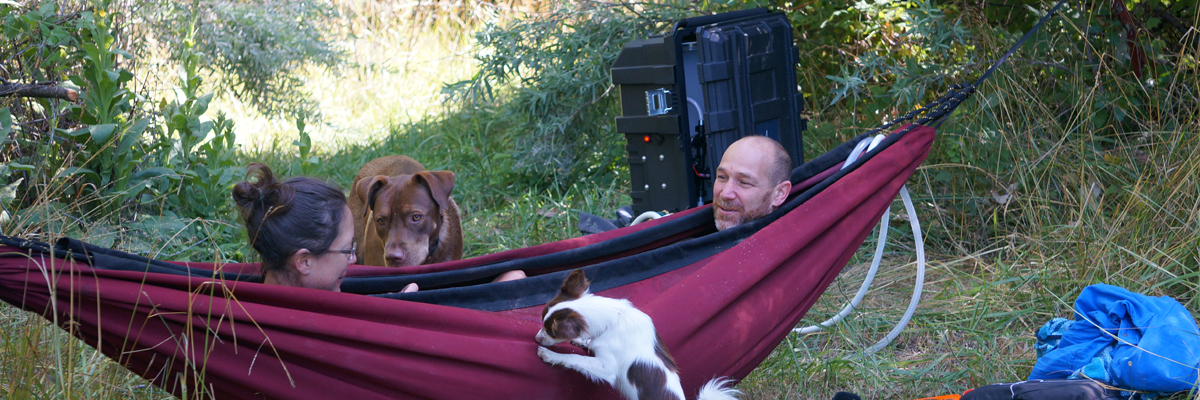
Last summer, our team spent a weekend at a lakeside cabin running through every backyard relaxation product on our list — and the one that made everyone stop mid-sentence was a portable water hammock. It looked almost absurd: a hammock-shaped bag, strung between two trees, filled with warm water. We had covered plenty of ideas in our outdoor relaxation guides, but nothing had prepared us for this. The Hydro Hammock is a real product, and it genuinely works.
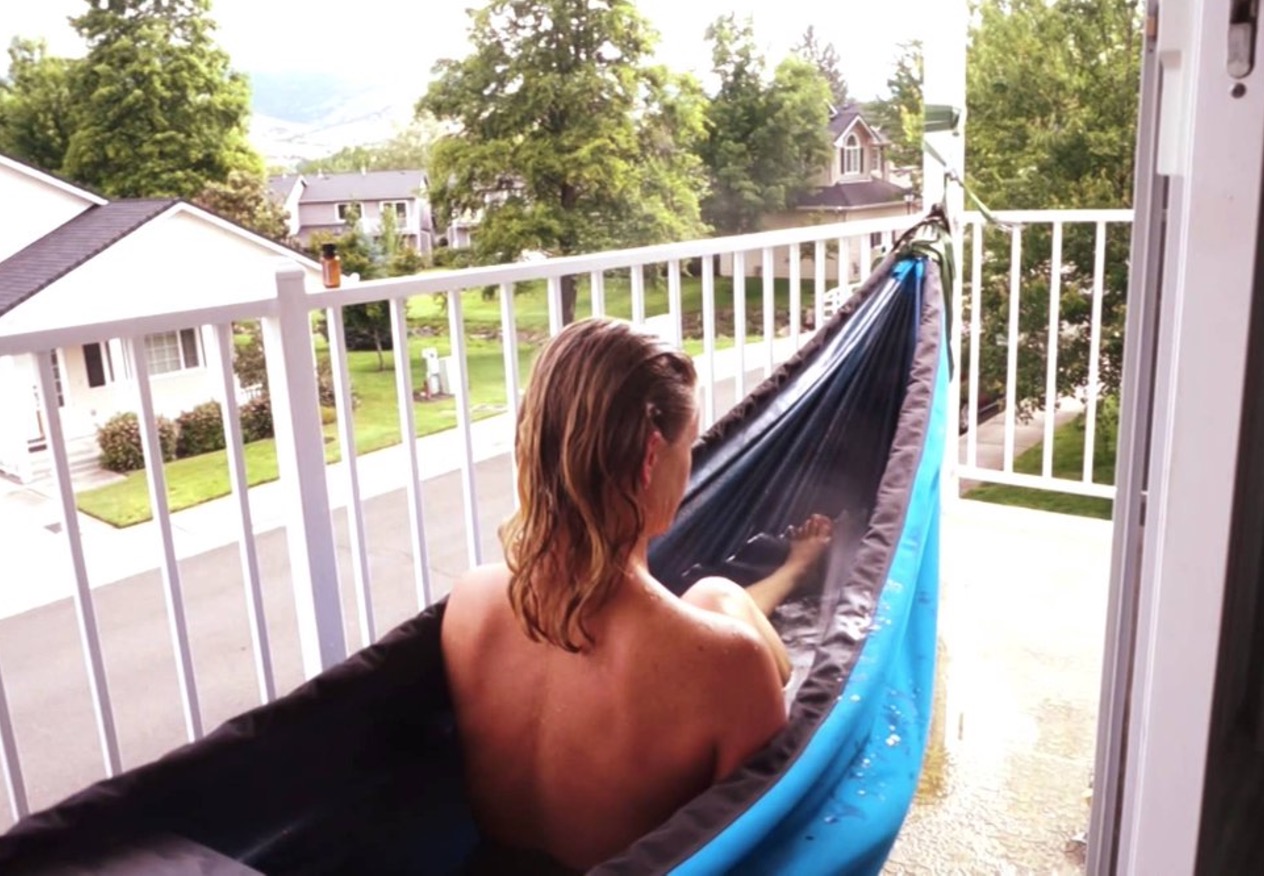
The Hydro Hammock is a portable hot tub reimagined as a hammock. It connects to a standard garden hose and a small heating unit, fills with warm water to a comfortable soaking temperature, and suspends between two anchor points. Most people can get it set up in under an hour. Lying in warm water while swaying gently outdoors is an experience our team hadn't encountered in any other backyard product — and that novelty is backed by genuine function.
In this review, our team covers everything worth knowing: when the Hydro Hammock makes sense to buy, how to get it running, what first-time buyers should expect versus seasoned outdoor gear owners, and where it performs best. We also share best practices for keeping it in good condition over time. Our recommendation is direct — this product earns its price for the right household, and we'll tell you exactly what that looks like.
Contents
Perfect Conditions for a Portable Water Hammock — and When to Skip It
When the Hydro Hammock Delivers
The Hydro Hammock thrives in warm-weather settings where there are two solid anchor points — mature trees, heavy fence posts, or purpose-built hammock stands. Our team found it performs best when ambient temperatures are above 65°F, because the heating unit maintains water temperature more easily and the experience of getting in and out doesn't involve shivering. The sweet spot is a calm, warm afternoon or evening with minimal wind and easy access to an outdoor water source.
Anyone who hosts backyard gatherings will immediately see the appeal. It becomes a centerpiece. Guests who've never tried it queue up. Paired with something like a sunken fire pit setup nearby for warming up afterward, the combination is hard to beat. Hydrotherapy — the therapeutic use of warm water — has a long history of supporting muscle relaxation and circulation, and the Hydro Hammock delivers a casual version of that benefit in a backyard setting.
Conditions That Work Against It
Our team is equally direct about the limitations. Cold weather is the most significant one. Below 50°F, the heating unit struggles, fill times stretch, and the experience becomes uncomfortable before it becomes relaxing. Strong wind is another deal-breaker — the hammock sways unpredictably when loaded with water, and that stops being fun very quickly.
Anyone expecting it to replace a built-in hot tub will be disappointed. The water volume is smaller, there are no jets, and it requires active setup each time. For anyone who prioritizes a zero-maintenance soak, a product like a market umbrella or zero gravity chair is a simpler investment. The Hydro Hammock rewards people who value the experience of using it, not just the outcome.
How to Set Up the Hydro Hammock
What to Have Ready Before Starting
Before the first use, our team recommends laying everything out and checking connections before any water is involved. The setup process is forgiving, but a few missing pieces will slow things down significantly. Below is a quick reference for what the setup requires:
| Item | Required | Notes |
|---|---|---|
| Two anchor points | Yes | Trees or posts at least 10–15 ft apart, rated for dynamic load |
| Garden hose with outdoor spigot | Yes | Standard hose works; long hose makes placement easier |
| Heating unit (included) | Yes | Plugs into standard outdoor outlet; extension cord may be needed |
| Level or near-level ground | Recommended | Not strictly required, but helps with stable hang angle |
| Tree straps or carabiners | Yes | Included with Hydro Hammock; check weight rating before use |
| Drain area or hose extension | Recommended | Water needs somewhere to go after each session |
Filling, Heating, and Hanging
Our team's preferred sequence: hang the empty hammock first, confirm it's level and stable at a comfortable height, then connect the hose and begin filling. Filling takes 15–25 minutes depending on water pressure. The heating unit runs during fill and continues after — reaching a comfortable soaking temperature typically adds another 20–30 minutes depending on starting water temperature and ambient conditions.
One thing our team learned quickly: don't rush the hang height. Too low and getting in becomes awkward; too high and the exit is stressful. A seated position roughly 18–24 inches off the ground at rest is the target. The hammock will drop a few inches when loaded with water, so account for that when setting the initial hang. Anyone planning a more permanent outdoor setup might also enjoy seeing how slate patio designs can create a clean base area around hanging structures.
First-Time Buyers vs. Outdoor Gear Regulars
For Anyone New to Specialty Outdoor Products
For households buying their first specialty outdoor relaxation product, the Hydro Hammock comes with a learning curve that's worth acknowledging upfront. The first session will take longer than expected — between finding the right hang height, waiting for heating, and working through the drain process, budget two hours for the inaugural setup. That time drops sharply by the second or third use.
Our team also recommends reading the weight limit documentation carefully before purchasing. The Hydro Hammock is rated for a specific capacity, and that number applies to the combined weight of water and occupant. Most people don't think about the weight of the water itself, which is substantial. Starting with a cautious fill level on the first use is a smart approach.
For Experienced Outdoor Enthusiasts
Experienced outdoor gear owners will adapt quickly. The mechanics are similar enough to conventional hammock setups that the hang and strap process feels familiar. The main adjustment is treating it more like a plumbing project than a camping setup — connections, flow rate, and drainage matter as much as hang angle and anchor strength.
Our team noticed that people who already own structured outdoor spaces — covered patios, pergolas, or even partial shelters — get more value from the Hydro Hammock because they can deploy it quickly using fixed anchor points. Pairing it with shade solutions like the Coolaroo Market Umbrella helps extend comfortable use into hotter parts of the day. The experience scales up well when the surrounding space is already set up for extended outdoor time.
Where the Hydro Hammock Actually Shines
Backyard and Patio Settings
The backyard is where the Hydro Hammock earns its price most consistently. Most properties with two mature trees or a sturdy pergola structure have everything needed. Our team found it works especially well for end-of-day unwinding — the warm water, the gentle sway, and the outdoor setting combine into something that a couch simply can't replicate. It's also a reliable crowd-pleaser at gatherings, where the novelty factor creates its own momentum.
Anyone thinking about expanding their outdoor relaxation options beyond seating will find the Hydro Hammock fills a genuinely different role. It's not competing with chairs or fire pits — it's occupying a category on its own. For households already thinking about enclosed outdoor spaces, our coverage of different types of solariums explores how to extend the outdoor season even further.
Camping and Off-Grid Locations
The portable water hammock does work in camping settings, but with more caveats. Access to a reliable water source and electrical outlet are non-negotiable for the heating unit. That limits it to car camping spots or well-equipped glamping sites rather than backcountry use. When those conditions are met, it becomes one of the most memorable parts of any trip — the kind of thing fellow campers wander over to ask about.
Getting the Most From Every Soak
Temperature and Timing
Our team's experience points to one consistent best practice: start heating earlier than seems necessary. Filling and heating simultaneously works, but the water temperature at fill-complete is still often lower than ideal. Running the heater for an additional 15–20 minutes before getting in makes a noticeable difference in comfort. Most people benefit from testing the water temperature with a simple pool thermometer before committing — 100–104°F is the sweet spot for most adults.
Evening use beats afternoon use in warm climates. The air temperature drop actually works in favor of the warm water experience — the contrast feels more dramatic and pleasant than soaking in heat while the sun beats down. Shorter sessions of 20–30 minutes tend to leave people feeling refreshed; longer sessions past 45 minutes can feel draining, similar to extended hot tub use.
Long-Term Care and Storage
Draining and drying the hammock after each session is non-negotiable. Standing water left inside the fabric will cause odor and material degradation over time. Our team recommends hanging the empty hammock in a sunny spot for an hour or two after draining, then storing it loosely folded in a dry location — not compressed tightly in its stuff sack for extended periods, which can stress the seams.
Inspect the fill valves and connection points seasonally. The rubber gaskets are the first thing to wear, and replacements are cheap and easy to install before they cause a leak mid-session. For households storing it over winter, a light rinse with a diluted solution of white vinegar before long-term storage keeps the interior fresh. Treated well, the Hydro Hammock holds up across multiple seasons without significant degradation.
Frequently Asked Questions
How long does it take to fill and heat the Hydro Hammock?
Our team found that filling takes roughly 15–25 minutes with standard water pressure, and reaching a comfortable soaking temperature adds another 20–30 minutes on top of that. Running the heater during the fill process saves some total time, but most people should plan on 45 minutes from start to ready-to-soak.
Can the Hydro Hammock be used without the heating unit in warm weather?
It can, and our team has tried it. In hot climates where tap water runs warm, the hammock works as a cool water soak rather than a hot one — a completely different but valid experience. Without the heater, the portable water hammock is lighter and more flexible for camping use where no electrical outlet is available.
What is the weight limit for the Hydro Hammock?
The Hydro Hammock has a combined weight rating that includes both the occupant and the water. Our team strongly recommends consulting the manufacturer's current specifications before purchase, as the water weight alone is substantial — a full load can add well over 100 lbs to the total. Anyone near the upper range of the occupant limit should factor that in carefully.
Next Steps
- Walk your backyard and identify two solid anchor points at least 10–15 feet apart — trees, heavy posts, or a pergola frame — and measure the distance to the nearest outdoor spigot and electrical outlet before ordering.
- Check the current Hydro Hammock product page for the latest weight rating and included accessories so the setup list is complete before the product arrives.
- Plan the first session for a warm evening above 65°F and budget two full hours — filling, heating, using, draining, and drying all included — to set realistic expectations for the first run.
- Pick up a simple pool thermometer to monitor water temperature accurately, and order a spare set of fill valve gaskets at the same time so a minor wear issue never cancels a session.
- Explore how the Hydro Hammock fits into a broader outdoor relaxation setup — our guides on sunken fire pit ideas and zero gravity chairs are good starting points for building out the space around it.


About Simmy Parker
Simmy Parker holds a Bachelor of Science in Civil Engineering from Sacramento State University and has applied that technical background to outdoor structure design, landscape planning, and backyard improvement projects for over a decade. Her love for the outdoors extends beyond design — she regularly leads nature hikes and has developed working knowledge of native plants, soil conditions, and sustainable landscaping practices across Northern California. At TheBackyardGnome, she covers backyard design guides, landscaping ideas, and eco-friendly outdoor living resources.
You can Get FREE Gifts. Receive Free Backyard Items here. Disable Ad Blocker to get them all now!
Once done, hit anything below